Форсунки стеклоомывате- ля – Инструкция по эксплуатации FIAT Bravo
Страница 209
209
СИ
СТ
ЕМ
А
БЕ
ЗО
ПА
СН
ОС
ТИ
СО
ВЕ
ТЫ
ВО
ДИ
ТЕ
ЛЮ
АВ
ТО
МО
БИ
ЛЯ
УС
ТР
АН
ЕН
ИЕ
НЕ
ИС
ПР
АВ
НО
СТ
ЕЙ
ТЕ
ХН
ИЧ
ЕС
КО
Е
ОБ
СЛ
УЖ
ИВ
АН
ИЕ
ТЕ
ХН
ИЧ
ЕС
КИ
Е
ХА
РА
КТ
ЕР
ИС
ТИ
КИ
ПР
ЕД
МЕ
ТН
ЫЙ
УК
АЗ
АТ
ЕЛ
Ь
КО
НТ
РО
ЛЬ
НЫ
Е
ЛА
МП
Ы
И
СО
ОБ
ЩЕ
НИ
Я
ПР
ИБ
ОР
Ы
И О
РГ
АН
Ы
УП
РА
ВЛ
ЕН
ИЯ
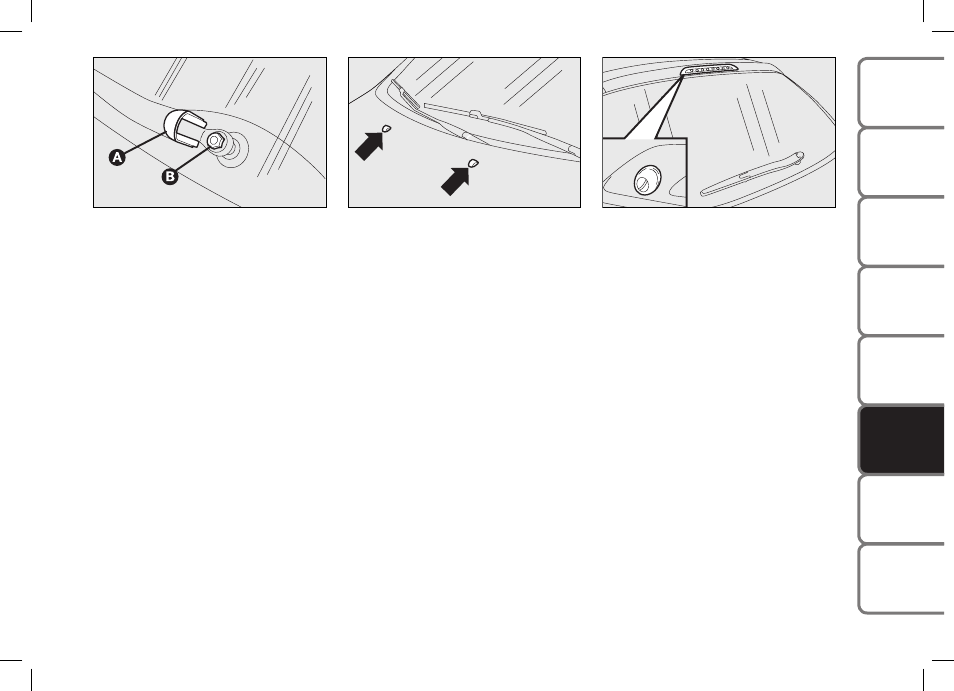
Замена щетки стеклоочистителя
заднего стекла
Сделайте следующее:
поднимите крышку A, рис. 15 и, от-
вернув гайку B крепления, снимите
рычаг;
Установите новый рычаг, правильно
расположив его, и полностью затяни-
те гайку;
оденьте крышку.
ФОРСУНКИ СТЕКЛООМЫВАТЕ-
ЛЯ
Форсунки стеклоомывателя, рис. 16
Если напор омывающей жидкости не-
достаточный, прежде всего проверьте
наличие жидкости в бачке омывателя:
(см. "Проверка уровней эксплуатацион-
ных жидкостей" в этой главе).
Затем проверьте, не засорились ли от-
верстия форсунок стеклоомывателя, при
необходимости прочистите с помощью
иглы.
Форсунки стеклоомывателей не регули-
руются.
Стеклоочиститель стекла двери
багажного отсека, рис. 17
Форсунка омывателя стекла двери ба-
гажного отсека не регулируемая.
Держатель форсунки располагается на
заднем стекле.
207
SAFETY DEVICES
CORRECT USE OF THE CAR
W
ARNING
LIGHTS AND MESSAGES
IN AN
EMERGENCY
TE
CH
NI
CA
L
SP
EC
IFI
CA
TIO
NS
INDEX
DA
SH
BO
AR
D
AN
D
CO
NT
RO
LS
CA
R
MA
IN
TE
NA
NC
E
Changing the rear
window blade
Proceed as follows:
❒
raise the cover A-fig. 15 and remove
the arm from the car, slackening the nut
B that fastens it to the pivot pin;
❒
fit the new arm, positioning it correct-
ly, and fully tighten the nut;
❒
lower the cover.
Rear window wiper fig. 17
Rear window washer jets are fixed.
The nozzle holder is on the rear window.
SPRAY NOZZLES
Windscreen wiper fig. 16
If the jet of fluid is inadequate, firstly check
that there is fluid in the reservoir: see
“Checking fluid levels” in this section).
Then check that the nozzle holes are not
clogged, if necessary use a needle.
The windscreen jets are fixed.
fig. 15
F0Q0663m
fig. 16
F0Q0661m
fig. 17
F0Q0660m
191-212 BRAVO GB 10-05-2007 9:21 Pagina 207
Рис. 15
207
SAFETY DEVICES
CORRECT USE OF THE CAR
W
ARNING
LIGHTS AND MESSAGES
IN AN
EMERGENCY
TE
CH
NI
CA
L
SP
EC
IFI
CA
TIO
NS
INDEX
DA
SH
BO
AR
D
AN
D
CO
NT
RO
LS
CA
R
MA
IN
TE
NA
NC
E
Changing the rear
window blade
Proceed as follows:
❒
raise the cover A-fig. 15 and remove
the arm from the car, slackening the nut
B that fastens it to the pivot pin;
❒
fit the new arm, positioning it correct-
ly, and fully tighten the nut;
❒
lower the cover.
Rear window wiper fig. 17
Rear window washer jets are fixed.
The nozzle holder is on the rear window.
SPRAY NOZZLES
Windscreen wiper fig. 16
If the jet of fluid is inadequate, firstly check
that there is fluid in the reservoir: see
“Checking fluid levels” in this section).
Then check that the nozzle holes are not
clogged, if necessary use a needle.
The windscreen jets are fixed.
fig. 15
F0Q0663m
fig. 16
F0Q0661m
fig. 17
F0Q0660m
191-212 BRAVO GB 10-05-2007 9:21 Pagina 207
Рис. 16
207
SAFETY DEVICES
CORRECT USE OF THE CAR
W
ARNING
LIGHTS AND MESSAGES
IN AN
EMERGENCY
TE
CH
NI
CA
L
SP
EC
IFI
CA
TIO
NS
INDEX
DA
SH
BO
AR
D
AN
D
CO
NT
RO
LS
CA
R
MA
IN
TE
NA
NC
E
Changing the rear
window blade
Proceed as follows:
❒
raise the cover A-fig. 15 and remove
the arm from the car, slackening the nut
B that fastens it to the pivot pin;
❒
fit the new arm, positioning it correct-
ly, and fully tighten the nut;
❒
lower the cover.
Rear window wiper fig. 17
Rear window washer jets are fixed.
The nozzle holder is on the rear window.
SPRAY NOZZLES
Windscreen wiper fig. 16
If the jet of fluid is inadequate, firstly check
that there is fluid in the reservoir: see
“Checking fluid levels” in this section).
Then check that the nozzle holes are not
clogged, if necessary use a needle.
The windscreen jets are fixed.
fig. 15
F0Q0663m
fig. 16
F0Q0661m
fig. 17
F0Q0660m
191-212 BRAVO GB 10-05-2007 9:21 Pagina 207
Рис. 17