Инструкция по эксплуатации FIAT Bravo
Страница 164
164
ПР
ИБ
ОР
Ы
И О
РГ
АН
Ы
УП
РА
ВЛ
ЕН
ИЯ
КО
НТ
РО
ЛЬ
НЫ
Е
ЛА
МП
Ы
И
СО
ОБ
ЩЕ
НИ
Я
СИ
СТ
ЕМ
А
БЕ
ЗО
ПА
СН
ОС
ТИ
СО
ВЕ
ТЫ
ВО
ДИ
ТЕ
ЛЮ
АВ
ТО
МО
БИ
ЛЯ
УС
ТРА
НЕ
НИ
Е
НЕ
ИС
ПР
АВ
-НО
СТ
ЕЙ
ТЕ
ХН
ИЧ
ЕС
КО
Е
ОБ
СЛ
УЖ
ИВ
АН
ИЕ
ТЕ
ХН
ИЧ
ЕС
КИ
Е
ХА
РА
КТ
ЕР
ИС
ТИ
КИ
ПР
ЕД
МЕ
ТН
ЫЙ
УК
АЗ
АТ
ЕЛ
Ь
Комплектации с дисками из легкого
сплава
Действуйте следующим образом:
заверните шпильку A, рис. 9, в одно
из отверстий в ступице для болтов
крепления колеса;
Установите колесо на шпильку и за-
тяните остальные болты с помощью
гаечного ключа. Это упрощается на-
личием расширений отверстий B под
ключ;
Выверните шпильку A и затяните пос-
ледний болт крепления колеса;
Опустите автомобиль и удалите домкрат;
Используя гаечный ключ, произведите
окончательную затяжку болтов крепле-
ния в последовательности, указанной
на для запасного колеса-докатки (см.,
рис. 8
).
Установите обратно колпак ступицы.
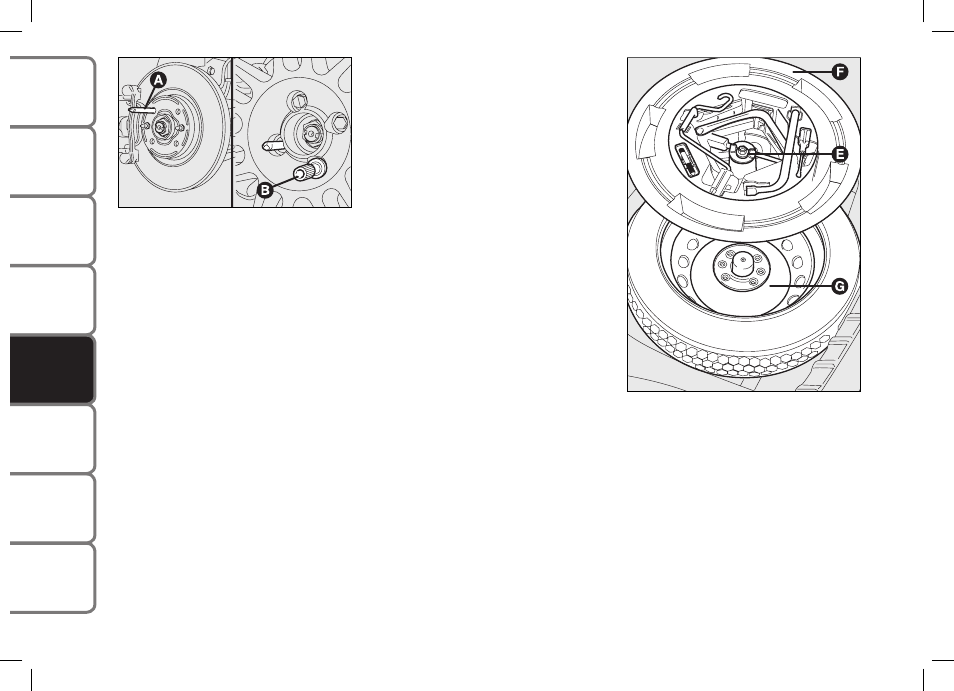
По окончании работы
Уложите запасное колесо-докатку G,
рис
. 10 в соответствующую нишу ба-
гажного отсека
Вложите частично открытый домкрат в
контейнер F и немного разожмите его
в ячейке так, чтобы он не вибрировал
при движении автомобиля;
Положите инструменты обратно в со-
ответствующие ячейки контейнера;
Установите контейнер с инструмента-
ми на запасное колесо и закрепите
его с помощью зажима E;
Закройте жесткую крышку.
162
SAFETY DEVICES
CORRECT USE OF THE CAR
W
ARNING
LIGHTS AND MESSAGES
CA
R
MA
IN
TE
NA
NC
E
TE
CH
NI
CA
L
SP
EC
IFI
CA
TIO
NS
INDEX
DA
SH
BO
AR
D
AN
D
CO
NT
RO
LS
IN AN
EMERGENCY
When you have finished
❒
Stow the space-saver spare wheel
G-fig. 10 in the space provided in the
boot;
❒
Insert the partially open jack into the
container F and force it slightly into its
seat so that it does not vibrate when
the car is moving;
❒
Put the tools back into their places in
the container;
❒
Stow the container complete with tools
on the spare wheel and secure every-
thing with the clamping device E;
❒
Correctly reposition the boot stiff cov-
er.
fig. 10
F0Q0392m
Versions with alloy rims
Proceed as follows:
❒
tighten pin A-fig. 9 in one of the holes
of the wheel hub fastening bolts;
❒
Insert the wheel on the pin and, using
the wrench provided, tighten the bolts
available. This is facilitated by the ex-
tension provided B;
❒
Loosen the pin A and tighten the last
fastening bolt;
❒
Lower the car and remove the jack;
❒
Using the wrench provided, fully tight-
en the bolts in the sequence shown
previously for the space-saver spare
wheel (see fig. 8).
❒
refit the hubcap.
fig. 9
F0Q0217m
155-190 BRAVO GB 10-05-2007 9:19 Pagina 162
Рис. 9
162
SAFETY DEVICES
CORRECT USE OF THE CAR
W
ARNING
LIGHTS AND MESSAGES
CA
R
MA
IN
TE
NA
NC
E
TE
CH
NI
CA
L
SP
EC
IFI
CA
TIO
NS
INDEX
DA
SH
BO
AR
D
AN
D
CO
NT
RO
LS
IN AN
EMERGENCY
When you have finished
❒
Stow the space-saver spare wheel
G-fig. 10 in the space provided in the
boot;
❒
Insert the partially open jack into the
container F and force it slightly into its
seat so that it does not vibrate when
the car is moving;
❒
Put the tools back into their places in
the container;
❒
Stow the container complete with tools
on the spare wheel and secure every-
thing with the clamping device E;
❒
Correctly reposition the boot stiff cov-
er.
fig. 10
F0Q0392m
Versions with alloy rims
Proceed as follows:
❒
tighten pin A-fig. 9 in one of the holes
of the wheel hub fastening bolts;
❒
Insert the wheel on the pin and, using
the wrench provided, tighten the bolts
available. This is facilitated by the ex-
tension provided B;
❒
Loosen the pin A and tighten the last
fastening bolt;
❒
Lower the car and remove the jack;
❒
Using the wrench provided, fully tight-
en the bolts in the sequence shown
previously for the space-saver spare
wheel (see fig. 8).
❒
refit the hubcap.
fig. 9
F0Q0217m
155-190 BRAVO GB 10-05-2007 9:19 Pagina 162
Рис. 10