If an interior light burns out – Инструкция по эксплуатации FIAT Bravo
Страница 177
177
СИ
СТ
ЕМ
А
БЕ
ЗО
ПА
СН
ОС
ТИ
СО
ВЕ
ТЫ
ВО
ДИ
ТЕ
ЛЮ
АВ
ТО
МО
БИ
ЛЯ
УС
ТР
АН
ЕН
ИЕ
НЕ
ИС
ПР
АВ
НО
СТ
ЕЙ
ТЕ
ХН
ИЧ
ЕС
КО
Е
ОБ
СЛ
УЖ
ИВ
АН
ИЕ
ТЕ
ХН
ИЧ
ЕС
КИ
Е
ХА
РА
КТ
ЕР
ИС
ТИ
КИ
ПР
ЕД
МЕ
ТН
ЫЙ
УК
АЗ
АТ
ЕЛ
Ь
КО
НТ
РО
ЛЬ
НЫ
Е
ЛА
МП
Ы
И
СО
ОБ
ЩЕ
НИ
Я
ПР
ИБ
ОР
Ы
И О
РГ
АН
Ы
УП
РА
ВЛ
ЕН
ИЯ
ЕСЛИ ПЕРЕГОРЕЛА ЛАМ-
ПА ВНУТРЕННЕГО ОСВЕ-
ТИТЕЛЬНОГО ПРИБОРА
Для определения типа и мощности ус-
тановленной лампы смотрите параграф
"ЗАМЕНА ЛАМП".
ПЕРЕДНИЙ ПОТОЛОЧНЫЙ СВЕ-
ТИЛЬНИК
Для замены лампы действуйте следую-
щим образом:
нажмите в местах, указанных стрелка-
ми, и снимите плафон A, рис. 36;
откройте защитную крышку B, рис. 37;
освободив лампы С из боковых кон-
тактов замените их. Убедитесь, что
новые лампы надежно закреплены
между контактами;
закройте защитную крышку B, рис. 37,
и установите плафон A, рис. 36 на мес-
то, надежно закрепив его.
Лампа заднего потолочного
светильника
Версии без люка в крыше
Для замены лампы действуйте следую-
щим образом:
снимите рассеиватель A, рис. 38, на-
жав в месте, указанном стрелкой;
извлеките лампу B, рис. 39, из боковых
контактов и замените ее, проверьте,
что новая лампа надежно закреплена
между контактами.
175
SAFETY DEVICES
CORRECT USE OF THE CAR
W
ARNING
LIGHTS AND MESSAGES
CA
R
MA
IN
TE
NA
NC
E
TE
CH
NI
CA
L
SP
EC
IFI
CA
TIO
NS
INDEX
DA
SH
BO
AR
D
AN
D
CO
NT
RO
LS
IN AN
EMERGENCY
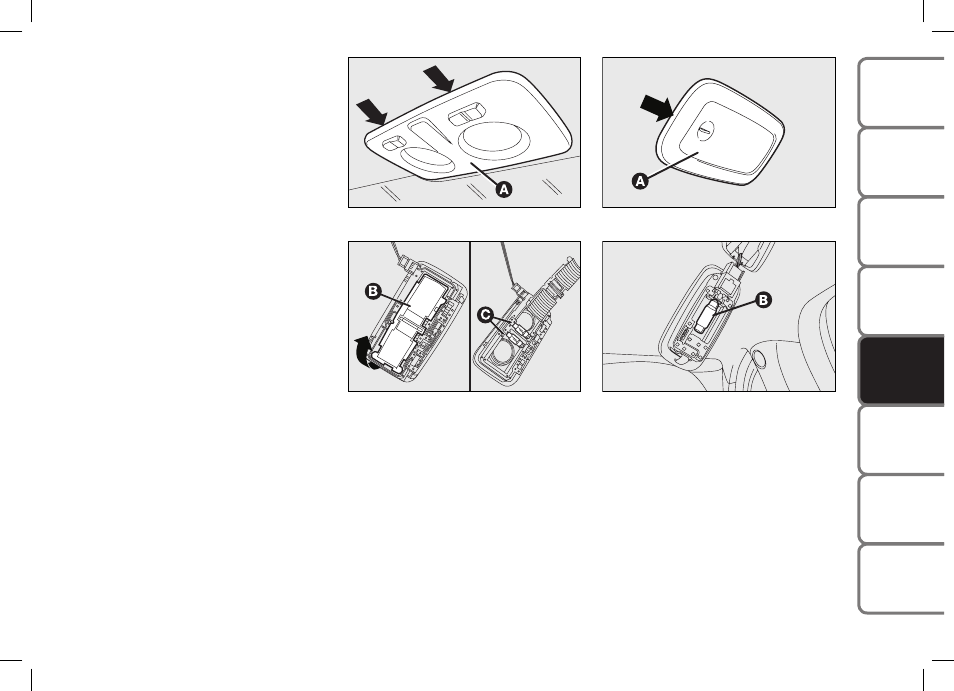
IF AN INTERIOR LIGHT
BURNS OUT
For the type of bulb and power rating, see
“When needing to change a bulb”.
FRONT CEILING LIGHT
To replace the bulbs proceed as follows:
❒
work in the points shown by the ar-
rows and remove light A-fig. 36;
❒
open the protection lid B-fig. 37;
❒
replace bulbs C releasing them from
the side contacts; make sure that new
bulbs are correctly clamped between
contacts;
❒
re-close the lid B-fig. 37 and secure
light A-fig. 36 into its housing locking
it properly.
fig. 36
F0Q0720m
fig. 37
F0Q0721m
REAR CEILING LIGHT
Versions without sunroof
To replace the bulbs proceed as follows:
❒
remove the light unit A-fig. 38 lever-
ing in the point shown by the arrow;
❒
replace the bulb B-fig. 39 releasing it
from the side contacts making sure that
the new bulb is correctly clamped be-
tween the contacts.
fig. 38
F0Q0723m
fig. 39
F0Q0722m
155-190 BRAVO GB 10-05-2007 9:19 Pagina 175
Рис. 36
175
SAFETY DEVICES
CORRECT USE OF THE CAR
W
ARNING
LIGHTS AND MESSAGES
CA
R
MA
IN
TE
NA
NC
E
TE
CH
NI
CA
L
SP
EC
IFI
CA
TIO
NS
INDEX
DA
SH
BO
AR
D
AN
D
CO
NT
RO
LS
IN AN
EMERGENCY
IF AN INTERIOR LIGHT
BURNS OUT
For the type of bulb and power rating, see
“When needing to change a bulb”.
FRONT CEILING LIGHT
To replace the bulbs proceed as follows:
❒
work in the points shown by the ar-
rows and remove light A-fig. 36;
❒
open the protection lid B-fig. 37;
❒
replace bulbs C releasing them from
the side contacts; make sure that new
bulbs are correctly clamped between
contacts;
❒
re-close the lid B-fig. 37 and secure
light A-fig. 36 into its housing locking
it properly.
fig. 36
F0Q0720m
fig. 37
F0Q0721m
REAR CEILING LIGHT
Versions without sunroof
To replace the bulbs proceed as follows:
❒
remove the light unit A-fig. 38 lever-
ing in the point shown by the arrow;
❒
replace the bulb B-fig. 39 releasing it
from the side contacts making sure that
the new bulb is correctly clamped be-
tween the contacts.
fig. 38
F0Q0723m
fig. 39
F0Q0722m
155-190 BRAVO GB 10-05-2007 9:19 Pagina 175
Рис. 37
175
SAFETY DEVICES
CORRECT USE OF THE CAR
W
ARNING
LIGHTS AND MESSAGES
CA
R
MA
IN
TE
NA
NC
E
TE
CH
NI
CA
L
SP
EC
IFI
CA
TIO
NS
INDEX
DA
SH
BO
AR
D
AN
D
CO
NT
RO
LS
IN AN
EMERGENCY
IF AN INTERIOR LIGHT
BURNS OUT
For the type of bulb and power rating, see
“When needing to change a bulb”.
FRONT CEILING LIGHT
To replace the bulbs proceed as follows:
❒
work in the points shown by the ar-
rows and remove light A-fig. 36;
❒
open the protection lid B-fig. 37;
❒
replace bulbs C releasing them from
the side contacts; make sure that new
bulbs are correctly clamped between
contacts;
❒
re-close the lid B-fig. 37 and secure
light A-fig. 36 into its housing locking
it properly.
fig. 36
F0Q0720m
fig. 37
F0Q0721m
REAR CEILING LIGHT
Versions without sunroof
To replace the bulbs proceed as follows:
❒
remove the light unit A-fig. 38 lever-
ing in the point shown by the arrow;
❒
replace the bulb B-fig. 39 releasing it
from the side contacts making sure that
the new bulb is correctly clamped be-
tween the contacts.
fig. 38
F0Q0723m
fig. 39
F0Q0722m
155-190 BRAVO GB 10-05-2007 9:19 Pagina 175
Рис. 38
175
SAFETY DEVICES
CORRECT USE OF THE CAR
W
ARNING
LIGHTS AND MESSAGES
CA
R
MA
IN
TE
NA
NC
E
TE
CH
NI
CA
L
SP
EC
IFI
CA
TIO
NS
INDEX
DA
SH
BO
AR
D
AN
D
CO
NT
RO
LS
IN AN
EMERGENCY
IF AN INTERIOR LIGHT
BURNS OUT
For the type of bulb and power rating, see
“When needing to change a bulb”.
FRONT CEILING LIGHT
To replace the bulbs proceed as follows:
❒
work in the points shown by the ar-
rows and remove light A-fig. 36;
❒
open the protection lid B-fig. 37;
❒
replace bulbs C releasing them from
the side contacts; make sure that new
bulbs are correctly clamped between
contacts;
❒
re-close the lid B-fig. 37 and secure
light A-fig. 36 into its housing locking
it properly.
fig. 36
F0Q0720m
fig. 37
F0Q0721m
REAR CEILING LIGHT
Versions without sunroof
To replace the bulbs proceed as follows:
❒
remove the light unit A-fig. 38 lever-
ing in the point shown by the arrow;
❒
replace the bulb B-fig. 39 releasing it
from the side contacts making sure that
the new bulb is correctly clamped be-
tween the contacts.
fig. 38
F0Q0723m
fig. 39
F0Q0722m
155-190 BRAVO GB 10-05-2007 9:19 Pagina 175
Рис. 39