Optional arcglide/edgepro multi-system interface, Elec sch:hpr260xd pwr sply w/auto – Инструкция по эксплуатации Hypertherm HPR260XD Auto Gas
Страница 266
7-26
4
3
2
1
1
A
4
3
2
A
B
C
D
B
C
D
Unit 1
and/or EdgePro Module(s)
ArcGlide THC
041993
CONTROL BOARD
1 2 3 4
S100
1 2
J303
3 4
3
2
1
4
J300A
J1
ArcGlide Ethernet Cable
Unit 2
Unit 3
Unit 4
CNC Interface Cable
Serial ID
Dipswitch
Machine Motion
Jumper Block
J106
2
1
J107
1 2
Optional ArcGlide/EdgePro Multi-System Interface
5 6 7 8
ON
J300B
J5
141131
ETHERNET INTERFACE
BOARD
0
7
1
5
4
6
2
3
SW1
UNIT ADDRESS
CONTROL BOARD
1 2 3 4
J1
Serial ID
Dipswitch
Machine Motion
Jumper Block
2
1
1 2
5 6 7 8
ON
J5
141131
ETHERNET INTERFACE
BOARD
0
7
1
5
4
6
2
3
SW1
UNIT ADDRESS
CONTROL BOARD
1 2 3 4
J1
Serial ID
Dipswitch
Machine Motion
Jumper Block
2
1
1 2
5 6 7 8
ON
J5
141131
ETHERNET INTERFACE
BOARD
0
7
1
5
4
6
2
3
SW1
UNIT ADDRESS
CONTROL BOARD
1 2 3 4
J1
Serial ID
Dipswitch
Machine Motion
Jumper Block
2
1
1 2
5 6 7 8
ON
J5
141131
ETHERNET INTERFACE
BOARD
0
7
1
5
4
6
2
3
SW1
UNIT ADDRESS
CNC Interface Cable
CNC Interface Cable
CNC Interface Cable
ArcGlide Ethernet Cable
ArcGlide Ethernet Cable
ArcGlide Ethernet Cable
S100
J303
J300A
J106
J107
J300B
041993
041993
S100
J303
J300A
J106
J107
J300B
S100
J303
J300A
J106
J107
J300B
041993
1 2 3 4
S101
ON
1 2 3 4
S101
ON
1 2 3 4
S101
ON
1 2 3 4
S101
ON
1 2 3 4
3
2
1
4
1 2 3 4
3
2
1
4
1 2 3 4
3
2
1
4
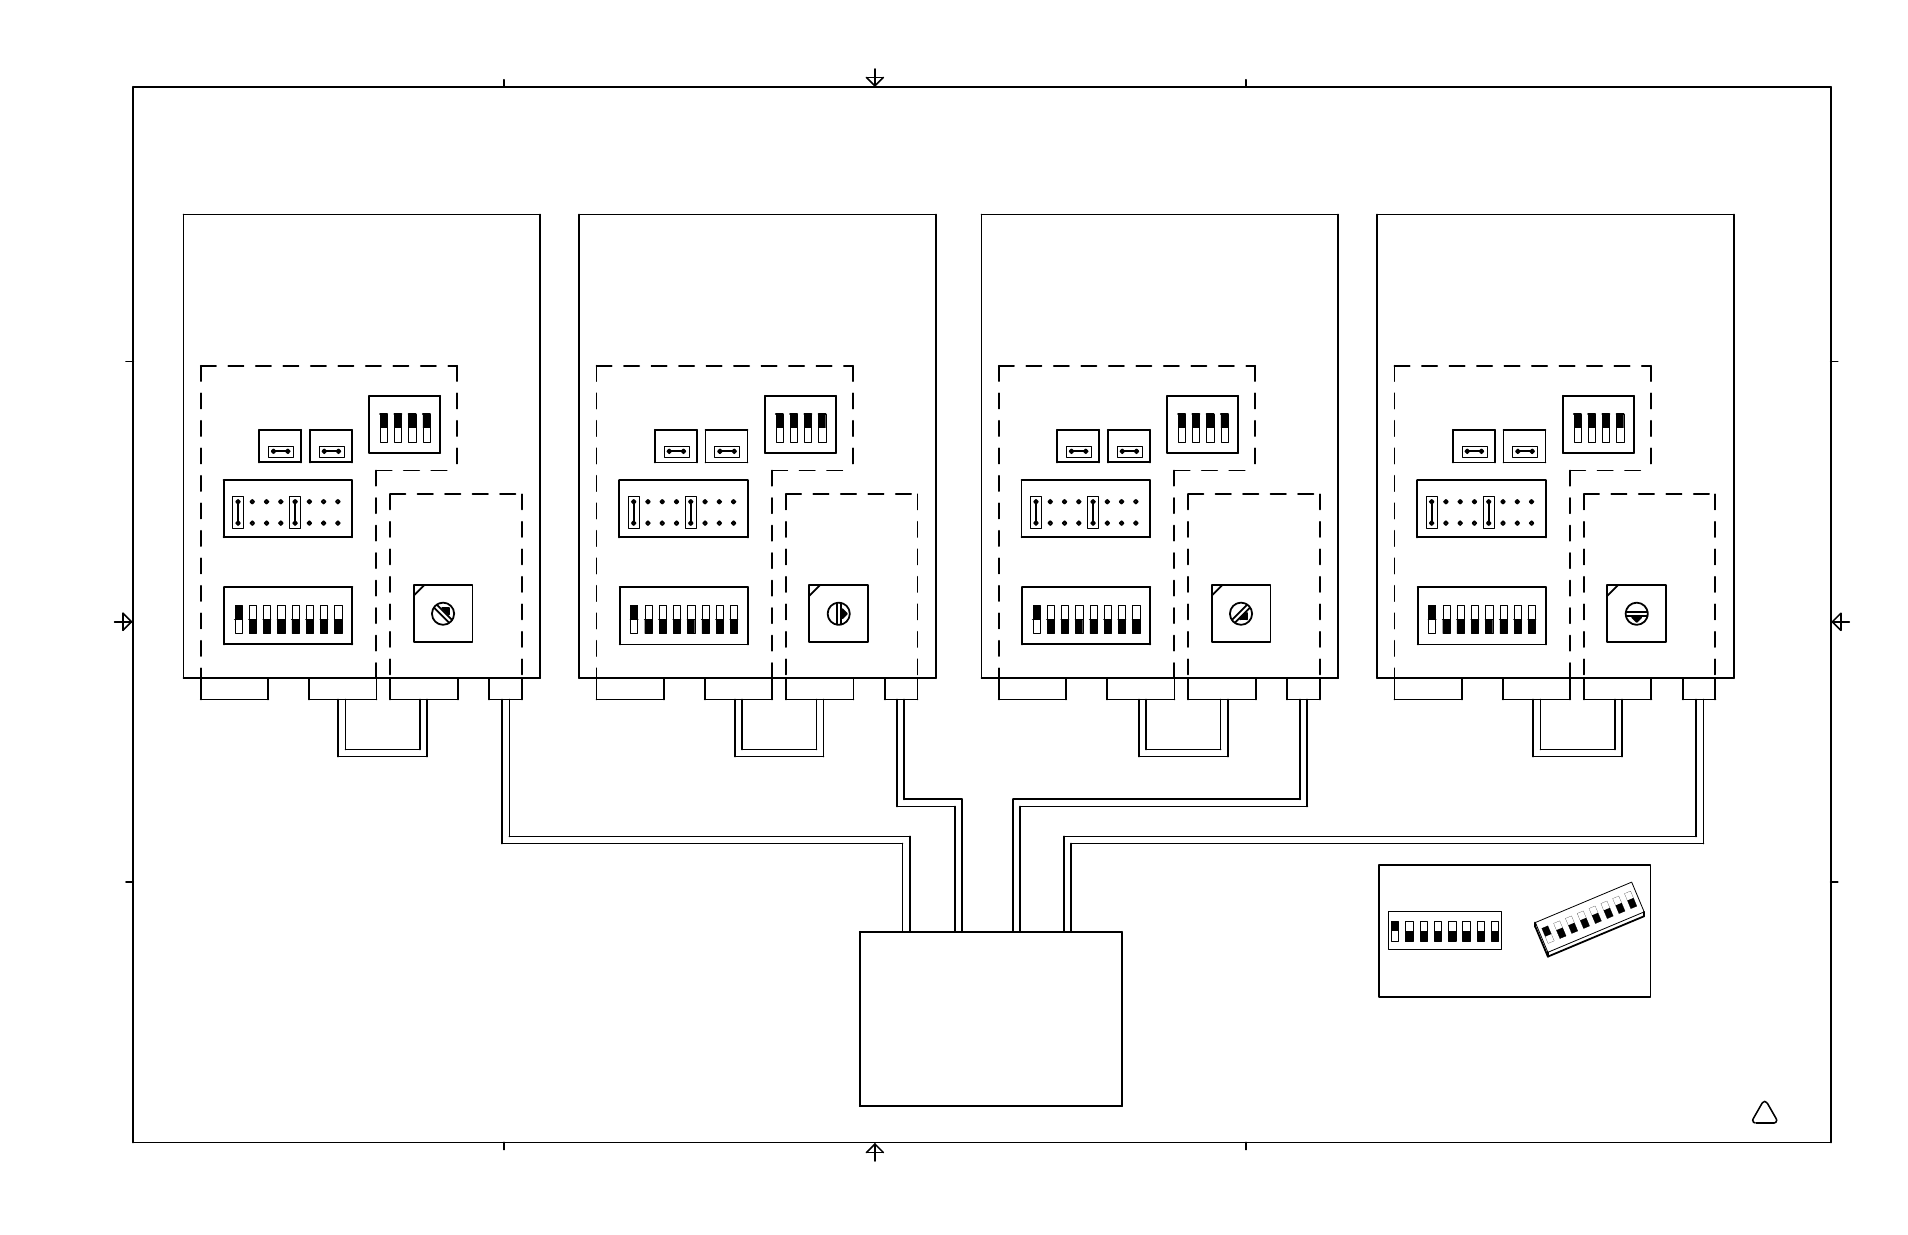
Notes:
1) For the 041993 control board, set Serial ID (S100), and Machine Motion (J303) as shown.
Jumpers J106 and J107 should be installed.
All 041993 DIPSWITCH and jumper settings are the same; serial IDs are determined
by the 141131 board setting.
2) For a single system installation, set SW1 on the 141131 board as shown in Unit 1.
3) For a two system installation, set SW1 on the 141131 boards as shown in Units 1 through 2.
4) For a three system installation, set SW1 on the 141131 boards as shown in Units 1 through 3.
5) For a four system installation, set SW1 on the 141131 boards as shown in Units 1 through 4.
Switch 1 is in the On position
Switches 2-8 are in the Off position
HPR PAC
Dry Cutting System
HPR PAC
Dry Cutting System
HPR PAC
Dry Cutting System
HPR PAC
Dry Cutting System
S100
1 2 3 4 5 6 7 8
Dipswitch setting example:
2
1
3 4
5 6
7 8
ON
ON
ELEC SCH:HPR260XD PWR SPLY W/AUTO
B
013378
SHEET 22 OF 22