2 mfétósí^stí^álgj. »[reset]®, i, 2 mfétósí^stí^álgj, O ffl iawa^^miss; c/s йкг) – Инструкция по эксплуатации Panasonic NV-VX30EN
Страница 38
Внимание! Текст в этом документе был распознан автоматически. Для просмотра оригинальной страницы Вы можете воспользоваться режимом "Оригинал".
s M: tasffliaw«é^M (
tús
)
«ffiKieitffJi«)n(-+i28).
яамйв^мйй^яшчЯйаййЮФ Bff ampJi.
1
ЙШЙ[MEMORY]ü, ¡tSBffliüSSS
¡U
í
HН
н
S
b
I
í
^/T^^ÍIS+
o
2 MfétóSí^Stí^álgJ.
»[RESET]®,
i$
Ш
i@?a?gi^ H
ШШШШ1
[
0
:
00
.
00
] o
• Mtótóas»»^.
-s-aíoííajRssiffl
¡ййшда^рл,
й»«;г^а»м§вй-^.
uís
^
t
-
•as.
[0:00.00].
■ScSíSffiiH-^ÍS/Tv^
S?t«[MEMORY]a «Wtt^ajKeínTÍS«:»«:
o ffl iawa^^miss; c/s йкг)
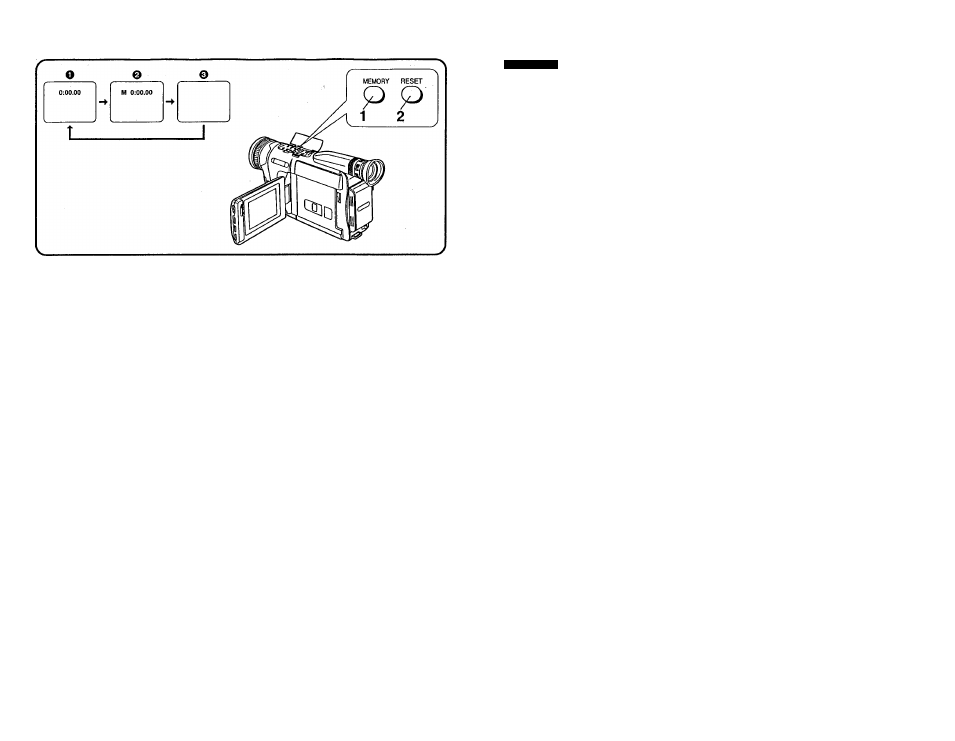
Using the Tape Counter
Indication
The Tape Counter Indication is convenient for the
following two purposes: For Checking the Elapsed Tape
Time (described below) and for Using the Memory Stop
Function (-» 128).
1. Checking the Elapsed Tape
Time
The Elapsed Tape Time Indication shows the amount
of time that has elapsed during recording or playback.
1
Press the [MEMORY] Button
repeatedly until the Elapsed Tape
Time Indication O is displayed on the
' LCD Monitor.
2
Press the [RESET] Button before
starting to record or play back in Oder
to reset the Elapsed Tape Time
Indication to [0:00.00].
•When recording or playback starts, the elapsed
tape time is indicated in hours, minutes and
seconds. During playback of parts of the tape on
which no recording has been made, this indication
does not change.
•Taking out the cassette or removing the Battery .
automatically resets the indication to [
0 :0 0 .0 0 ].
.
■ Changing the Tape Counter Indication
Every press of the [MEMORY] Button changes the Tape
Counter indication in the following orden
O
Elapsed Tape Time Indication (initial setting)
@ Memory Stop Indication and Elapsed Tape Time
Indication (-♦ 128)
e No Indication
русский
язык
Присоединение ппечевого
ремня и держателя
устройства дистанционного
управления
1
Снимите регулятор длины
плечевого ремня О с одного конца
плечевого ремня, как показано
выше.
2
Протяните тот же конец плечевого
ремня через две щели в держателе
устройства дистанционного
управления, так чтобы он был
обращен наружу. Затем вставьте на
место регуляторы длины
плечевого ремня.
3
Протяните тот же конец плечевого
ремня через держатель плечевого
ремня О.
4
Надежно присоедините этот конец
плечевого ремня
(О
более
2 см).
5
Выполните вышеуказанные
пункты 1,3 и 4 для присоединения
другого конца плечевого ремня к
другому держателю плечевого
ремня О на видеокамере.
6
Надежно вставьте устройство
дистанционного управления в
держатель устройства
дистанционного управления.
^ Ii¿ «
i.i.I С.,Г/
JL b J
lm
S
j
J
JbJLí ¿}-C yq C 7 П
..>.!) iJjJa ^ O i-ÜSJI JLbd J
5
J
3
Jj.x
.0
£>í¡
1
.^ÁILSJI ¿QiiJ
hil.dl jUa-J «JjJiaJI
jl
^I
jju
.«.diduSUf JU^
o
V
jjl
.«
oLL«j-4
jUaU kJ^paJf jjuuü U4.>wu#l чЗ
¿UaJ
6) uLlXJI JLbJJ cip^l IxA
1
«^ 4
uijJaJf
J
• .^д ■ I 4
5 3 *1 Olg-taJj-l
5
>i-Vl uüOXJI JUaJ
.^iliJf JUaJj
.jüu (©JL>
wé
JI ^I.>4,4
I
126
39