Installing the floppy disk drive (optional) – Инструкция по эксплуатации Yamaha CLP-295GP
Страница 115
CLP-295GP Руководство пользователя
115
CLP-295GP Owner’s Manual
115
Appendix
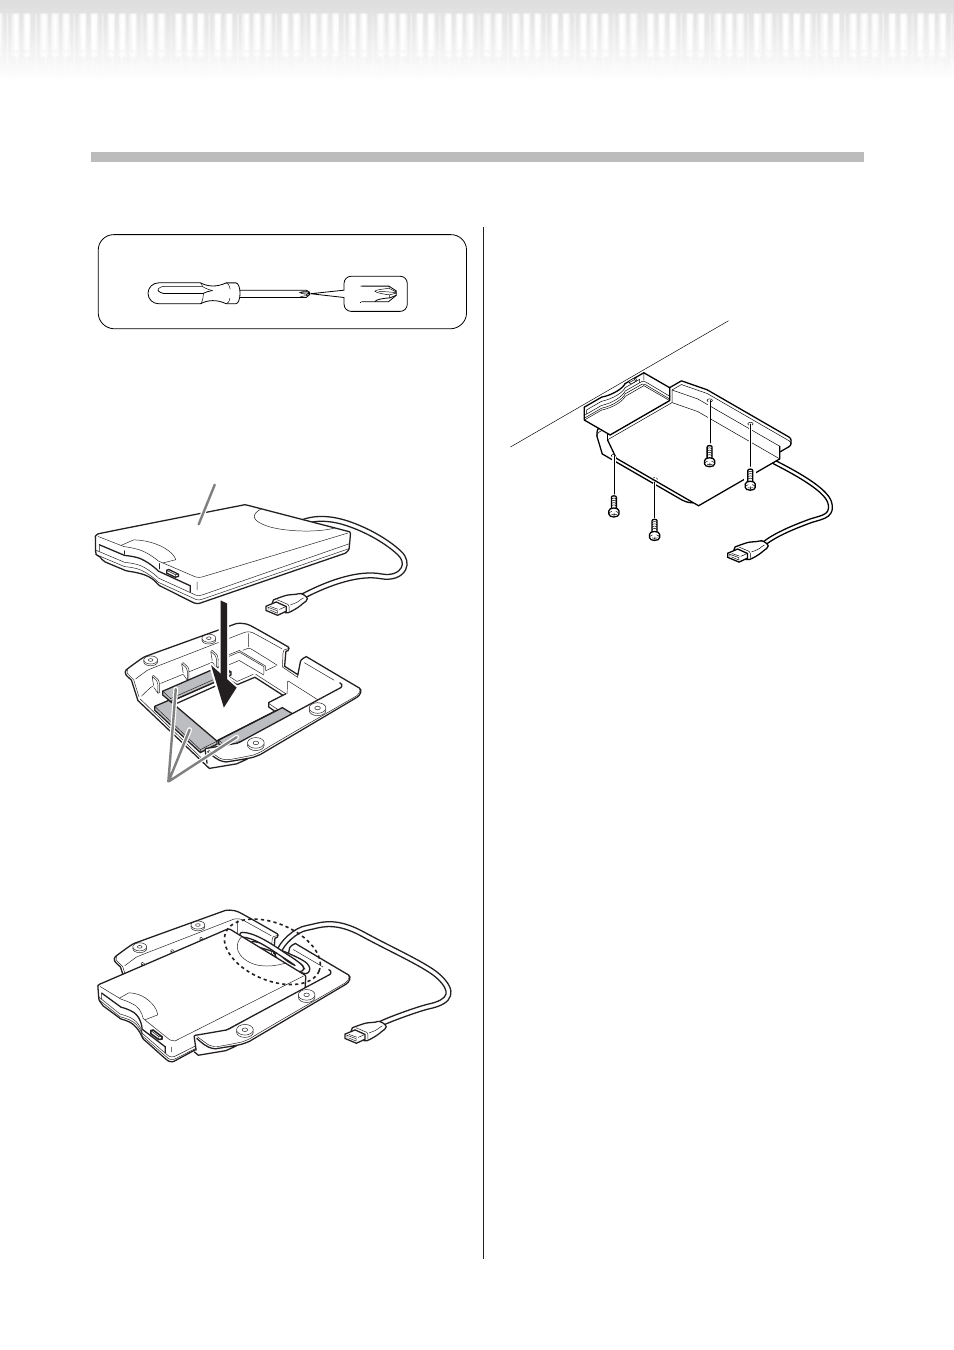
Installing the Floppy Disk Drive (Optional)
The optional UD-FD01 floppy disk drive can be installed to the bottom of the instrument by using the included
floppy disk drive case and screws.
1.
Remove the three backing papers
from the adhesive tape in the case,
and fit the floppy disk drive into the
case.
2.
Fold the USB cable inside the case as
shown.
3.
Attach the drive and case assembly
to the left underside of the instru-
ment, using the included four screws
(4mm x 10mm).
4.
Connect the USB cable to the USB
[TO DEVICE] terminal.
Have a Phillips-head (+) screwdriver ready.
Insert the drive to the case, with the side
having the rubber stoppers facing the case.
Dual-sided adhesive tape
Приготовьте крестовую отвертку с наконечником
Phillips (+).
1.
удалите три бумажные подложки с клей-
кой ленты в кожухе и поместите дисковод
в кожyх.
Сторона с резиновыми ограничителями
должна быть обращена к кожуху.
CLP-295GP Owner’s Manual
115
Appendix
Installing the Floppy Disk Drive (Optional)
The optional UD-FD01 floppy disk drive can be installed to the bottom of the instrument by using the included
floppy disk drive case and screws.
1.
Remove the three backing papers
from the adhesive tape in the case,
and fit the floppy disk drive into the
case.
2.
Fold the USB cable inside the case as
shown.
3.
Attach the drive and case assembly
to the left underside of the instru-
ment, using the included four screws
(4mm x 10mm).
4.
Connect the USB cable to the USB
[TO DEVICE] terminal.
Have a Phillips-head (+) screwdriver ready.
Insert the drive to the case, with the side
having the rubber stoppers facing the case.
Dual-sided adhesive tape
Двусторонняя клейкая лента
2.
сверните кабель USB внутри кож уха, как
показано.
CLP-295GP Owner’s Manual
115
Appendix
Installing the Floppy Disk Drive (Optional)
The optional UD-FD01 floppy disk drive can be installed to the bottom of the instrument by using the included
floppy disk drive case and screws.
1.
Remove the three backing papers
from the adhesive tape in the case,
and fit the floppy disk drive into the
case.
2.
Fold the USB cable inside the case as
shown.
3.
Attach the drive and case assembly
to the left underside of the instru-
ment, using the included four screws
(4mm x 10mm).
4.
Connect the USB cable to the USB
[TO DEVICE] terminal.
Have a Phillips-head (+) screwdriver ready.
Insert the drive to the case, with the side
having the rubber stoppers facing the case.
Dual-sided adhesive tape
3.
прикрепите дисковод в кожухе слева к
нижней стороне инструмента с помощью
четырех прилагаемых винтов (4 мм х
10 мм).
CLP-295GP Owner’s Manual
115
Appendix
Installing the Floppy Disk Drive (Optional)
The optional UD-FD01 floppy disk drive can be installed to the bottom of the instrument by using the included
floppy disk drive case and screws.
1.
Remove the three backing papers
from the adhesive tape in the case,
and fit the floppy disk drive into the
case.
2.
Fold the USB cable inside the case as
shown.
3.
Attach the drive and case assembly
to the left underside of the instru-
ment, using the included four screws
(4mm x 10mm).
4.
Connect the USB cable to the USB
[TO DEVICE] terminal.
Have a Phillips-head (+) screwdriver ready.
Insert the drive to the case, with the side
having the rubber stoppers facing the case.
Dual-sided adhesive tape
4.
подключите кабель USB к разъему
[TO DEVICE].
Установка дисковода гибких
дисков (поставляется по заказу)
Необязательный дисковод UD-FDO1 можно установить в нижней части инструмента с помощью кожуха и
винтов, входящих в поставку.