Инструкция по эксплуатации Yamaha CLP-295GP
Страница 112
112
CLP-295GP Руководство пользователя
2
прикрепите две передние ножки и за-
днюю ножку.
112
CLP-295GP Owner’s Manual
Appendix
2.
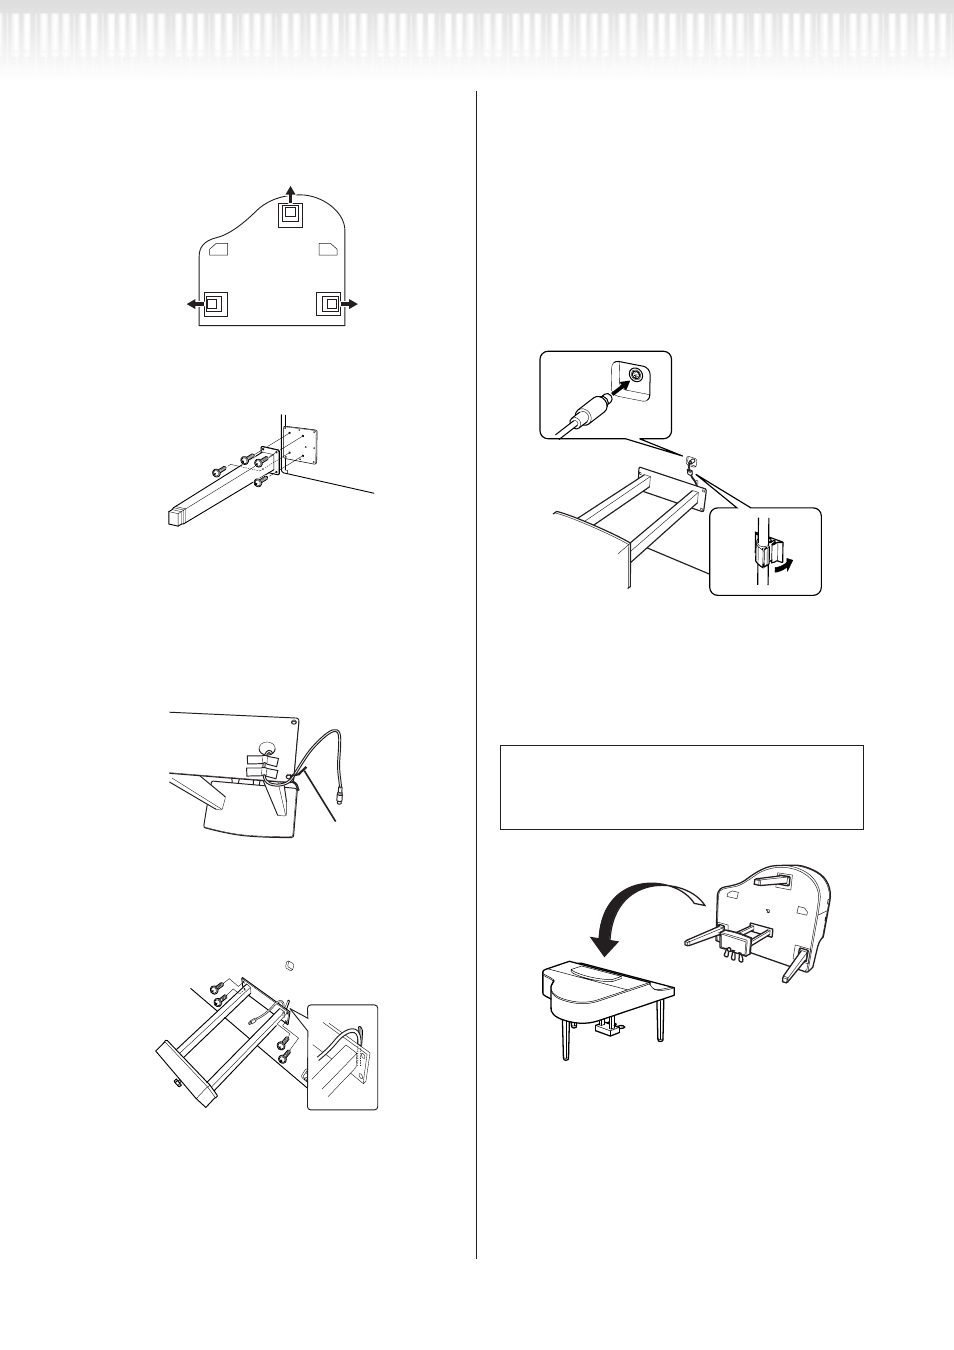
Attach two front legs and a rear leg.
Refer to the diagram below to verify the orientation of
the legs.
Install and tighten four 6 x 40 mm screws on each leg,
starting with one of the front legs.
3.
Install the pedal box.
1
Remove the twist tie that affixes the pedal
cord to the upper portion of the pedal box.
2
Align the cord with the groove on the unit,
and attach the pedal box using four
6 x 20 mm
screws.
3
Insert the pedal cord plug into the pedal
connector. Insert the plug so the arrow side
faces front (toward the keyboard).
If the plug will not go in easily, do not
force it. Double-check the orientation of
the plug, then try again.
4
Attach the cord holder on the unit as shown
in the illustration below, then use the cord
holder to affix the pedal cord.
4.
Raising the unit to the standing posi-
tion.
Use the front legs as support to raise the unit.
Rear leg
Front leg
Front leg
Twist tie
4
3
CAUTION
• Be careful not to pinch your fingers.
• When you raise the unit, do not hold the key
cover.
См. Рисунок ниже для правильного ориентирова-
ния ножек.
112
CLP-295GP Owner’s Manual
Appendix
2.
Attach two front legs and a rear leg.
Refer to the diagram below to verify the orientation of
the legs.
Install and tighten four 6 x 40 mm screws on each leg,
starting with one of the front legs.
3.
Install the pedal box.
1
Remove the twist tie that affixes the pedal
cord to the upper portion of the pedal box.
2
Align the cord with the groove on the unit,
and attach the pedal box using four
6 x 20 mm
screws.
3
Insert the pedal cord plug into the pedal
connector. Insert the plug so the arrow side
faces front (toward the keyboard).
If the plug will not go in easily, do not
force it. Double-check the orientation of
the plug, then try again.
4
Attach the cord holder on the unit as shown
in the illustration below, then use the cord
holder to affix the pedal cord.
4.
Raising the unit to the standing posi-
tion.
Use the front legs as support to raise the unit.
Rear leg
Front leg
Front leg
Twist tie
4
3
CAUTION
• Be careful not to pinch your fingers.
• When you raise the unit, do not hold the key
cover.
3.
установите педальный ящик.
1. Снимите замок для проволоки, выполненный
способом перекручивания, с помощью кото-
рого прикреплен педальный провод к верх-
ней части педального ящика.
112
CLP-295GP Owner’s Manual
Appendix
2.
Attach two front legs and a rear leg.
Refer to the diagram below to verify the orientation of
the legs.
Install and tighten four 6 x 40 mm screws on each leg,
starting with one of the front legs.
3.
Install the pedal box.
1
Remove the twist tie that affixes the pedal
cord to the upper portion of the pedal box.
2
Align the cord with the groove on the unit,
and attach the pedal box using four
6 x 20 mm
screws.
3
Insert the pedal cord plug into the pedal
connector. Insert the plug so the arrow side
faces front (toward the keyboard).
If the plug will not go in easily, do not
force it. Double-check the orientation of
the plug, then try again.
4
Attach the cord holder on the unit as shown
in the illustration below, then use the cord
holder to affix the pedal cord.
4.
Raising the unit to the standing posi-
tion.
Use the front legs as support to raise the unit.
Rear leg
Front leg
Front leg
Twist tie
4
3
CAUTION
• Be careful not to pinch your fingers.
• When you raise the unit, do not hold the key
cover.
2. Расположите провод в пазе на устройстве
и прикрепите педальный ящик при помощи
четырех 6 x 20 мм винтов.
112
CLP-295GP Owner’s Manual
Appendix
2.
Attach two front legs and a rear leg.
Refer to the diagram below to verify the orientation of
the legs.
Install and tighten four 6 x 40 mm screws on each leg,
starting with one of the front legs.
3.
Install the pedal box.
1
Remove the twist tie that affixes the pedal
cord to the upper portion of the pedal box.
2
Align the cord with the groove on the unit,
and attach the pedal box using four
6 x 20 mm
screws.
3
Insert the pedal cord plug into the pedal
connector. Insert the plug so the arrow side
faces front (toward the keyboard).
If the plug will not go in easily, do not
force it. Double-check the orientation of
the plug, then try again.
4
Attach the cord holder on the unit as shown
in the illustration below, then use the cord
holder to affix the pedal cord.
4.
Raising the unit to the standing posi-
tion.
Use the front legs as support to raise the unit.
Rear leg
Front leg
Front leg
Twist tie
4
3
CAUTION
• Be careful not to pinch your fingers.
• When you raise the unit, do not hold the key
cover.
3. Вставьте штекер педального шнура в разъем
для педали. Вставьте штекер так, чтобы бок
стрелки смотрел вперед (к клавиатуре).
Если штекер будет входить с трудом, не при-
кладывайте большие усилия. Еще раз про-
верьте ориентировку штекера и попробуйте
еще раз.
4. Прикрепите держатель шнура на устройстве
как показано на рисунке ниже, а затем вос-
пользуйтесь держателем для прикрепления
педального шнура.
112
CLP-295GP Owner’s Manual
Appendix
2.
Attach two front legs and a rear leg.
Refer to the diagram below to verify the orientation of
the legs.
Install and tighten four 6 x 40 mm screws on each leg,
starting with one of the front legs.
3.
Install the pedal box.
1
Remove the twist tie that affixes the pedal
cord to the upper portion of the pedal box.
2
Align the cord with the groove on the unit,
and attach the pedal box using four
6 x 20 mm
screws.
3
Insert the pedal cord plug into the pedal
connector. Insert the plug so the arrow side
faces front (toward the keyboard).
If the plug will not go in easily, do not
force it. Double-check the orientation of
the plug, then try again.
4
Attach the cord holder on the unit as shown
in the illustration below, then use the cord
holder to affix the pedal cord.
4.
Raising the unit to the standing posi-
tion.
Use the front legs as support to raise the unit.
Rear leg
Front leg
Front leg
Twist tie
4
3
CAUTION
• Be careful not to pinch your fingers.
• When you raise the unit, do not hold the key
cover.
4.
перевод устройства в вертикальное по-
ложение.
Используйте передние ножки в качестве опоры
для поднятия устройства.
Внимание
w
w
• Осторожно, не прищемите пальцы.
• При поднятии устройства, не держитесь за
крышку клавиатуры.
112
CLP-295GP Owner’s Manual
Appendix
2.
Attach two front legs and a rear leg.
Refer to the diagram below to verify the orientation of
the legs.
Install and tighten four 6 x 40 mm screws on each leg,
starting with one of the front legs.
3.
Install the pedal box.
1
Remove the twist tie that affixes the pedal
cord to the upper portion of the pedal box.
2
Align the cord with the groove on the unit,
and attach the pedal box using four
6 x 20 mm
screws.
3
Insert the pedal cord plug into the pedal
connector. Insert the plug so the arrow side
faces front (toward the keyboard).
If the plug will not go in easily, do not
force it. Double-check the orientation of
the plug, then try again.
4
Attach the cord holder on the unit as shown
in the illustration below, then use the cord
holder to affix the pedal cord.
4.
Raising the unit to the standing posi-
tion.
Use the front legs as support to raise the unit.
Rear leg
Front leg
Front leg
Twist tie
4
3
CAUTION
• Be careful not to pinch your fingers.
• When you raise the unit, do not hold the key
cover.
Сборка подставки для клавиатуры