Инструкция по эксплуатации Yamaha CLP-295GP
Страница 113
CLP-295GP Руководство пользователя
113
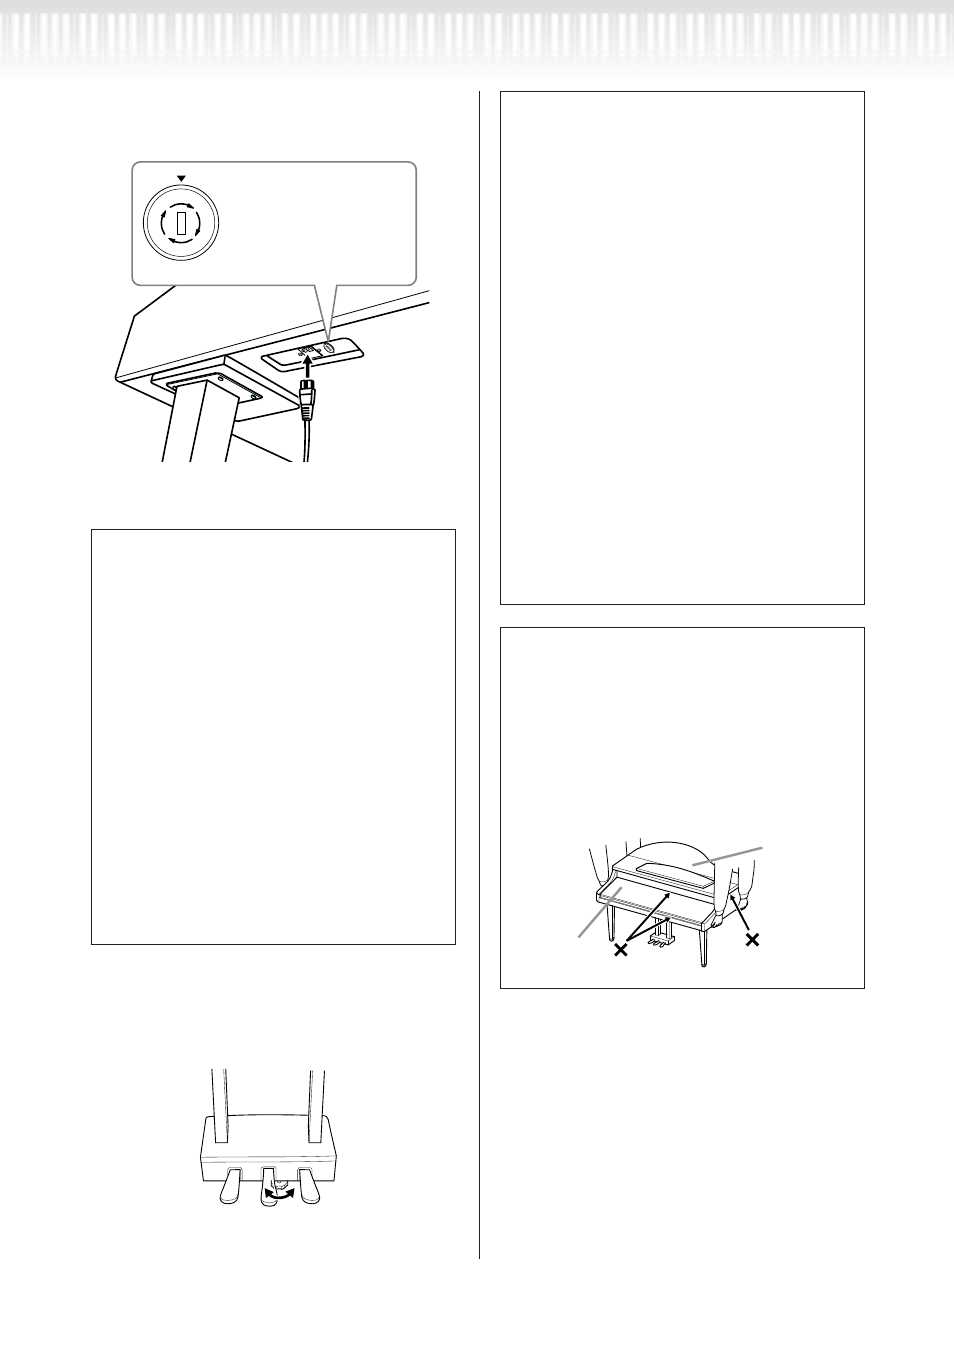
5.
подсоедините сетевой шнур.
Вставьте вилку сетевого шнура в [AC INLET].
Правая ножка снизу основного устройства; вид
спереди
CLP-295GP Owner’s Manual
113
Appendix
5.
Connect the power cord.
Insert the AC power cord plug into the [AC INLET].
6.
Set the adjuster.
Rotate the adjuster until it comes in firm contact with
the floor surface.
After completing the assembly, please check the following.
Voltage Selector
Before connecting the AC power cord, check the setting
of the voltage selector which is provided in some areas. To
set the selector for 110V, 127V, 220V or 240V main volt-
ages, use a “minus” screwdriver to rotate the selector dial
so that the correct voltage for your region appears next to
the pointer on the panel. The voltage selector is set at
240V when the unit is initially shipped.
After the proper voltage has been selected, connect the
AC power cord to the [AC INLET] and an AC wall outlet.
A plug adaptor may be also provided in some areas to
match the pin configuration of the AC wall outlets in
your area.
WARNING
An improper voltage setting can cause serious damage to
the Clavinova or result in improper operation.
240
127
110
220
For models that feature
a voltage selector:
Set the voltage selector to an
appropriate voltage.
Right leg on the bottom of the main unit, when
viewed from front
• Are there any parts left over?
→
Review the assembly procedure and correct
any errors.
• Is the Clavinova clear of doors and other mov-
able fixtures?
→
Move the Clavinova to an appropriate loca-
tion.
• Does the Clavinova make a rattling noise when
you shake it?
→
Tighten all screws.
• Does the pedal box rattle or give way when you
step on the pedals?
→
Turn the adjuster so that it is set firmly
against the floor.
• Are the pedal and power cords inserted
securely into the sockets?
→
Check the connection.
• If the main unit creaks or is otherwise unsteady
when you play on the keyboard, refer to the
assembly diagrams and retighten all screws.
When moving the instrument after assembly,
always hold the bottom of the main unit.
CAUTION
Do not hold the key cover or top portion.
Improper handling can result in damage to the
instrument or personal injury.
Top portion
Key cover
для моделей, которые
оснащены селектором на-
пряжения:
Установите переключатель
напряжения на соответству-
ющее напряжение.
переключатель напряжения
В некоторых регионах используется переклю-
чатель напряжения. Прежде чем подключать
кабель питания, проверьте, правильно ли он
установлен. Для установки переключателя на
110, 127, 220 или 240 вольт с помощью от-
вертки поверните диск так, чтобы правильное
напряжение для вашего региона находилось
напротив указателя на панели. При поставке,
переключатель напряжения установлен на
напряжение в 240 В. Выбрав соответствующее
напряжение, подключите кабель питания к
разъему AC INLET и к электросети. В некото-
рых регионах для подключения к электросети
требуются переходники с соответствующим рас-
положением контактов.
ПрЕДУПрЕЖДЕНИЕ
w
w
Неправильная установка напряжения может се-
рьезно повредить цифровое пианино Clavinova или
вызвать неправильную работу.
6.
установите регулятор высоты
Поворачивайте фиксирующий винт до тех пор,
пока он не придет в тесный контакт с поверхно-
стью пола.
CLP-295GP Owner’s Manual
113
Appendix
5.
Connect the power cord.
Insert the AC power cord plug into the [AC INLET].
6.
Set the adjuster.
Rotate the adjuster until it comes in firm contact with
the floor surface.
After completing the assembly, please check the following.
Voltage Selector
Before connecting the AC power cord, check the setting
of the voltage selector which is provided in some areas. To
set the selector for 110V, 127V, 220V or 240V main volt-
ages, use a “minus” screwdriver to rotate the selector dial
so that the correct voltage for your region appears next to
the pointer on the panel. The voltage selector is set at
240V when the unit is initially shipped.
After the proper voltage has been selected, connect the
AC power cord to the [AC INLET] and an AC wall outlet.
A plug adaptor may be also provided in some areas to
match the pin configuration of the AC wall outlets in
your area.
WARNING
An improper voltage setting can cause serious damage to
the Clavinova or result in improper operation.
240
127
110
220
For models that feature
a voltage selector:
Set the voltage selector to an
appropriate voltage.
Right leg on the bottom of the main unit, when
viewed from front
• Are there any parts left over?
→
Review the assembly procedure and correct
any errors.
• Is the Clavinova clear of doors and other mov-
able fixtures?
→
Move the Clavinova to an appropriate loca-
tion.
• Does the Clavinova make a rattling noise when
you shake it?
→
Tighten all screws.
• Does the pedal box rattle or give way when you
step on the pedals?
→
Turn the adjuster so that it is set firmly
against the floor.
• Are the pedal and power cords inserted
securely into the sockets?
→
Check the connection.
• If the main unit creaks or is otherwise unsteady
when you play on the keyboard, refer to the
assembly diagrams and retighten all screws.
When moving the instrument after assembly,
always hold the bottom of the main unit.
CAUTION
Do not hold the key cover or top portion.
Improper handling can result in damage to the
instrument or personal injury.
Top portion
Key cover
После сборки проверьте следующее.
• Не осталось ли «лишних» деталей?
Проверьте сборку и исправьте ошибки.
• Не мешает ли пианино Clavinova открывать
двери и перемещать предметы?
Поставьте цифровое пианино Clavinova в
удобное место
• Не «болтается» ли инструмент Clavinova,
когда вы его трясете?
Затяните все винты.
• Не смещается ли педальный блок и не
слышно ли дребезжания при нажатии на
педали?
Поверните фиксирующий винт так, чтобы
он твердо стоял на полу.
• Плотно ли вставлены в разъемы кабели
педали и питания?
Проверьте соединения.
• Если при игре на клавишах основная часть
инструмента скрипит или неустойчива,
посмотрите схему сборки и затяните все
винты.
При перемещении собранного инструмента
всегда беритесь за нижнюю часть основного
блока.
ВНИМАНИЕ!
w
w
Не беритесь за крышку клавиатуры или ее
верхнюю часть. Неправильная эксплуатация
может привести к выходу инструмента из строя
или к травме.
CLP-295GP Owner’s Manual
113
Appendix
5.
Connect the power cord.
Insert the AC power cord plug into the [AC INLET].
6.
Set the adjuster.
Rotate the adjuster until it comes in firm contact with
the floor surface.
After completing the assembly, please check the following.
Voltage Selector
Before connecting the AC power cord, check the setting
of the voltage selector which is provided in some areas. To
set the selector for 110V, 127V, 220V or 240V main volt-
ages, use a “minus” screwdriver to rotate the selector dial
so that the correct voltage for your region appears next to
the pointer on the panel. The voltage selector is set at
240V when the unit is initially shipped.
After the proper voltage has been selected, connect the
AC power cord to the [AC INLET] and an AC wall outlet.
A plug adaptor may be also provided in some areas to
match the pin configuration of the AC wall outlets in
your area.
WARNING
An improper voltage setting can cause serious damage to
the Clavinova or result in improper operation.
240
127
110
220
For models that feature
a voltage selector:
Set the voltage selector to an
appropriate voltage.
Right leg on the bottom of the main unit, when
viewed from front
• Are there any parts left over?
→
Review the assembly procedure and correct
any errors.
• Is the Clavinova clear of doors and other mov-
able fixtures?
→
Move the Clavinova to an appropriate loca-
tion.
• Does the Clavinova make a rattling noise when
you shake it?
→
Tighten all screws.
• Does the pedal box rattle or give way when you
step on the pedals?
→
Turn the adjuster so that it is set firmly
against the floor.
• Are the pedal and power cords inserted
securely into the sockets?
→
Check the connection.
• If the main unit creaks or is otherwise unsteady
when you play on the keyboard, refer to the
assembly diagrams and retighten all screws.
When moving the instrument after assembly,
always hold the bottom of the main unit.
CAUTION
Do not hold the key cover or top portion.
Improper handling can result in damage to the
instrument or personal injury.
Top portion
Key cover
Верхняя
часть
Крышка
клавиатуры
Сборка подставки для клавиатуры