42 блок monitor, Кнопка monitor display, Кнопка control room – Инструкция по эксплуатации Yamaha dm2000v2e1
Страница 42: Кнопка aux 11, Кнопка aux 12, Индикатор solo, Регулятор solo contrast, Кнопка clear, Studio, Solo
DM2000 Version 2—Owner’s Manual
Панель управления и задняя панель
42
Блок MONITOR
Ниже описаны секции блока монитора.
STUDIO
Кнопка MONITOR DISPLAY
Используется для выбора следующих страниц: Solo Setting, Control Room Setup,
Talkback Setup, Surround Monitor, Surround Monitor Setup, Surround Monitor Patch и
Surround Monitor Library. Информация о выделении (Configuring Solo) приведена на стр.
143, мониторинге аппаратной (Control Room Monitoring) – стр. 158, использовании вос-
произведения (Using Talkback & Slate) - на стр. 163 и мониторинге окружающего звука
(Surround Monitoring) – на стр.160 соответственно.
Кнопка CONTROL ROOM
Выбирает сигнал монитора аппаратной в качестве источника сигнала для монитора
студии. При выборе данного источника загорается соответствующий индикатор. Инфор-
мация о мониторинге студии (Studio Monitoring) приведена на стр. 159.
Кнопка AUX 11
Выбирает Aux Send #11 в качестве источника сигнала для монитора студии. При выборе
данного источника загорается соответствующий индикатор. Информация о мониторинге
студии приведена на стр. 159.
Кнопка AUX 12
Выбирает Aux Send #12 в качестве источника сигнала для монитора студии. При выборе
данного источника загорается соответствующий индикатор. Информация о мониторинге
студии (Studio Monitoring) приведена на стр. 159.
SOLO
Индикатор SOLO
Этот индикатор мигает. Когда выделены один или более каналов, указывая, что функция
Соло активна. Информация о выделении каналов (Soloing Channels) приведена на стр.
142.
Регулятор SOLO CONTRAST
Этот регулятор используется для установки уровня баланса между выделенными кана-
лами выхода и выбранным в настоящее время источником CONTROL ROOM. Он не влия-
ет на выделенные каналы выхода. Информация о выделении каналов (Soloing Channels)
приведена на стр. 142.
Кнопка CLEAR
Используется для отмены выделения каналов. Информация о выделении каналов
(Soloing Channels) приведена на стр. 142.
42
Chapter 2—Control Surface & Rear Panel
DM2000 Version 2—Owner’s Manual
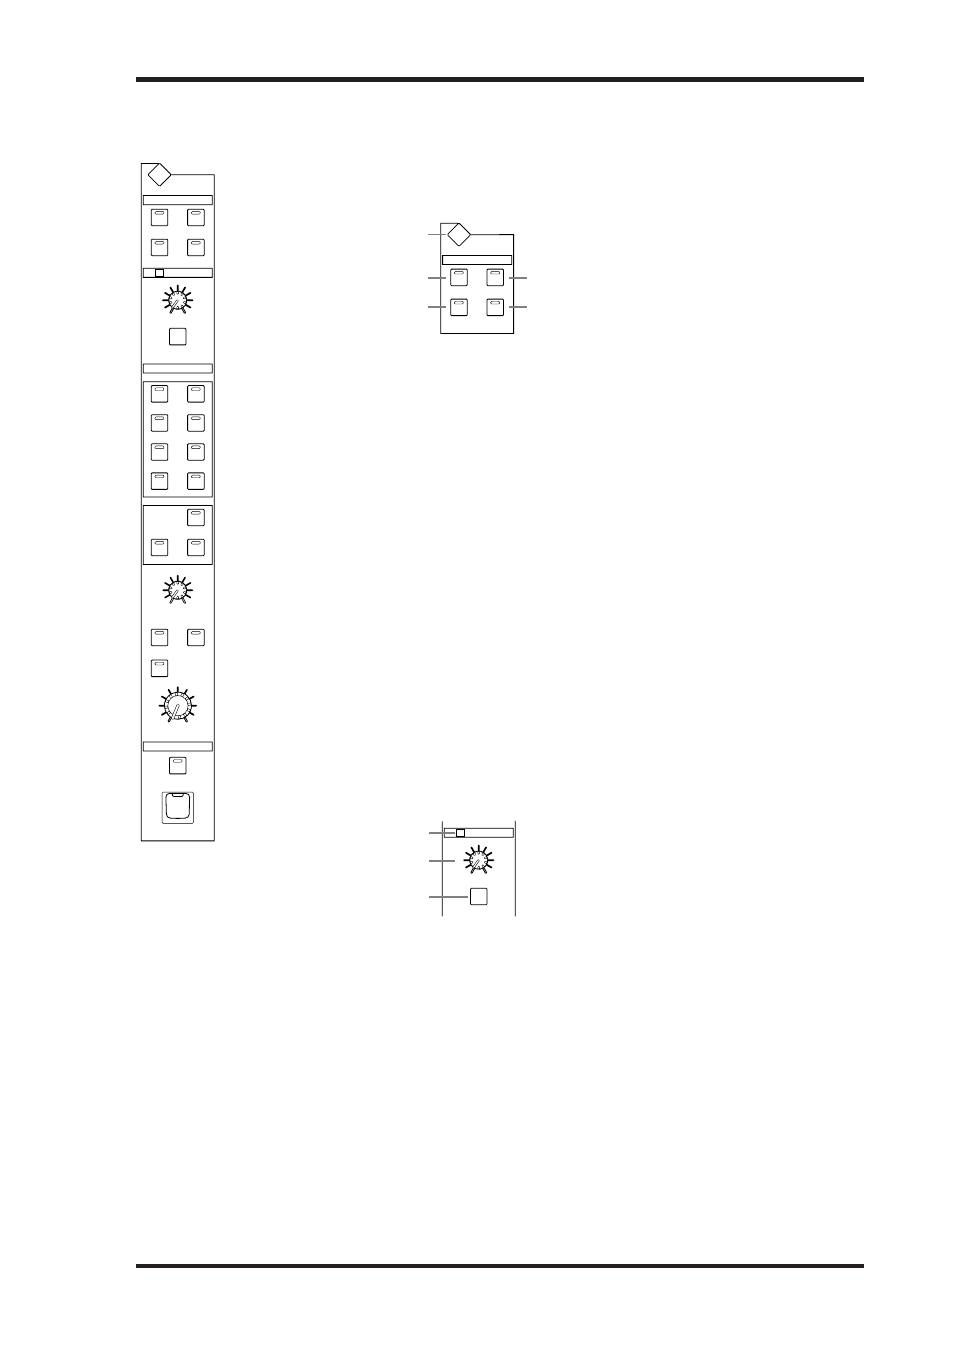
MONITOR Section
The various subsections of the MONITOR section are explained below.
STUDIO
A
MONITOR DISPLAY button
This button is used to select the following pages: Solo Setting, Control Room Setup, Talk-
back Setup, Surround Monitor, Surround Monitor Setup, Surround Monitor Patch, and
Surround Monitor Library. See “Configuring Solo” on page 143, “Control Room Monitor-
ing” on page 158 “Using Talkback & Slate” on page 163, and “Surround Monitoring” on
page 160 respectively for more information.
B
CONTROL ROOM button
This button selects the Control Room Monitor signal as the Studio Monitor signal source.
Its indicator lights up when this source is selected. See “Studio Monitoring” on page 159 for
more information.
C
STEREO button
This button selects the Stereo Out signal as the Studio Monitor signal source. Its indicator
lights up when this source is selected. See “Studio Monitoring” on page 159 for more infor-
mation.
D
AUX 11 button
This button selects Aux Send #11 as the Studio Monitor signal source. Its indicator lights up
when this source is selected. See “Studio Monitoring” on page 159 for more information.
E
AUX 12 button
This button selects Aux Send #12 as the Studio Monitor signal source. Its indicator lights up
when this source is selected. See “Studio Monitoring” on page 159 for more information.
SOLO
A
SOLO indicator
This indicator flashes when one or more Channels are soloed, indicating that the Solo func-
tion is active. See “Soloing Channels” on page 142 for more information.
B
SOLO CONTRAST control
This control is used to set the level balance between soloed Input Channels and the cur-
rently selected CONTROL ROOM source. It has no effect on soloed Output Channels. See
“Soloing Channels” on page 142 for more information.
C
CLEAR button
This button can be used to unsolo all soloed Channels. See “Soloing Channels” on page 142
for more information.
STUDIO
CONTROL
ROOM
STEREO
AUX
11
AUX
12
CONTROL ROOM
SOLO
CLEAR
SOLO CONTRAST
2TR D1
2TR A1
2TR D2
2TR A2
2TR D3
STEREO
ASSIGN
1
ASSIGN
2
ASSIGN
1
ASSIGN
2
DIMMER
SMALL
MONO
SURROUND
MONITOR LEVEL
SLATE
TALKBACK
MONITOR
CONTROL ROOM LEVEL
BUS
TALKBACK
DISPLAY
STEREO
SURROUND
10
0
STUDIO
CONTROL
ROOM
STEREO
AUX
11
AUX
12
MONITOR
DISPLAY
1
2
4
3
5
SOLO
CLEAR
SOLO CONTRAST
1
2
3
42
Chapter 2—Control Surface & Rear Panel
DM2000 Version 2—Owner’s Manual
MONITOR Section
The various subsections of the MONITOR section are explained below.
STUDIO
A
MONITOR DISPLAY button
This button is used to select the following pages: Solo Setting, Control Room Setup, Talk-
back Setup, Surround Monitor, Surround Monitor Setup, Surround Monitor Patch, and
Surround Monitor Library. See “Configuring Solo” on page 143, “Control Room Monitor-
ing” on page 158 “Using Talkback & Slate” on page 163, and “Surround Monitoring” on
page 160 respectively for more information.
B
CONTROL ROOM button
This button selects the Control Room Monitor signal as the Studio Monitor signal source.
Its indicator lights up when this source is selected. See “Studio Monitoring” on page 159 for
more information.
C
STEREO button
This button selects the Stereo Out signal as the Studio Monitor signal source. Its indicator
lights up when this source is selected. See “Studio Monitoring” on page 159 for more infor-
mation.
D
AUX 11 button
This button selects Aux Send #11 as the Studio Monitor signal source. Its indicator lights up
when this source is selected. See “Studio Monitoring” on page 159 for more information.
E
AUX 12 button
This button selects Aux Send #12 as the Studio Monitor signal source. Its indicator lights up
when this source is selected. See “Studio Monitoring” on page 159 for more information.
SOLO
A
SOLO indicator
This indicator flashes when one or more Channels are soloed, indicating that the Solo func-
tion is active. See “Soloing Channels” on page 142 for more information.
B
SOLO CONTRAST control
This control is used to set the level balance between soloed Input Channels and the cur-
rently selected CONTROL ROOM source. It has no effect on soloed Output Channels. See
“Soloing Channels” on page 142 for more information.
C
CLEAR button
This button can be used to unsolo all soloed Channels. See “Soloing Channels” on page 142
for more information.
STUDIO
CONTROL
ROOM
STEREO
AUX
11
AUX
12
CONTROL ROOM
SOLO
CLEAR
SOLO CONTRAST
2TR D1
2TR A1
2TR D2
2TR A2
2TR D3
STEREO
ASSIGN
1
ASSIGN
2
ASSIGN
1
ASSIGN
2
DIMMER
SMALL
MONO
SURROUND
MONITOR LEVEL
SLATE
TALKBACK
MONITOR
CONTROL ROOM LEVEL
BUS
TALKBACK
DISPLAY
STEREO
SURROUND
10
0
STUDIO
CONTROL
ROOM
STEREO
AUX
11
AUX
12
MONITOR
DISPLAY
1
2
4
3
5
SOLO
CLEAR
SOLO CONTRAST
1
2
3