Layer a, Stereo a, Кнопка мастер (master) – Инструкция по эксплуатации Yamaha dm2000v2e1
Страница 34: Кнопки удаленные 1-4 (remote 1–4), Кнопка auto, Кнопка выбор (sel), Кнопка включения (on), Фейдер (fader)
DM2000 Version 2—Owner’s Manual
Панель управления и задняя панель
34
УРОВЕНЬ (LAYER)
34
Chapter 2—Control Surface & Rear Panel
DM2000 Version 2—Owner’s Manual
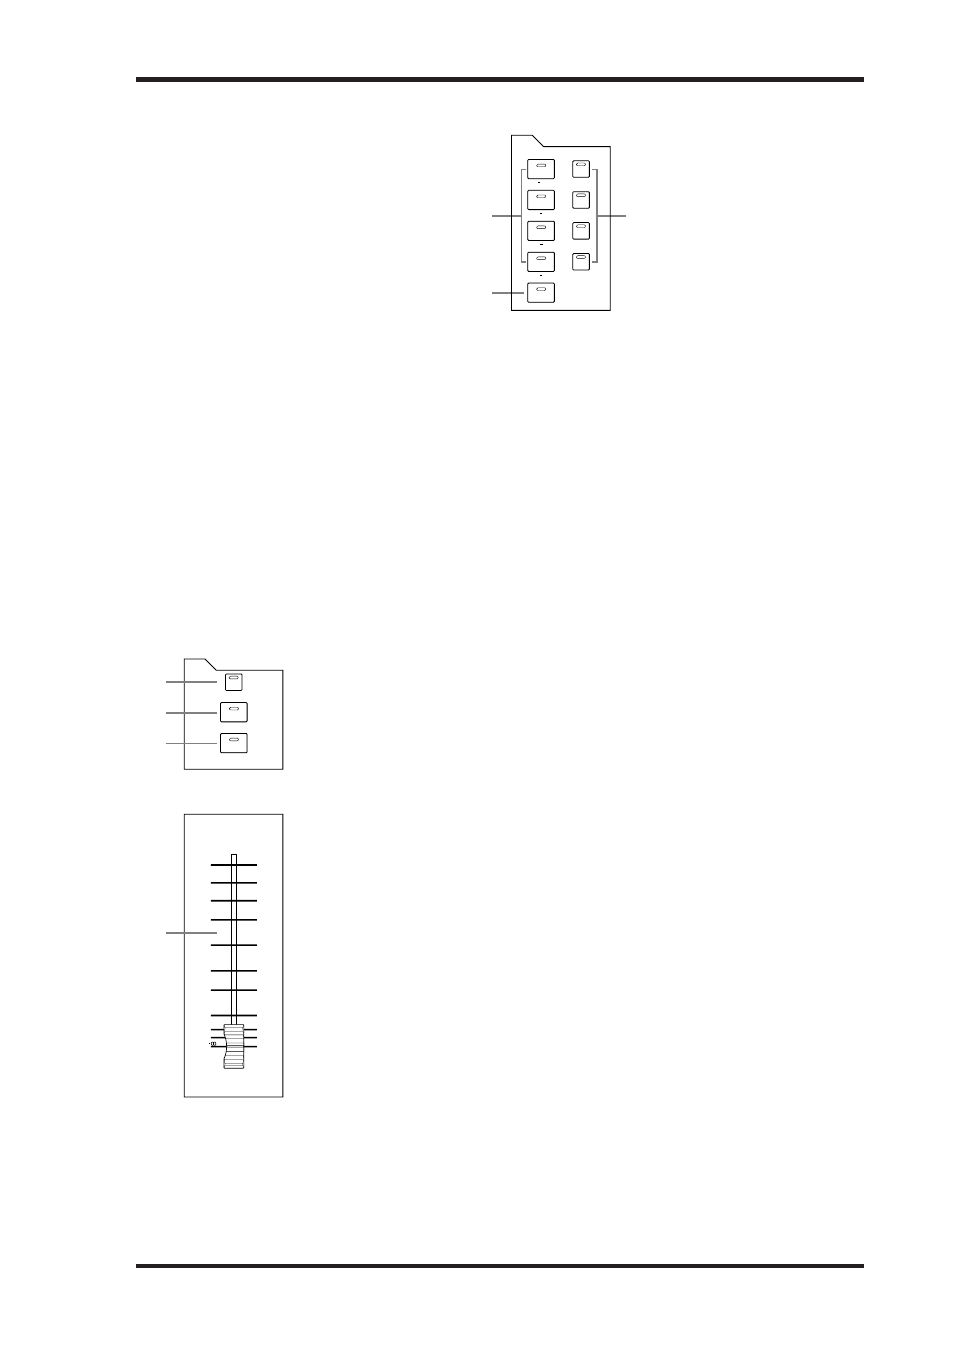
LAYER
A
1–24, 25–48, 49–72 & 73–96 buttons
These buttons select the Input Channel Layers, which determine which Input Channels are
controlled by the channel strips. The LAYER button indicator for the currently selected
Layer lights up. See “Selecting Layers” on page 58 for more information.
B
MASTER button
This button selects the Master Layer, from which the channel strips control Bus Outs, Aux
Sends, and Matrix Sends. Its indicator lights up when the Master Layer is selected. See
“Selecting Layers” on page 58 for more information.
C
REMOTE 1–4 buttons
These buttons select the Remote Layers, which can be used to control external devices,
including DAWs. See “About Remote Layers” on page 253 for more information. The
LAYER button indicator for the currently selected Remote Layer lights up. See “Selecting
Layers” on page 58 for more information.
STEREO
A
AUTO button
This button is used exclusively to set Automix recording and playback for the Ste-
reo Out. Its indicator lights up orange in Record-Ready mode, red while record-
ing, and green during playback. See “Channel Strip [AUTO] Buttons” on page 199
for more information.
B
SEL button
The Stereo Out [SEL] button is used exclusively to select the Stereo Out for editing
with the SELECTED CHANNEL section. Its indicator lights up when the Stereo
Out is selected. Each time it’s pressed, the selection toggles between the Stereo
Out’s left and right channels. See “Selecting Channels” on page 59 for more infor-
mation. It can also be used to add and remove the Stereo Out to and from EQ,
Comp, Fader, and Mute groups.
C
ON button
This button is used exclusively to mute the Stereo Out. Its indicator lights up when
the Stereo Out is on. See “Muting the Stereo Out (ON/OFF)” on page 105 for
more information.
D
Fader
This 100 mm touch-sensitive motorized fader is used exclusively to adjust the level
of the Stereo Out. See “Setting the Stereo Out Level” on page 105 for more infor-
mation. It can be grouped with other Output Channel faders for simultaneous
operation. See “Grouping Output Channel Faders” on page 146 for more infor-
mation. It can also be used to select the Stereo Out, see “Auto Channel Select &
Touch Sense Select” on page 60, or to punch the Stereo Out in and out during
Automix recording. See “Punching In & Out Individual Parameters” on page 207
for more information.
1
3
2
REMOTE
1
REMOTE
2
REMOTE
3
REMOTE
4
LAYER
MASTER
1 24
25 48
49 72
73 96
ON
SEL
STEREO
STEREO
AUTO
70
60
50
40
30
20
15
10
5
0
3
2
1
4
Кнопки 1–24, 25–48, 49–72 и 73–96
Эти кнопки используется для выбора Уровней канала входа, который определяют, какие
каналы входа контролируются данными полосами каналов. Индикатор кнопки выбран-
ного уровня (LAYER) загорается. Информация о выборе уровней приведена на стр. 58.
Кнопка мастер (MASTER)
Это кнопка для выбора уровня Мастер, полосы каналов которого контролируют выходных
шин Bus, шины Aux и шины матрицы. Ее индикатор загорается при выборе уровня Мастер.
Кнопки удаленные 1-4 (REMOTE 1–4)
Эти кнопки – для выбора удаленных Уровней, которые могут использоваться для управ-
ления внешними устройствами. Информация об Удаленных уровнях приведена на стр.
253. Индикатор кнопки уровень выбранного удаленного уровня загорается. Информация
о выборе уровней приведена на стр. 58.
СТЕРЕО
34
Chapter 2—Control Surface & Rear Panel
DM2000 Version 2—Owner’s Manual
LAYER
A
1–24, 25–48, 49–72 & 73–96 buttons
These buttons select the Input Channel Layers, which determine which Input Channels are
controlled by the channel strips. The LAYER button indicator for the currently selected
Layer lights up. See “Selecting Layers” on page 58 for more information.
B
MASTER button
This button selects the Master Layer, from which the channel strips control Bus Outs, Aux
Sends, and Matrix Sends. Its indicator lights up when the Master Layer is selected. See
“Selecting Layers” on page 58 for more information.
C
REMOTE 1–4 buttons
These buttons select the Remote Layers, which can be used to control external devices,
including DAWs. See “About Remote Layers” on page 253 for more information. The
LAYER button indicator for the currently selected Remote Layer lights up. See “Selecting
Layers” on page 58 for more information.
STEREO
A
AUTO button
This button is used exclusively to set Automix recording and playback for the Ste-
reo Out. Its indicator lights up orange in Record-Ready mode, red while record-
ing, and green during playback. See “Channel Strip [AUTO] Buttons” on page 199
for more information.
B
SEL button
The Stereo Out [SEL] button is used exclusively to select the Stereo Out for editing
with the SELECTED CHANNEL section. Its indicator lights up when the Stereo
Out is selected. Each time it’s pressed, the selection toggles between the Stereo
Out’s left and right channels. See “Selecting Channels” on page 59 for more infor-
mation. It can also be used to add and remove the Stereo Out to and from EQ,
Comp, Fader, and Mute groups.
C
ON button
This button is used exclusively to mute the Stereo Out. Its indicator lights up when
the Stereo Out is on. See “Muting the Stereo Out (ON/OFF)” on page 105 for
more information.
D
Fader
This 100 mm touch-sensitive motorized fader is used exclusively to adjust the level
of the Stereo Out. See “Setting the Stereo Out Level” on page 105 for more infor-
mation. It can be grouped with other Output Channel faders for simultaneous
operation. See “Grouping Output Channel Faders” on page 146 for more infor-
mation. It can also be used to select the Stereo Out, see “Auto Channel Select &
Touch Sense Select” on page 60, or to punch the Stereo Out in and out during
Automix recording. See “Punching In & Out Individual Parameters” on page 207
for more information.
1
3
2
REMOTE
1
REMOTE
2
REMOTE
3
REMOTE
4
LAYER
MASTER
1 24
25 48
49 72
73 96
ON
SEL
STEREO
STEREO
AUTO
70
60
50
40
30
20
15
10
5
0
3
2
1
4
Кнопка AUTO
Используется для настройки записи автосведения и воспроизведения ис-
ключительно для Stereo Outs. Их индикаторы загораются оранжевым в гото-
вом к записи Record-Ready режиме, красным во время записи и зеленым
во время воспроизведения. Информация о кнопках AUTO полосы каналов
приведена на стр. 199.
Кнопка выбор (SEL)
Кнопка выбора Stereo Outs SEL используется исключительно для выбора
Stereo Outs для редактирования блока вЫБРАННЫЙ КАНАЛ. Ее индикатор
загорается при выборе Stereo Outs. Ее нажатие каждый раз переключает
правый и левый каналы Stereo Outs. Она может также быть использована
для добавления и Stereo Outs в группы эквалайзера, компрессора, фейдера
и Бесшумную и удаления из них.
Кнопка включения (ON)
Используется исключительно для заглушения Stereo Outs. Ее индикатор
загорается при включении Stereo Outs. Информация о кнопках заглушении
Stereo Outs (ON/OFF) приведена на стр. 105.
Фейдер (Fader)
Этот 100-мм сенсорный фейдер, оснащенный приводом, используется для
установки уровня стереовыходов. Информация об установке уровня стерео-
выходов приведена на стр. 105. Он может группироваться с другими фейде-
рами канала выхода для одновременного функционирования. Информация
о группировке фейдеров канала выхода приведена на стр. 146. Он также
может использоваться для выбора Stereo Outs, информация об автомати-
ческом выборе и сенсорном выборе каналов приведена на стр. 60, а также
для (де)активации Stereo Outs во время записи автосведения. Информация
о (де)активации индивидуальных параметров приведена на стр. 207.