Other functions – Инструкция по эксплуатации Olympus VN-5500
Страница 6
9
EN
• If you press the STOP (
4) button
during a menu setup operation,
the recorder will stop and apply the
items that were set to that point.
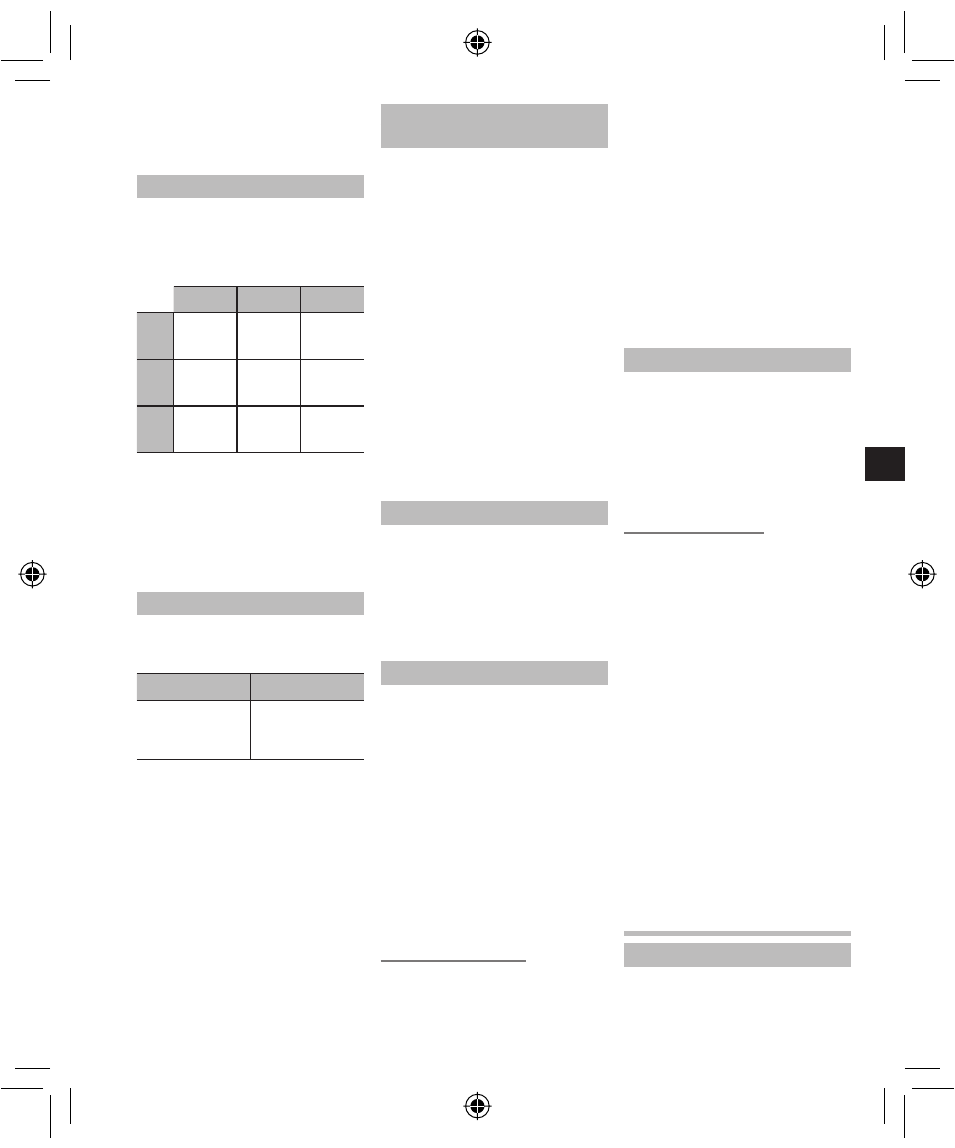
Recording Modes [HQ SP LP]
The recording mode can be chosen
f r o m [ H Q ] ( h i g h q u a l i t y s o u n d
recording), [SP] (standard recording)
and [LP] (long-term recording).
In Menu mode selection...[HQ], [SP], [LP]
VN-7500
VN-6500
VN-5500
HQ
Approx.
81 h.
Approx.
40 h.
30 min.
Approx.
20 h.
5 min.
SP
Approx.
215 h.
50 min.
Approx.
107 h.
55 min.
Approx.
53 h.
40 min.
LP
Approx.
1208 h.
30 min.
Approx.
604 h.
15 min.
Approx.
300 h.
30 min.
1 Current recording mode (Fig. i)
• The recording time shown above
is for one continuous f ile. The
available recording time may be
shorter than specifi ed if several fi les
are recorded. (Use the remaining
time and recorded time only as
references.)
Microphone Sensitivity [
h
]
Microphone sensitivity is adjustable to
meet your recording needs.
In Menu mode selection...[
g], [i]
g
i
High-sensitivity
mode that records
sounds in all
directions
Low-sensitivity
mode suited for
dictation
• To ensure successful recording, make
a test recording to select appropriate
microphone sensitivit y b efore
recording.
• If you select [
g], we recommend
setting the recording mode to [HQ]
to best take advantage of the higher
sensitivity.
• If you select [
g ], background
noise may be high depending on the
recording conditions.
1 Current microphone sensitivity
(Fig. o)
Using the Variable Control
Voice Actuator [VCVA]
When the microphone senses that
sound has reached a preset volume,
the built-in Variable Control Voice
Ac tuator ( VC VA) star ts recording
automatically, and stops it when the
volume drops.
Par ticularly helpful for ex tended
r e c o r d i n g , t h e V C VA n o t o n l y
conserves memor y by turning of f
recording during silent periods, but
also makes playback more efficient
and convenient.
In Menu mode selection...[On], [OFF]
• During recording, press the + and
– buttons to adjust the VCVA level
in 15 levels.
• The record/play indicator light is lit
during recording. When the recorder
is in Standby mode, the Record/Play
indicator light fl ashes and [VCVA]
fl ashes on the display.
1 VCVA indicator (Fig. ;)
System Sounds [BEEP] (Fig. a)
Informs a button operation or a wrong
operation of the recorder by sound.
System sounds may be turned off.
In Menu mode selection...[On], [OFF]
• If the alarm playback function has
been set, the alarm will sound at the
scheduled time even if the system
sounds are disabled.
Alarm Playback Function [
k]
You can use the alarm p layback
function to sound the alarm tone
for 5 minutes at the scheduled time.
Within this 5 minutes, pressing any
button other than the HOLD switch
starts the recorder to playback the
preselected file.
In Menu mode selection...[SET], [On],
[OFF]
After selecting [SET], press the PLAY
(
`) button to set the time.
• With the alarm playback function, only
one fi le can be played back. Select a
fi le for the function before setting the
time.
1 Alarm indicator (Fig. s)
To cancel an alarm playback:
For [
k] in the menu mode, select [OFF] and
press the
PLAY (
`) button.
• Regardless of the selected folder,
once the alarm playback is set,
it operates every day unless the
setting is canceled.
• To view the current setting, select
[On], and press the PLAY (
`) button.
• The alarm tone stops automatically
if no button is pressed within 5
minutes after the alarm starts. The
fi le is not played back in this case.
• If the recorder has no recorded fi le
in the selected folder, the alarm
playback function is not available.
• Alarm playback occurs every day
unless it is set to [OFF].
Timer Recording [TIMER]
You c an sche dule for automatic
recording, specifying the start time
and end time of recording. When the
timer-controlled recording completes,
the setting is released.
In Menu mode selection...[SET], [On], [OFF]
After selecting [SET], press the PLAY
(
`) button to set the time.
1 Timer indicator (Fig. d)
To cancel the timer setting:
For the timer in the menu mode, select [
OFF],
and press the
PLAY (
`) button.
• To view the current setting, select
[O n] , and press the PL AY (
` )
button.
• With this func tion, you can set
only the start and the end time of
recording. The current settings of
the recording mode, microphone
sensitivit y, VC VA and folder are
applied for the settings before you
set timer-controlled recording.
• The setting exceeding the remaining
recording time is not allowed.
• You can record at any time even if it
is not within the specifi ed recording
duration. However, if that makes
t h e r e m a i n i n g r e co r d i n g t i m e
insuffi
cient for the timer-controlled
recording, the recording will not
complete.
• If any operation is ongoing, the
t i m e r- c o n t r o l l e d r e c o r d i n g i s
overridden.
Other Functions
Moving File between Folders
You can move files recorded in folders
[
F], [G], [H] and [I] to other folders.
The moved file is added to the end of
the destination folder.