Инструкция по эксплуатации ELNA 3210
Страница 34
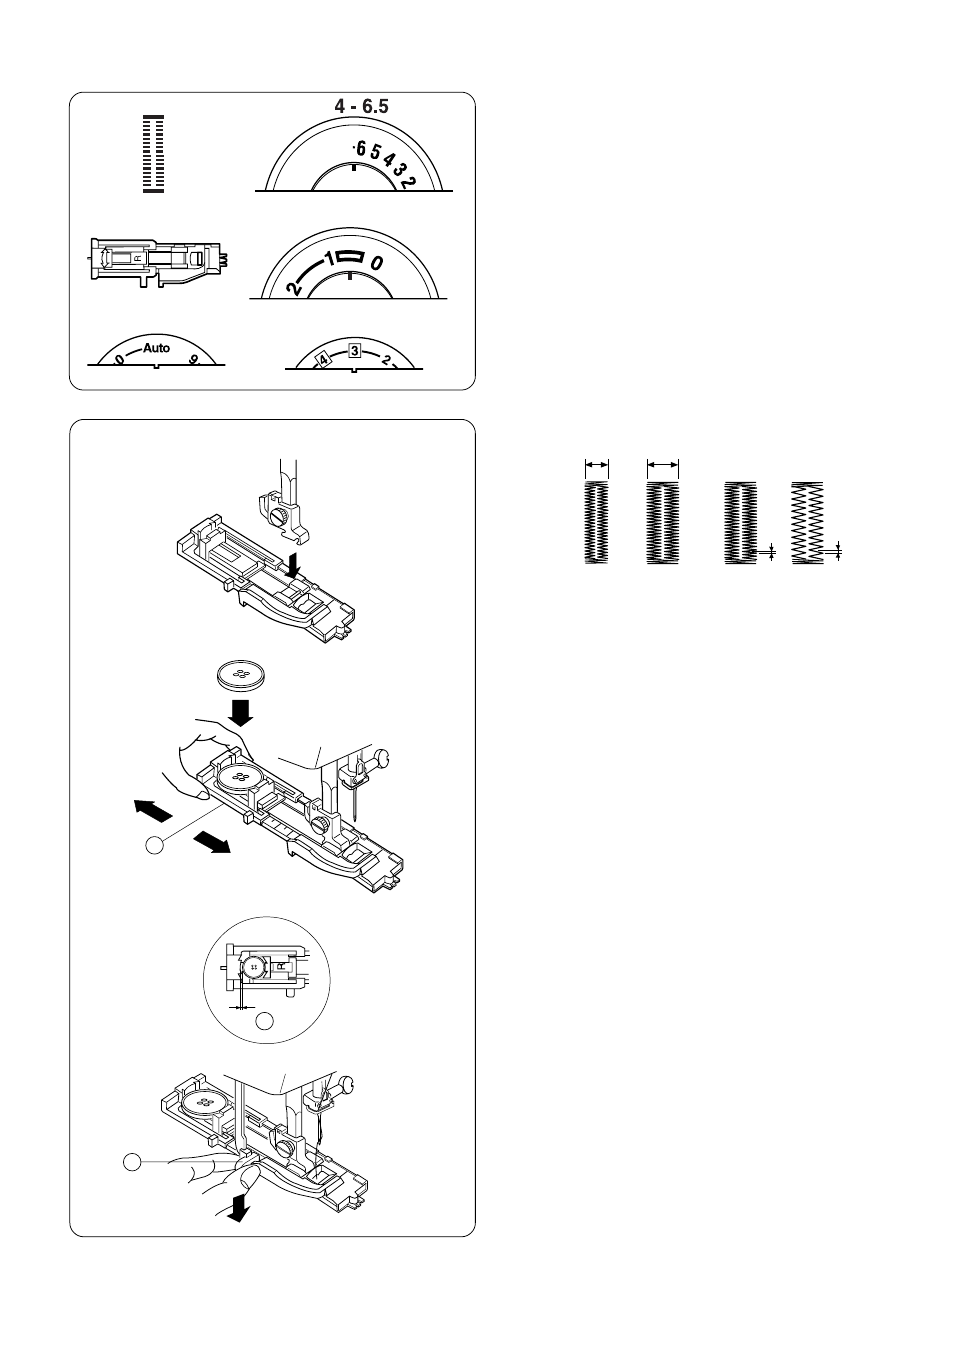
Выполнение автоматической петли
При создании петли следует использовать
прокладочный материал, такого же типа как и
основная ткань. Прокладочная ткань особенно
важна при создании петель на тканях стреч.
Всегда делайте пробную петлю на
дополнительной ткани для получения лучшего
результата на основном изделии.
•
Для легких петель используйте ширину
зигзага 4,
а для более основательных петель 6.5.
•
Для легких тканей делайте петлю более
плотной, установив длину строчки 0.5. Для
тяжелых тканей делайте петлю менее
плотной, установив длину строчки 1. Не
выходите за размеры нарисованных петель.
1.
Установите лапку для автоматической петли,
проверьте, чтобы держатель пуговицы был
сзади.
2.
Оттяните держатель пуговицы
q
назад и
поместите туда пуговицу. Подтолкните
держатель назад к пуговице и плотно ее
прижмите.
ПРИМЕЧАНИЕ: Машина автоматически
определяет размер петли по помещенной в лапку
пуговице. Держатель в лапке принимает
пуговицы до 2,5 см в диаметре. При
использовании нестандартной или очень толстой
пуговицы, которая может не пройти сквозь
петлю, приоткройте держатель пуговицы и
увеличьте размер петли
w
.
3.
Опустите рычаг подъема лапки
e
вниз.
33
2
3
1
1
2
3
Automatic Buttonhole
All buttonholes should use interfacing that is the same
weight as the fabric. Interfacing is especially important
when sewing on stretch fabrics. Always make a test
buttonhole on extra fabric before sewing on your fabric.
•
Use a narrow stith width (4) for a finer buttonhole, a
wider stitch width(6.5) for a more substantial
buttonhole.
•
Use a shorter stitch length (0.5) for finer fabrics, a
longer stitch length (1) for heavier fabrics. Remain
within the range of the buttonhole illustration.
4 6.5
0.5 1
1. Attach the automatic buttonhole foot. Make sure the
button opening is at the back of the foot when it is
attached.
2 - 4
0.5 - 1
2. Pull open the buttonholder to the back and place
the button in it. Push the buttonholder together tightly
around the button.
NOTE: Placing the button in the automatic buttonhole
foot automatically sets the size of the buttonhole. The
button holder on the foot adjusts for a button up to 2.5 cm
(1”) in diameter. If you are using a novelty button or
extremely thick button that does not fit through the test
buttonhole, pull the buttonholder open to lengthen the
buttonhole .
3. Pull the buttonhole lever down as far as it will go.
33
33
2
3
1
1
2
3
Automatic Buttonhole
All buttonholes should use interfacing that is the same
weight as the fabric. Interfacing is especially important
when sewing on stretch fabrics. Always make a test
buttonhole on extra fabric before sewing on your fabric.
•
Use a narrow stith width (4) for a finer buttonhole, a
wider stitch width(6.5) for a more substantial
buttonhole.
•
Use a shorter stitch length (0.5) for finer fabrics, a
longer stitch length (1) for heavier fabrics. Remain
within the range of the buttonhole illustration.
4 6.5
0.5 1
1. Attach the automatic buttonhole foot. Make sure the
button opening is at the back of the foot when it is
attached.
2 - 4
0.5 - 1
2. Pull open the buttonholder to the back and place
the button in it. Push the buttonholder together tightly
around the button.
NOTE: Placing the button in the automatic buttonhole
foot automatically sets the size of the buttonhole. The
button holder on the foot adjusts for a button up to 2.5 cm
(1”) in diameter. If you are using a novelty button or
extremely thick button that does not fit through the test
buttonhole, pull the buttonholder open to lengthen the
buttonhole .
3. Pull the buttonhole lever down as far as it will go.