The rpx400 and recording – Инструкция по эксплуатации DigiTech rpx400
Страница 34
11. В ряде настроек выберите REAMP, используя регулятор USB 1-2 Source. После этого программа
записи будет пропускать звук через модуль эффектов RPx400.
12. Нажмите на напольный переключатель
PLAY. Вернитесь в Режим Выступления, удерживая
одновременно переключатели
Up и AMP A/B до появления UPDOWN на дисплее. После этого вы
можете прослушивать имеющиеся пресеты, пока не найдете нужный вам. Затем необходимо
вернуть напольный переключатель в режим Записи.
13. Нажмите на напольный переключатель
STOP/UNDO для перемотки на начало дорожки.
14. Нажмите на напольный переключатель
RECORD. После этого стерео-дорожка обработанной
гитары запишется в текущий проект.
15. Для остановки записи нажмите на напольный переключатель
STOP/UNDO.
Для повторной обработки сигнала необходимо:
1. Нажать переключатели
UP и Amp A-B до появления на дисплее REC FS для перехода
процессора в режим записи.
2. Выберите
File>New в меню Pro Tracks. Откроется окно New Project File.
3. Выберите шаблон проекта
Normal-Hands Free Session.
4. Выберите ряд настроек (
Setup) на матрице RPx400.
5. Выберите DRYGTR регулятором
USB 1-2 Source, регулятор USB 3-4 Source необходимо поставить
на OFF.
6. Нажмите на напольный переключатель
RECORD. На дисплее появится RECORD. Начнется
запись, а звуковые дорожки будут автоматически помещены в текущую сессию Pro Tracks.
7. Нажмите на напольный переключатель
STOP/UNDO для завершения записи. Дисплей RPx400
показывает STOP, и запись останавливается. Нажмите еще раз на Stop для перемотки
дорожки на начало.
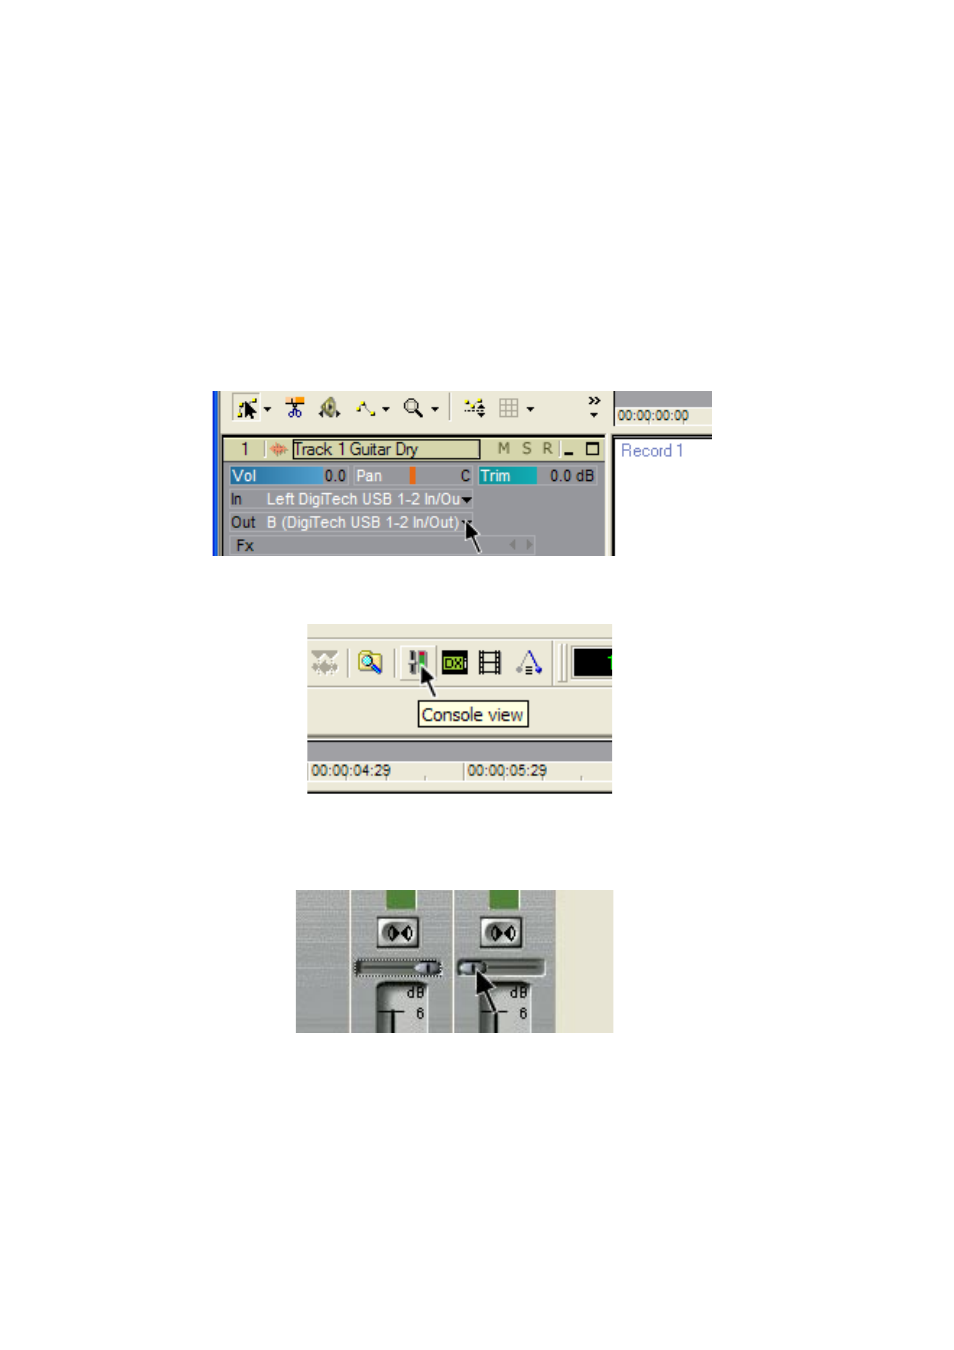
8. В разделе
Out записанной дорожки выберите B (DigiTech USB 1-2 In/Out).
To re-amp a track back through the RPx400, follow these steps:
1. Put the RPx400 footswitches in Recorder mode by pressing and holding the UP and AMP A/B
footswitches until the display reads
rec fs
.
2. From the Pro Tracks menu bar, select File>New. The New Project File window will open.
3. Select the Normal-Hands Free Session project template.
4. Select the SETUP row in the RPx400’s matrix.
5. Use the USB 1-2 Source knob to select
drygtr
and USB3-4 Source to
off
.
6. Press the RECORD footswitch. The RPx400’s display reads
record
. A track is automatically
inserted in the current session of the Pro Tracks software and recording on this track begins.
7. To stop recording, press the STOP/UNDO footswitch. The RPx400’s display reads
stop
and
recording will stop. Press Stop again to rewind to the beginning of the track.
8. In the Out box of the track you just recorded, select B(Digitech USB 1-2 In/Out).
9. In the tool bar press the Console View button to see the mixing console.
10. Pan the B - Mains Output hard left and the A - Mains Output hard right.
11. Select the SETUP row again and use the USB 1-2 Source knob to select
REAMP
. This configures
the recording software to playback audio through the RPx400’s effects processing.
12. Press the PLAY footswitch. Put the footswitches back to Performance mode by pressing and holding
the UP and AMP A/B footswitches simultaneously until the display reads
updown
. You can nowo
audition presets until you find one you like . Once you have done so, return to Recorder footswitch
mode.
13. Press the STOP/UNDO footswitch twice to rewind to the beginning of the track.
14. Press the RECORD footswitch and the recorder will now insert and record a stereo track of
processed guitar.
15. To stop recording, press the STOP/UNDO footswitch.
33
The RPx400 and Recording
9. В панели инструментов нажмите кнопку
Console View для вывода на экран микшерской
консоли.
To re-amp a track back through the RPx400, follow these steps:
1. Put the RPx400 footswitches in Recorder mode by pressing and holding the UP and AMP A/B
footswitches until the display reads
rec fs
.
2. From the Pro Tracks menu bar, select File>New. The New Project File window will open.
3. Select the Normal-Hands Free Session project template.
4. Select the SETUP row in the RPx400’s matrix.
5. Use the USB 1-2 Source knob to select
drygtr
and USB3-4 Source to
off
.
6. Press the RECORD footswitch. The RPx400’s display reads
record
. A track is automatically
inserted in the current session of the Pro Tracks software and recording on this track begins.
7. To stop recording, press the STOP/UNDO footswitch. The RPx400’s display reads
stop
and
recording will stop. Press Stop again to rewind to the beginning of the track.
8. In the Out box of the track you just recorded, select B(Digitech USB 1-2 In/Out).
9. In the tool bar press the Console View button to see the mixing console.
10. Pan the B - Mains Output hard left and the A - Mains Output hard right.
11. Select the SETUP row again and use the USB 1-2 Source knob to select
REAMP
. This configures
the recording software to playback audio through the RPx400’s effects processing.
12. Press the PLAY footswitch. Put the footswitches back to Performance mode by pressing and holding
the UP and AMP A/B footswitches simultaneously until the display reads
updown
. You can nowo
audition presets until you find one you like . Once you have done so, return to Recorder footswitch
mode.
13. Press the STOP/UNDO footswitch twice to rewind to the beginning of the track.
14. Press the RECORD footswitch and the recorder will now insert and record a stereo track of
processed guitar.
15. To stop recording, press the STOP/UNDO footswitch.
33
The RPx400 and Recording
10. Разведите выходной сигнал по панораме (
B – Mains Output до конца налево, A – Mains Output
до конца направо)
To re-amp a track back through the RPx400, follow these steps:
1. Put the RPx400 footswitches in Recorder mode by pressing and holding the UP and AMP A/B
footswitches until the display reads
rec fs
.
2. From the Pro Tracks menu bar, select File>New. The New Project File window will open.
3. Select the Normal-Hands Free Session project template.
4. Select the SETUP row in the RPx400’s matrix.
5. Use the USB 1-2 Source knob to select
drygtr
and USB3-4 Source to
off
.
6. Press the RECORD footswitch. The RPx400’s display reads
record
. A track is automatically
inserted in the current session of the Pro Tracks software and recording on this track begins.
7. To stop recording, press the STOP/UNDO footswitch. The RPx400’s display reads
stop
and
recording will stop. Press Stop again to rewind to the beginning of the track.
8. In the Out box of the track you just recorded, select B(Digitech USB 1-2 In/Out).
9. In the tool bar press the Console View button to see the mixing console.
10. Pan the B - Mains Output hard left and the A - Mains Output hard right.
11. Select the SETUP row again and use the USB 1-2 Source knob to select
REAMP
. This configures
the recording software to playback audio through the RPx400’s effects processing.
12. Press the PLAY footswitch. Put the footswitches back to Performance mode by pressing and holding
the UP and AMP A/B footswitches simultaneously until the display reads
updown
. You can nowo
audition presets until you find one you like . Once you have done so, return to Recorder footswitch
mode.
13. Press the STOP/UNDO footswitch twice to rewind to the beginning of the track.
14. Press the RECORD footswitch and the recorder will now insert and record a stereo track of
processed guitar.
15. To stop recording, press the STOP/UNDO footswitch.
33
The RPx400 and Recording