Установка master id, Настройка режима связи, Setting the master id – Инструкция по эксплуатации Yamaha sp2060
Страница 39: Setting link mode
Предисловие
Введение
в SP2060
Регуляторы
и подключения
Работа
с панелью
Настройки
сети
Справочники
SP2060 Руководство пользователя
39
Настройки сети
6.
Для подтверждения настройки нажмите
на клавишу [YES].
Настройка будет применена, и устройство вернется к
странице IP Address.
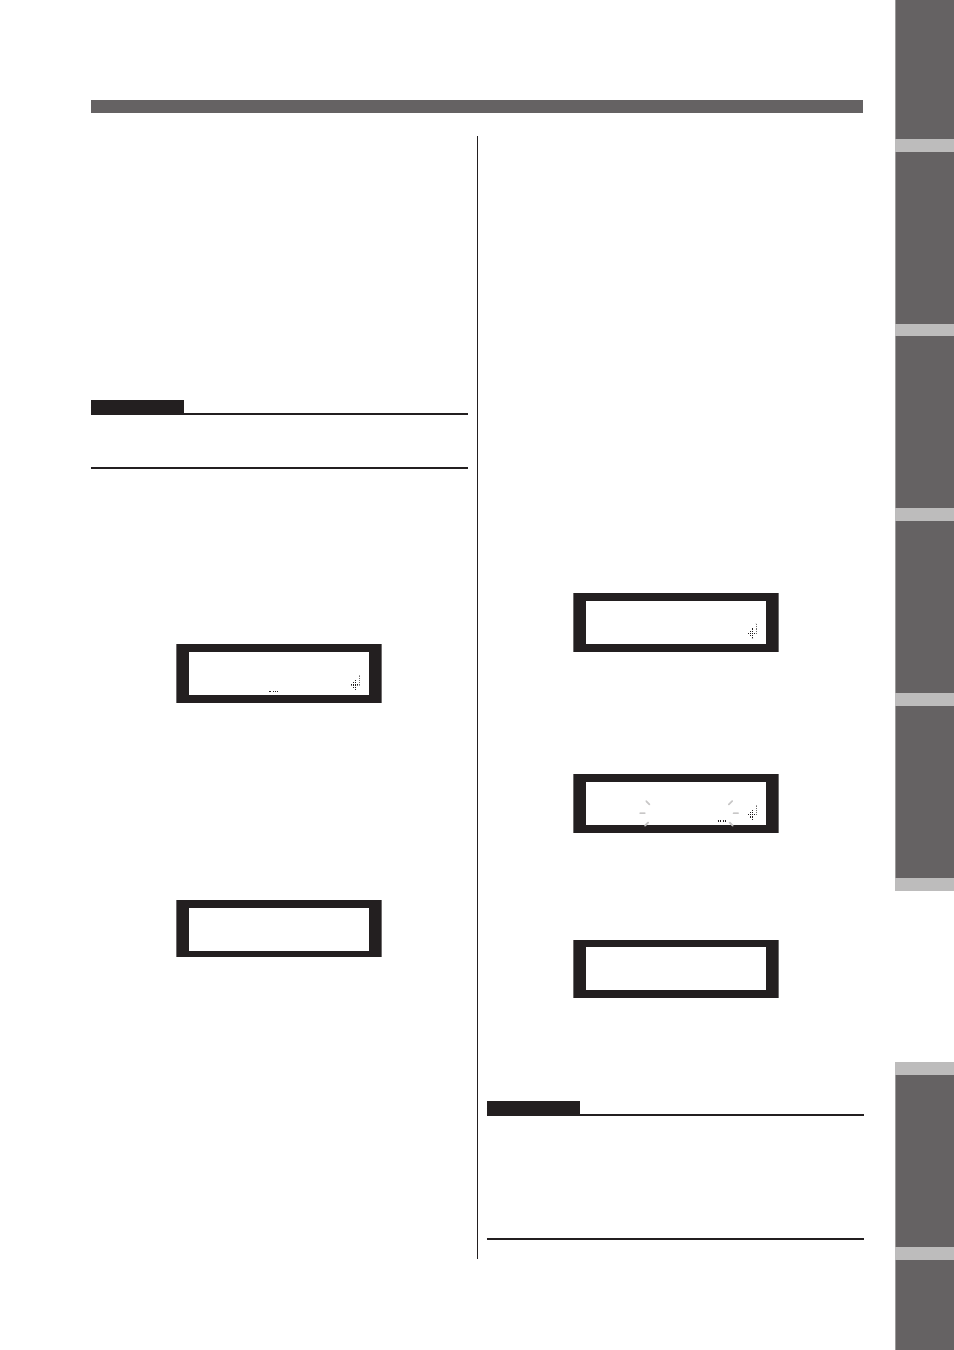
Установка Master ID
Устройства SP2060, назначенные в группе приборов в ка-
честве ведомых, подчиняются мастер SP2060, расположен-
ному в этой же группе. Для настройки мастер ID на ведомых
устройствах SP2060, выполните следующие шаги: В качест-
ве значении параметра Мастер ID используйте 4-ый октет IP
адреса мастер устройства.
ПРИМЕЧАНИЕ:
Этот параметр может быть установлен в диапазоне от 2 до
253.
1.
Нажмите на клавишу [UTILITY] для выбо-
ра экрана Utility (Утилиты).
На экране будут выведены наиболее часто используе-
мые утилиты.
2.
Нажмите повторно на клавишу [UTILITY],
[NEXT] или [BACK] до тех пор, пока не
появится страница Master ID (Мастер ID).
Network Settings
SP2060 Owner’s Manual
Fore
w
or
d
Netw
ork Settings
Ref
erences
P
anel Operation
Intr
oduction
to the SP2060
The Contr
ols
and Connector
s
40
6.
To confirm the setting, press the [YES] key.
The setting is applied and the unit returns to the IP Ad-
dress page.
Setting the Master ID
The SP2060 units that are assigned as slaves in a device
group follow the master SP2060 in the same group via com-
munication. Follow the steps below to set the master ID on
the slave SP2060 units. Use the 4th octet of the IP address of
the master unit as the Master ID parameter value.
1.
Press the [UTILITY] key to select the Utility
display.
The most recently used Utility display will appear.
2.
Press the [UTILITY], [NEXT] or [BACK] key
repeatedly until the Master ID page appears.
3.
Press the [▲INC]/[▼DEC] keys to set the
value to the same number as the 4th octet of
the master SP2060 IP address.
4.
Press the [NEXT] key to move the cursor to
the icon, then press the [YES] key.
A confirmation message will appear.
5.
To confirm the setting, press the [YES] key.
The setting is applied and the unit returns to the Master
ID page.
To cancel the operation and return to the original set-
ting, press the [NO] key, instead of the [YES] key.
Setting Link Mode
Follow the steps below to select 100Base-TX or 10Base-T for
the [NETWORK] connector speed.
100Base-TX
The [NETWORK] connector basically operates as 100Base-
TX, but automatically switches to 10Base-T if the network
environment is not compatible with 100Base-TX.
10Base-T
The [NETWORK] connector is compatible with 10Base-T
operation.
1.
Press the [UTILITY] key to select the Utility
display.
The most recently used Utility display will appear.
2.
Press the [UTILITY], [NEXT] or [BACK] key
repeatedly until the Link Mode page appears.
3.
Press the [▲INC] key to select 100Base-TX,
and the [▼DEC] key to select 10Base-T.
When you change the setting, the parameter setting
flashes.
4.
Press the [NEXT] key to move the cursor to
the icon, then press the [YES] key.
A confirmation message will appear.
5.
To confirm the setting, press the [YES] key.
The unit reflects the edit and returns to the Link Mode
page.
NOTE
This parameter can be set from 2 through 253.
MASTER ID
253
MASTER ID
ARE YOU SURE?
NOTE
Depending on the specifications of the connected network
devices (such as a switching hub, router, etc.), changing Link
Mode may cause the SP2060 to be unable to reconnect to the
network. In this case, turn the power to the SP2060 off and then
on. The SP2060 will reconnect to the network.
LINK MODE
100BASE-TX
LINK MODE
10BASE-T
LINK MODE
ARE YOU SURE?
3.
Для установки значения на тот же номер,
что и четвертый октет IP адреса мастер
устройства SP2060, используйте клави-
ши [
/
INC]/[
\
DEC]
4.
Нажмите на клавишу [NEXT] для пере-
мещения курсора на эту иконку и затем
нажмите на клавишу [YES].
Появится подтверждающее сообщение.
Network Settings
SP2060 Owner’s Manual
Fore
w
or
d
Netw
ork Settings
Ref
erences
P
anel Operation
Intr
oduction
to the SP2060
The Contr
ols
and Connector
s
40
6.
To confirm the setting, press the [YES] key.
The setting is applied and the unit returns to the IP Ad-
dress page.
Setting the Master ID
The SP2060 units that are assigned as slaves in a device
group follow the master SP2060 in the same group via com-
munication. Follow the steps below to set the master ID on
the slave SP2060 units. Use the 4th octet of the IP address of
the master unit as the Master ID parameter value.
1.
Press the [UTILITY] key to select the Utility
display.
The most recently used Utility display will appear.
2.
Press the [UTILITY], [NEXT] or [BACK] key
repeatedly until the Master ID page appears.
3.
Press the [▲INC]/[▼DEC] keys to set the
value to the same number as the 4th octet of
the master SP2060 IP address.
4.
Press the [NEXT] key to move the cursor to
the icon, then press the [YES] key.
A confirmation message will appear.
5.
To confirm the setting, press the [YES] key.
The setting is applied and the unit returns to the Master
ID page.
To cancel the operation and return to the original set-
ting, press the [NO] key, instead of the [YES] key.
Setting Link Mode
Follow the steps below to select 100Base-TX or 10Base-T for
the [NETWORK] connector speed.
100Base-TX
The [NETWORK] connector basically operates as 100Base-
TX, but automatically switches to 10Base-T if the network
environment is not compatible with 100Base-TX.
10Base-T
The [NETWORK] connector is compatible with 10Base-T
operation.
1.
Press the [UTILITY] key to select the Utility
display.
The most recently used Utility display will appear.
2.
Press the [UTILITY], [NEXT] or [BACK] key
repeatedly until the Link Mode page appears.
3.
Press the [▲INC] key to select 100Base-TX,
and the [▼DEC] key to select 10Base-T.
When you change the setting, the parameter setting
flashes.
4.
Press the [NEXT] key to move the cursor to
the icon, then press the [YES] key.
A confirmation message will appear.
5.
To confirm the setting, press the [YES] key.
The unit reflects the edit and returns to the Link Mode
page.
NOTE
This parameter can be set from 2 through 253.
MASTER ID
253
MASTER ID
ARE YOU SURE?
NOTE
Depending on the specifications of the connected network
devices (such as a switching hub, router, etc.), changing Link
Mode may cause the SP2060 to be unable to reconnect to the
network. In this case, turn the power to the SP2060 off and then
on. The SP2060 will reconnect to the network.
LINK MODE
100BASE-TX
LINK MODE
10BASE-T
LINK MODE
ARE YOU SURE?
5.
Для подтверждения настройки нажмите
на клавишу [YES].
Настройка будет применена, и устройство вернется к
странице Master IP.
Для отмены операции и возврата к оригинальной
настройке, нажмите на клавишу [NO] вместо клавиши
[YES].
Настройка режима связи
Выполните следующие шаги для выбора карты 100Base-TX
или 10Base-T для разъема [NETWORK].
100Base-TX
Разъем NETWORK в основном работает как 100Base¬TX, но
в том случае, если сетевое оборудование не совместимо с
100Base-TX, автоматически переключается на 10Base-T.
10Base-T
Разъем [NETWORK] совместим с 10Base-T
1.
Нажмите на клавишу [UTILITY] для выбо-
ра экрана Utility (Утилиты).
На экране будут выведены наиболее часто используе-
мые утилиты.
2.
Нажмите повторно на клавишу [UTILITY],
[NEXT] или [BACK] до тех пор, пока не
появится страница Link Mode (Режим
связи).
Network Settings
SP2060 Owner’s Manual
Fore
w
or
d
Netw
ork Settings
Ref
erences
P
anel Operation
Intr
oduction
to the SP2060
The Contr
ols
and Connector
s
40
6.
To confirm the setting, press the [YES] key.
The setting is applied and the unit returns to the IP Ad-
dress page.
Setting the Master ID
The SP2060 units that are assigned as slaves in a device
group follow the master SP2060 in the same group via com-
munication. Follow the steps below to set the master ID on
the slave SP2060 units. Use the 4th octet of the IP address of
the master unit as the Master ID parameter value.
1.
Press the [UTILITY] key to select the Utility
display.
The most recently used Utility display will appear.
2.
Press the [UTILITY], [NEXT] or [BACK] key
repeatedly until the Master ID page appears.
3.
Press the [▲INC]/[▼DEC] keys to set the
value to the same number as the 4th octet of
the master SP2060 IP address.
4.
Press the [NEXT] key to move the cursor to
the icon, then press the [YES] key.
A confirmation message will appear.
5.
To confirm the setting, press the [YES] key.
The setting is applied and the unit returns to the Master
ID page.
To cancel the operation and return to the original set-
ting, press the [NO] key, instead of the [YES] key.
Setting Link Mode
Follow the steps below to select 100Base-TX or 10Base-T for
the [NETWORK] connector speed.
100Base-TX
The [NETWORK] connector basically operates as 100Base-
TX, but automatically switches to 10Base-T if the network
environment is not compatible with 100Base-TX.
10Base-T
The [NETWORK] connector is compatible with 10Base-T
operation.
1.
Press the [UTILITY] key to select the Utility
display.
The most recently used Utility display will appear.
2.
Press the [UTILITY], [NEXT] or [BACK] key
repeatedly until the Link Mode page appears.
3.
Press the [▲INC] key to select 100Base-TX,
and the [▼DEC] key to select 10Base-T.
When you change the setting, the parameter setting
flashes.
4.
Press the [NEXT] key to move the cursor to
the icon, then press the [YES] key.
A confirmation message will appear.
5.
To confirm the setting, press the [YES] key.
The unit reflects the edit and returns to the Link Mode
page.
NOTE
This parameter can be set from 2 through 253.
MASTER ID
253
MASTER ID
ARE YOU SURE?
NOTE
Depending on the specifications of the connected network
devices (such as a switching hub, router, etc.), changing Link
Mode may cause the SP2060 to be unable to reconnect to the
network. In this case, turn the power to the SP2060 off and then
on. The SP2060 will reconnect to the network.
LINK MODE
100BASE-TX
LINK MODE
10BASE-T
LINK MODE
ARE YOU SURE?
3.
Нажмите на клавишу [
/
INC] для выбора
100Base-TX, и на клавишу [
\
DEC] для
выбора 10Base-T
При изменении настройки, настройка параметра
мигает.
Network Settings
SP2060 Owner’s Manual
Fore
w
or
d
Netw
ork Settings
Ref
erences
P
anel Operation
Intr
oduction
to the SP2060
The Contr
ols
and Connector
s
40
6.
To confirm the setting, press the [YES] key.
The setting is applied and the unit returns to the IP Ad-
dress page.
Setting the Master ID
The SP2060 units that are assigned as slaves in a device
group follow the master SP2060 in the same group via com-
munication. Follow the steps below to set the master ID on
the slave SP2060 units. Use the 4th octet of the IP address of
the master unit as the Master ID parameter value.
1.
Press the [UTILITY] key to select the Utility
display.
The most recently used Utility display will appear.
2.
Press the [UTILITY], [NEXT] or [BACK] key
repeatedly until the Master ID page appears.
3.
Press the [▲INC]/[▼DEC] keys to set the
value to the same number as the 4th octet of
the master SP2060 IP address.
4.
Press the [NEXT] key to move the cursor to
the icon, then press the [YES] key.
A confirmation message will appear.
5.
To confirm the setting, press the [YES] key.
The setting is applied and the unit returns to the Master
ID page.
To cancel the operation and return to the original set-
ting, press the [NO] key, instead of the [YES] key.
Setting Link Mode
Follow the steps below to select 100Base-TX or 10Base-T for
the [NETWORK] connector speed.
100Base-TX
The [NETWORK] connector basically operates as 100Base-
TX, but automatically switches to 10Base-T if the network
environment is not compatible with 100Base-TX.
10Base-T
The [NETWORK] connector is compatible with 10Base-T
operation.
1.
Press the [UTILITY] key to select the Utility
display.
The most recently used Utility display will appear.
2.
Press the [UTILITY], [NEXT] or [BACK] key
repeatedly until the Link Mode page appears.
3.
Press the [▲INC] key to select 100Base-TX,
and the [▼DEC] key to select 10Base-T.
When you change the setting, the parameter setting
flashes.
4.
Press the [NEXT] key to move the cursor to
the icon, then press the [YES] key.
A confirmation message will appear.
5.
To confirm the setting, press the [YES] key.
The unit reflects the edit and returns to the Link Mode
page.
NOTE
This parameter can be set from 2 through 253.
MASTER ID
253
MASTER ID
ARE YOU SURE?
NOTE
Depending on the specifications of the connected network
devices (such as a switching hub, router, etc.), changing Link
Mode may cause the SP2060 to be unable to reconnect to the
network. In this case, turn the power to the SP2060 off and then
on. The SP2060 will reconnect to the network.
LINK MODE
100BASE-TX
LINK MODE
10BASE-T
LINK MODE
ARE YOU SURE?
4.
Нажмите на клавишу [NEXT] для переме-
щения курсора на иконку и затем нажми-
те на клавишу [YES].
Появится подтверждающее сообщение.
Network Settings
SP2060 Owner’s Manual
Fore
w
or
d
Netw
ork Settings
Ref
erences
P
anel Operation
Intr
oduction
to the SP2060
The Contr
ols
and Connector
s
40
6.
To confirm the setting, press the [YES] key.
The setting is applied and the unit returns to the IP Ad-
dress page.
Setting the Master ID
The SP2060 units that are assigned as slaves in a device
group follow the master SP2060 in the same group via com-
munication. Follow the steps below to set the master ID on
the slave SP2060 units. Use the 4th octet of the IP address of
the master unit as the Master ID parameter value.
1.
Press the [UTILITY] key to select the Utility
display.
The most recently used Utility display will appear.
2.
Press the [UTILITY], [NEXT] or [BACK] key
repeatedly until the Master ID page appears.
3.
Press the [▲INC]/[▼DEC] keys to set the
value to the same number as the 4th octet of
the master SP2060 IP address.
4.
Press the [NEXT] key to move the cursor to
the icon, then press the [YES] key.
A confirmation message will appear.
5.
To confirm the setting, press the [YES] key.
The setting is applied and the unit returns to the Master
ID page.
To cancel the operation and return to the original set-
ting, press the [NO] key, instead of the [YES] key.
Setting Link Mode
Follow the steps below to select 100Base-TX or 10Base-T for
the [NETWORK] connector speed.
100Base-TX
The [NETWORK] connector basically operates as 100Base-
TX, but automatically switches to 10Base-T if the network
environment is not compatible with 100Base-TX.
10Base-T
The [NETWORK] connector is compatible with 10Base-T
operation.
1.
Press the [UTILITY] key to select the Utility
display.
The most recently used Utility display will appear.
2.
Press the [UTILITY], [NEXT] or [BACK] key
repeatedly until the Link Mode page appears.
3.
Press the [▲INC] key to select 100Base-TX,
and the [▼DEC] key to select 10Base-T.
When you change the setting, the parameter setting
flashes.
4.
Press the [NEXT] key to move the cursor to
the icon, then press the [YES] key.
A confirmation message will appear.
5.
To confirm the setting, press the [YES] key.
The unit reflects the edit and returns to the Link Mode
page.
NOTE
This parameter can be set from 2 through 253.
MASTER ID
253
MASTER ID
ARE YOU SURE?
NOTE
Depending on the specifications of the connected network
devices (such as a switching hub, router, etc.), changing Link
Mode may cause the SP2060 to be unable to reconnect to the
network. In this case, turn the power to the SP2060 off and then
on. The SP2060 will reconnect to the network.
LINK MODE
100BASE-TX
LINK MODE
10BASE-T
LINK MODE
ARE YOU SURE?
5.
Для подтверждения настройки нажмите
на клавишу [YES].
На устройстве будет отражено сделанное редактиро-
вание, и оно вернется к дисплею Link Mode.
ПРИМЕЧАНИЕ:
В зависимости от спецификаций подключенных сетевых ус-
тройств (например коммутирующий концентратор, маршру-
тизатор и так алее), изменение Link Mode может сделать не-
возможным переподключение Sp2060 к сети. В этом случае,
выключите и вновь включите питание SP2060. SP2060 будет
переподключен к сети.