In models with " covered terminal block, Schema – Инструкция по эксплуатации Beko CE 56100
Страница 38
Внимание! Текст в этом документе был распознан автоматически. Для просмотра оригинальной страницы Вы можете воспользоваться режимом "Оригинал".
In models with " covered terminal block"
In mix models a cable supplied with a plug with your oven (H05 V V-F 3G 1.5 mm2)
If a cable without a plug is provided together with your oven
Take care to connect as below:
Brown cable = L (Live)
Blue cable = N (Neutral)
Green/Yellow cable = E (Earth )
If your oven is supplied without supply cord use schema-l to
choose supply cord and use schema-ll for installation of cord.
The cable length should be max 2m long for isolation safety.
pO-O
>
0-0
■-Oc-O
-¡^0^0
Loo
—OlhO
AC 220/230/240 V
-0-0
—
0-0
—o«o
-p^O-^O
L
q
-O
—OlhO
3N AC 380/400/415 V
Open the terminal block cover (1).
Connect the supply cable according to wiring diagram on the rear cover.
«•"Assembly the terminal block cover to its place.
«•" The mains cable must pass through the cable clamp (2).
«•" Fix the supply cable to main body with two screw via cable tightener (2).
Your oven is suitable for single and three phase connection.
«•" The mains cable should be routed away from the appliance and in particular
ventilation slots, the vent outlet and should not be obstructed when pushed
in to position between the appliance and the wall and/or cabinet.
-7-0-0
L
q
-O
—o«o
-¡^0^0
Loo
—OlhO
2N AC 380/400/415 V
Schema
Connection Type
Monophase
Three phase
with Neutral
Two phase
with Neutral
Voltage
220/230/ 240 V
380/400/415 V
380/400/415 V
Supply cord type
(max 2m long)
3x4.0 mm2
H05 V V-F
5x2,5 mm2
H05 VV-F
4x2,5 mm2
H05 VV-F
©
Schema I
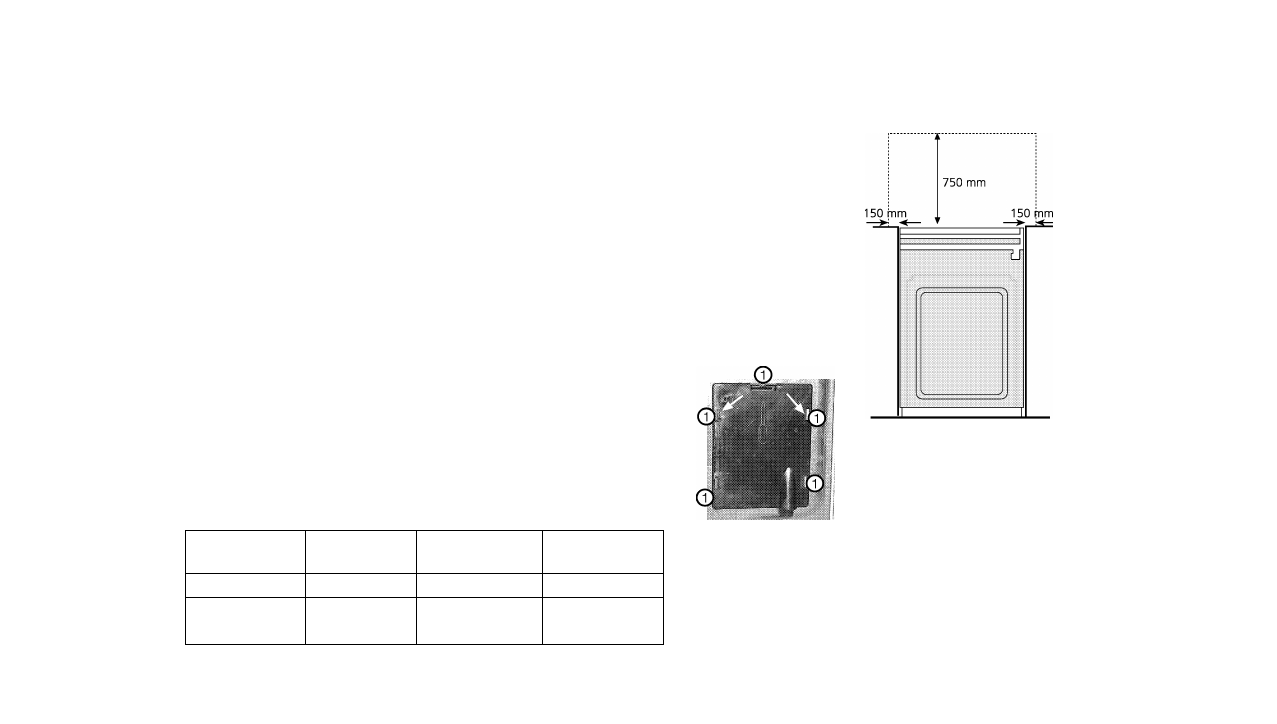
Location for models having
any top gas burner
Adjacent side walls above the appliance
must not be nearer to the cooker than
150 mm and should be of heat resistant
material. Leave at least 750 mm learance
above the hotplates. The appliance
should be located on a level surface.
The two front feet can be adjusted as
required. To ensure that your appliance
is standing level adjust the two front
feet by turning clockwise or
counterclockwise until the product is in
firm contact with the floor.