Panorama mode, Anti-shake mode – Инструкция по эксплуатации UFO DS 8650
Страница 47
EN-47
[
] Panorama Mode
This mode is designed to make it easier to take a series of shots then stitch them together with software
to make a single photo. You can capture a photographic subject that won’t fit into a single frame, such
as a landscape, and stitch it together later with a program such as Cool 360 or Photoshop application.
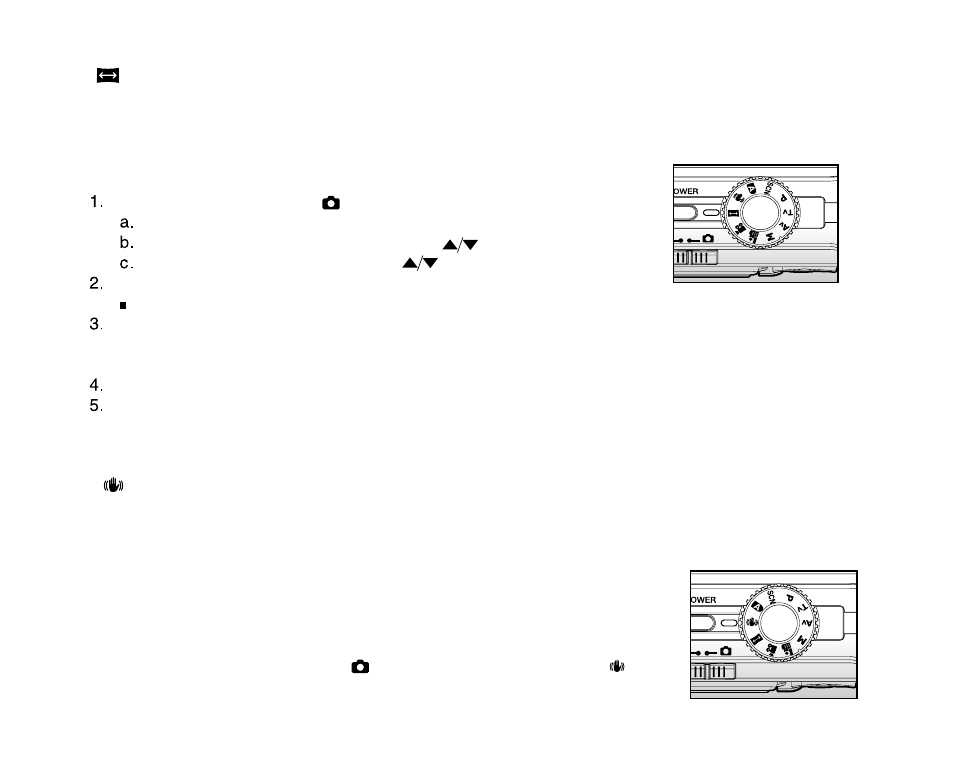
1. Slide the mode switch to [
] and set the mode dial to [
].
2. Shoot the first image.
J
The next image appears beside the previous image.
3. Orient the camera so that the second frame overlaps a small
portion of the photographic subject of the first image and press
the shutter button to capture the next image.
4. Follow the same steps to capture subsequent images in the
sequence.
5. Finish the sequence by pressing the
SET button after the last
image has been recorded.
[
] Anti-Shake Mode
The anti-shake function works according to the luminance of the target object. This function uses special
image data processing for getting high sensitivity of CCD. High sensitivity can use higher shutter speed
compared with normal mode, so it reduces influence of hand shaking. From the resolution point of view,
it becomes worse than normal mode. Maximum size of image becomes 5 mega pixels (2560 x 1920).
1. Slide the mode switch to [
] and set the mode dial to [ ].
2. Compose the image, press the shutter button down halfway,
then press it down fully.
37
И
н
с
тр
у
к
ц
и
я
п
о
л
ь
з
о
в
а
те
л
я
>
>
ПРИМЕЧАНИЕ
Панорамный режим
Этот режим специально разработан для получения серии снимков, которые потом могут быть
обработаны и сшиты в один кадр при помощи програмного обеспечения. Таким образом можно снять
объект, который не вмещается в обычный кадр, как например Cool360 либо Photoshop.
Переключатель режимов в полож.
Нажмите кнопку Меню
Выберите [Место действия/Scene Mode] кнопками а потом Установить
Выберите [Панорама/Panorama] кнопками а потом Установить.
Снимите первый кадр
Следующий кадр появится за предыдущим.
Направте камеру таким образом, чтобы следующий кадр пересекался небольшой частью
объектов съемки с первым кадром. Нажмите кнопку спуска для получения очередного снимка.
Повторяйте анналогичные действия для получения необходимого количества снимков
Закончите последовательность нажатием кнопки Меню или переключите на другой режим сразу
после записи последнего снимка.
Режим видео
Этот режим разрешает Вам записывать видеофрагменты с разрешением 320 х 240 640 х 480 пикселей.
Вы можете выбрать записывать со звуком или нет.
Переключатель режимов в полож.
Скомпонуйте изображение пользуясь кнопками зума.
Нажмите кнопку спуска
Начнется запись видеофрагмента.
После повторного нажатия кнопки спуска
запись прекратится
Продолжительность записи зависит от
емкости носителя и объектов съемки.
Функция зума не работает во время записи видео
Во время записи видеофрагмента пользоваться вспышкой невозможно.
Доступные пунеты меню Съемки: Размер, Качество, Цвет
Доступные пунеты меню Функций: Аудио, Яркость ЖКД и цифровой зум
EN-47
[
] Panorama Mode
This mode is designed to make it easier to take a series of shots then stitch them together with software
to make a single photo. You can capture a photographic subject that won’t fit into a single frame, such
as a landscape, and stitch it together later with a program such as Cool 360 or Photoshop application.
1. Slide the mode switch to [
] and set the mode dial to [
].
2. Shoot the first image.
J
The next image appears beside the previous image.
3. Orient the camera so that the second frame overlaps a small
portion of the photographic subject of the first image and press
the shutter button to capture the next image.
4. Follow the same steps to capture subsequent images in the
sequence.
5. Finish the sequence by pressing the
SET button after the last
image has been recorded.
[
] Anti-Shake Mode
The anti-shake function works according to the luminance of the target object. This function uses special
image data processing for getting high sensitivity of CCD. High sensitivity can use higher shutter speed
compared with normal mode, so it reduces influence of hand shaking. From the resolution point of view,
it becomes worse than normal mode. Maximum size of image becomes 5 mega pixels (2560 x 1920).
1. Slide the mode switch to [
] and set the mode dial to [ ].
2. Compose the image, press the shutter button down halfway,
then press it down fully.
Режим устранения дрожания рук
EN-47
[
] Panorama Mode
This mode is designed to make it easier to take a series of shots then stitch them together with software
to make a single photo. You can capture a photographic subject that won’t fit into a single frame, such
as a landscape, and stitch it together later with a program such as Cool 360 or Photoshop application.
1. Slide the mode switch to [
] and set the mode dial to [
].
2. Shoot the first image.
J
The next image appears beside the previous image.
3. Orient the camera so that the second frame overlaps a small
portion of the photographic subject of the first image and press
the shutter button to capture the next image.
4. Follow the same steps to capture subsequent images in the
sequence.
5. Finish the sequence by pressing the
SET button after the last
image has been recorded.
[
] Anti-Shake Mode
The anti-shake function works according to the luminance of the target object. This function uses special
image data processing for getting high sensitivity of CCD. High sensitivity can use higher shutter speed
compared with normal mode, so it reduces influence of hand shaking. From the resolution point of view,
it becomes worse than normal mode. Maximum size of image becomes 5 mega pixels (2560 x 1920).
1. Slide the mode switch to [
] and set the mode dial to [ ].
2. Compose the image, press the shutter button down halfway,
then press it down fully.
Этот режим работает в зависимости от степени яркости выбранного объекта. Эта функция
использует специальный процесс обработки изображений для высокой чувствительности CCD
сенсора. Высокая чувствительность использует большую скорость выдержки по сравнению с
обычным режимом, таким образом предотвращается дрожание рук.
С точки зрения разрешения, качество извображения хуже чем в обычном режиме.
Максимальный размер фотографии 5,0 Мп (2560 х 1920).
1. Установите переключатель режимов и шкалу режимов в положение.
2. Компонуйте изображения, нажимайте кнопку спуска частично а потом полностью.
EN-47
[
] Panorama Mode
This mode is designed to make it easier to take a series of shots then stitch them together with software
to make a single photo. You can capture a photographic subject that won’t fit into a single frame, such
as a landscape, and stitch it together later with a program such as Cool 360 or Photoshop application.
1. Slide the mode switch to [
] and set the mode dial to [
].
2. Shoot the first image.
J
The next image appears beside the previous image.
3. Orient the camera so that the second frame overlaps a small
portion of the photographic subject of the first image and press
the shutter button to capture the next image.
4. Follow the same steps to capture subsequent images in the
sequence.
5. Finish the sequence by pressing the
SET button after the last
image has been recorded.
[
] Anti-Shake Mode
The anti-shake function works according to the luminance of the target object. This function uses special
image data processing for getting high sensitivity of CCD. High sensitivity can use higher shutter speed
compared with normal mode, so it reduces influence of hand shaking. From the resolution point of view,
it becomes worse than normal mode. Maximum size of image becomes 5 mega pixels (2560 x 1920).
1. Slide the mode switch to [
] and set the mode dial to [ ].
2. Compose the image, press the shutter button down halfway,
then press it down fully.
37
И
н
с
тр
у
к
ц
и
я
п
о
л
ь
з
о
в
а
те
л
я
>
>
ПРИМЕЧАНИЕ
Панорамный режим
Этот режим специально разработан для получения серии снимков, которые потом могут быть
обработаны и сшиты в один кадр при помощи програмного обеспечения. Таким образом можно снять
объект, который не вмещается в обычный кадр, как например Cool360 либо Photoshop.
Переключатель режимов в полож.
Нажмите кнопку Меню
Выберите [Место действия/Scene Mode] кнопками а потом Установить
Выберите [Панорама/Panorama] кнопками а потом Установить.
Снимите первый кадр
Следующий кадр появится за предыдущим.
Направте камеру таким образом, чтобы следующий кадр пересекался небольшой частью
объектов съемки с первым кадром. Нажмите кнопку спуска для получения очередного снимка.
Повторяйте анналогичные действия для получения необходимого количества снимков
Закончите последовательность нажатием кнопки Меню или переключите на другой режим сразу
после записи последнего снимка.
Режим видео
Этот режим разрешает Вам записывать видеофрагменты с разрешением 320 х 240 640 х 480 пикселей.
Вы можете выбрать записывать со звуком или нет.
Переключатель режимов в полож.
Скомпонуйте изображение пользуясь кнопками зума.
Нажмите кнопку спуска
Начнется запись видеофрагмента.
После повторного нажатия кнопки спуска
запись прекратится
Продолжительность записи зависит от
емкости носителя и объектов съемки.
Функция зума не работает во время записи видео
Во время записи видеофрагмента пользоваться вспышкой невозможно.
Доступные пунеты меню Съемки: Размер, Качество, Цвет
Доступные пунеты меню Функций: Аудио, Яркость ЖКД и цифровой зум
EN-47
[
] Panorama Mode
This mode is designed to make it easier to take a series of shots then stitch them together with software
to make a single photo. You can capture a photographic subject that won’t fit into a single frame, such
as a landscape, and stitch it together later with a program such as Cool 360 or Photoshop application.
1. Slide the mode switch to [
] and set the mode dial to [
].
2. Shoot the first image.
J
The next image appears beside the previous image.
3. Orient the camera so that the second frame overlaps a small
portion of the photographic subject of the first image and press
the shutter button to capture the next image.
4. Follow the same steps to capture subsequent images in the
sequence.
5. Finish the sequence by pressing the
SET button after the last
image has been recorded.
[
] Anti-Shake Mode
The anti-shake function works according to the luminance of the target object. This function uses special
image data processing for getting high sensitivity of CCD. High sensitivity can use higher shutter speed
compared with normal mode, so it reduces influence of hand shaking. From the resolution point of view,
it becomes worse than normal mode. Maximum size of image becomes 5 mega pixels (2560 x 1920).
1. Slide the mode switch to [
] and set the mode dial to [ ].
2. Compose the image, press the shutter button down halfway,
then press it down fully.
EN-47
[
] Panorama Mode
This mode is designed to make it easier to take a series of shots then stitch them together with software
to make a single photo. You can capture a photographic subject that won’t fit into a single frame, such
as a landscape, and stitch it together later with a program such as Cool 360 or Photoshop application.
1. Slide the mode switch to [ ] and set the mode dial to [ ].
2. Shoot the first image.
J
The next image appears beside the previous image.
3. Orient the camera so that the second frame overlaps a small
portion of the photographic subject of the first image and press
the shutter button to capture the next image.
4. Follow the same steps to capture subsequent images in the
sequence.
5. Finish the sequence by pressing the
SET button after the last
image has been recorded.
[
] Anti-Shake Mode
The anti-shake function works according to the luminance of the target object. This function uses special
image data processing for getting high sensitivity of CCD. High sensitivity can use higher shutter speed
compared with normal mode, so it reduces influence of hand shaking. From the resolution point of view,
it becomes worse than normal mode. Maximum size of image becomes 5 mega pixels (2560 x 1920).
1. Slide the mode switch to [ ] and set the mode dial to [ ].
2. Compose the image, press the shutter button down halfway,
then press it down fully.