Установка таймера, Setting the self-timer – Инструкция по эксплуатации UFO DS 8650
Страница 38
EN-38
The self-timer setting is automatically cancelled after an image is captured.
Use of the [
2s] or [
10s] self-timer setting is effective in preventing motion-blur that can
result when the shutter button is pressed at long exposure times. Use a tripod for best results.
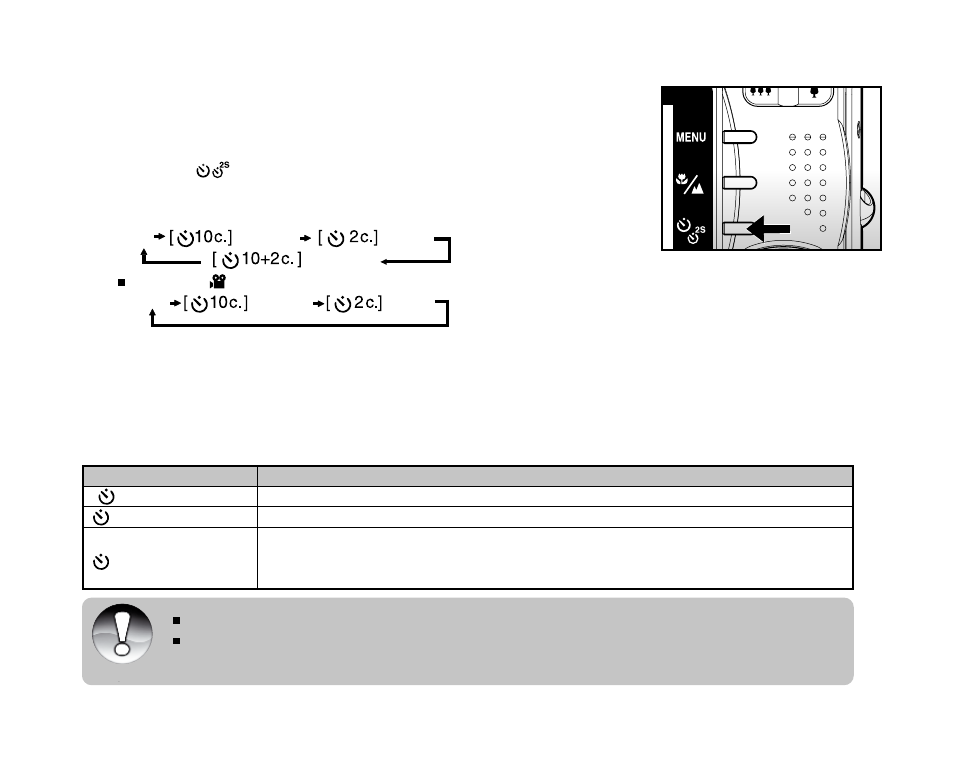
Setting the Self-timer
This setting allows images to be captured with the self-timer.
1. Slide the mode switch to [
]
and set the mode dial to one of the
photography modes.
2. Toggle the
button to select the setting.
Each press of the button moves the icon one step through
the sequence and displays it on the screen.
For [Single] capture mode.
OFF [
10s] 10 sec. [
2s ] 2 sec.
[
10+2s ] 10+2 sec.
For [ ]
, [ ], [Continuous] and [AEB] capture modes.
OFF [
10s ] 10 sec. [
2s ] 2 sec.
3. Compose the image, press the shutter button down halfway, then press it down fully.
The self-timer LED flashes and the image will be captured after the preset time has elapsed.
The countdown is displayed on the LCD monitor.
To cancel the self-timer during operation, press the
SET button.
The table below will help you choose the appropriate self-timer mode:
Self-timer mode
Description
[
10s] 10 sec.
The image is captured about 10 seconds after the shutter button is pressed.
[
2s]
2 sec.
The image is captured about 2 seconds after the shutter button is pressed.
[
10+2s]10+2 sec.
The first image is captured about 10 seconds after the shutter button is
pressed, and then the second image is captured 2 seconds later. The 10+2
mode is convenient when capturing group images in succession.
EN-38
The self-timer setting is automatically cancelled after an image is captured.
Use of the [
2s] or [
10s] self-timer setting is effective in preventing motion-blur that can
result when the shutter button is pressed at long exposure times. Use a tripod for best results.
Setting the Self-timer
This setting allows images to be captured with the self-timer.
1. Slide the mode switch to [
]
and set the mode dial to one of the
photography modes.
2. Toggle the
button to select the setting.
Each press of the button moves the icon one step through
the sequence and displays it on the screen.
For [Single] capture mode.
OFF [
10s] 10 sec. [
2s ] 2 sec.
[
10+2s ] 10+2 sec.
For [ ]
, [ ], [Continuous] and [AEB] capture modes.
OFF [
10s ] 10 sec. [
2s ] 2 sec.
3. Compose the image, press the shutter button down halfway, then press it down fully.
The self-timer LED flashes and the image will be captured after the preset time has elapsed.
The countdown is displayed on the LCD monitor.
To cancel the self-timer during operation, press the
SET button.
The table below will help you choose the appropriate self-timer mode:
Self-timer mode
Description
[
10s] 10 sec.
The image is captured about 10 seconds after the shutter button is pressed.
[
2s]
2 sec.
The image is captured about 2 seconds after the shutter button is pressed.
[
10+2s]10+2 sec.
The first image is captured about 10 seconds after the shutter button is
pressed, and then the second image is captured 2 seconds later. The 10+2
mode is convenient when capturing group images in succession.
Установка таймера
Эта функция разрешает делать снимки с помощью таймера.
Установите переключатель режимов и шкалу режимов в положение любого
фоторежима.
Нажимайте чтобы выбрать нужный режим. Каждое нажатие кнопки
изменяет настройки таймера на один шаг в последовательности. При этом
изменяется пометка на экране.
1.
2.
33
И
н
с
тр
у
к
ц
и
я
п
о
л
ь
з
о
в
а
те
л
я
>
>
Установки таймера
Эта функция позволяет делать снимки с использованием таймера.
Переключатель режимов в полож. или
Нажимайте что-бы выбрать нужный режим.
Фоторежим
ВЫКЛ.
Видеорежим
ВЫКЛ.
Скомпонуйте снимок, Нажмите кнопку спуска наполовину а потом полностью.
Индикатор таймера начинает мигать, и после окончания установленого времени
камера делает снимок.
Таймер активируется и на на ЖКД отображается обратный отсчет времени.
Для отмены активированного таймера, полунажмите кнопку спуска.
Нижеследующая таблица поможет вам избрать нужен режим автоспуска:
Режим автоспуска
Описание
Камера делает снимок приблизительно через 10 секунд после нажатия
кнопки спуска.
Камера делает снимок приблизительно через 2 секунды после нажатия
кнопки спуска.
Камера делает первый снимок приблизительно через 10
секунд после нажатия кнопки спуска, а второй - приблизительно через 2
секунды. Это удобно для снятия групповых фотографий.
Скомпонуйте снимок, нажмите кнопку спуска на половину, а потом до упору.
Индикатор автоспуска начинает мигать и после окончания установленного времени камера делает снимок.
На ЖК дисплее отображается обратный отчет времени.
Чтобы отменить активированный автоспуск, нажмите кнопку установить.
Ниже следующая таблица поможет Вам избрать нужный режим автоспуска.
3.
Камера делает снимок приблизительно через 10 секунд после нажатия
Камера делает снимок приблизительно через 2 секунды после нажатия
Камера делает первый снимок приблизительно через 10
секунд после нажатия кнопки спуска, а второй - приблизительно через 2
секунды. Это удобно для снятия групповых фотографий.
Режим автоспука
Описание
сек.
сек.
сек.
Примечание
Параметры автоспуска автоматически отменяются после создания снимка.
Использование режима может превести к размыванию изображения при нажатии
кнопки для больших значений выдержки. Применяйте штатив с этим режимом.
с
с
с