1 [ power, 2 ®[date/title]ia,'ii0wmravm=s, 3 ii^idate/time/shietjchm^btfav^) is, ss – Инструкция по эксплуатации Panasonic NV-VX55EN
Страница 44: 4 bitiiidate/time/setjcsw/atrbv, At, mi$[date/time/shift]mo, Setting the date and time, 1[ power, 3 ii^idate/time/shietjchm^btfav^)
Внимание! Текст в этом документе был распознан автоматически. Для просмотра оригинальной страницы Вы можете воспользоваться режимом "Оригинал".
1
[ POWER]
• [CAMERA]i§;j^ig0Kg„
2
®[DATE/TITLE]ia,'ii0WMraVM=S
^^№B^/B#raVM^ii^(0-0^©)o(-^36)
3 ii^iDATE/TIME/SHIETJCHm^BtFaV^)
IS, ss “%”
4 BitiiiDATE/TIME/SETjCSW/atrBV
iS:i:)ia, eSjP/Tvaiili£0D^fi(i:bin:
1998)o
^■-
1990-^1991^......................... ^2089^1990-
M-
1^2^..................................................^12^1-
B:
1^2^................................................-^31^1-
'\^m- 0-^1^.............................................. ^23-^0-
00^0 W........................................ —59--00-
“n\ “ B ’ \ “'m” n “'9-a”o
6
islm
% 0
at, mi$[DATE/TIME/SHIFT]Mo
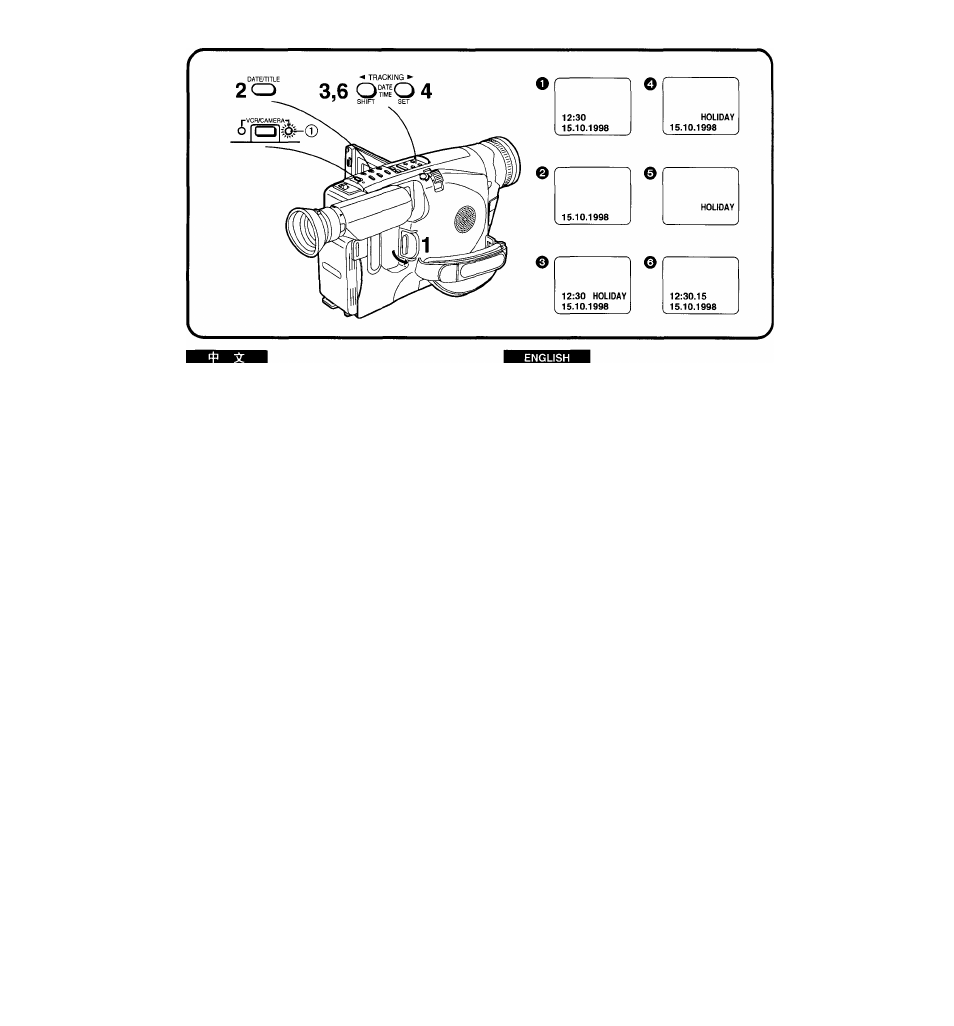
Setting the Date and Time
1
Turn out the [POWER] Switch to turn the
Movie Camera on.
•The [CAMERA] Lamp (T) lights.
2
Press the [DATE/TITLE] Button to make
the Date/Time/Title Indication appear.
•To set the date and time, one of the indications
other than the Title Indication alone
0
shown
above must be displayed. If the Title Indication
alone
0
is displayed, select another Date/Time/
Title indication (0 - 0 or
0).
(-► 36)
3
Press the [DATE/TIME/SHIFT] Button
until the “Year” portion flashes.
4
Press the [DATE/TIME/SET] Button
repeatedly until the current year (for
example: 1998) is displayed.
•The figures in the Date/Time Indication change in
the following order:
Year:
1990^ 1991
............^2089-^ 1990^...
Month: 1^2-^ ...............................^12^1-^...
Day:
1^2^ ........................ ^31-^1^...
Hour: 0^1^ .................................. ^23-^0^...
Minute: 00^01 ^ .......................... ^59^00^...
5
Also set the “Month”, “Day”, “Hour”,
“Minute” in the same way as explained
in steps 3 and 4.
6
After you have set the date and time and
confirmed that they are correct, press
the [DATE/TIMeSHIFT] Button.
•The operation of the clock starts.
48