Инструкция по эксплуатации SINGER Brilliance 6160
Страница 18
18
②
③
①
④
⑤
1
2
3
5
4
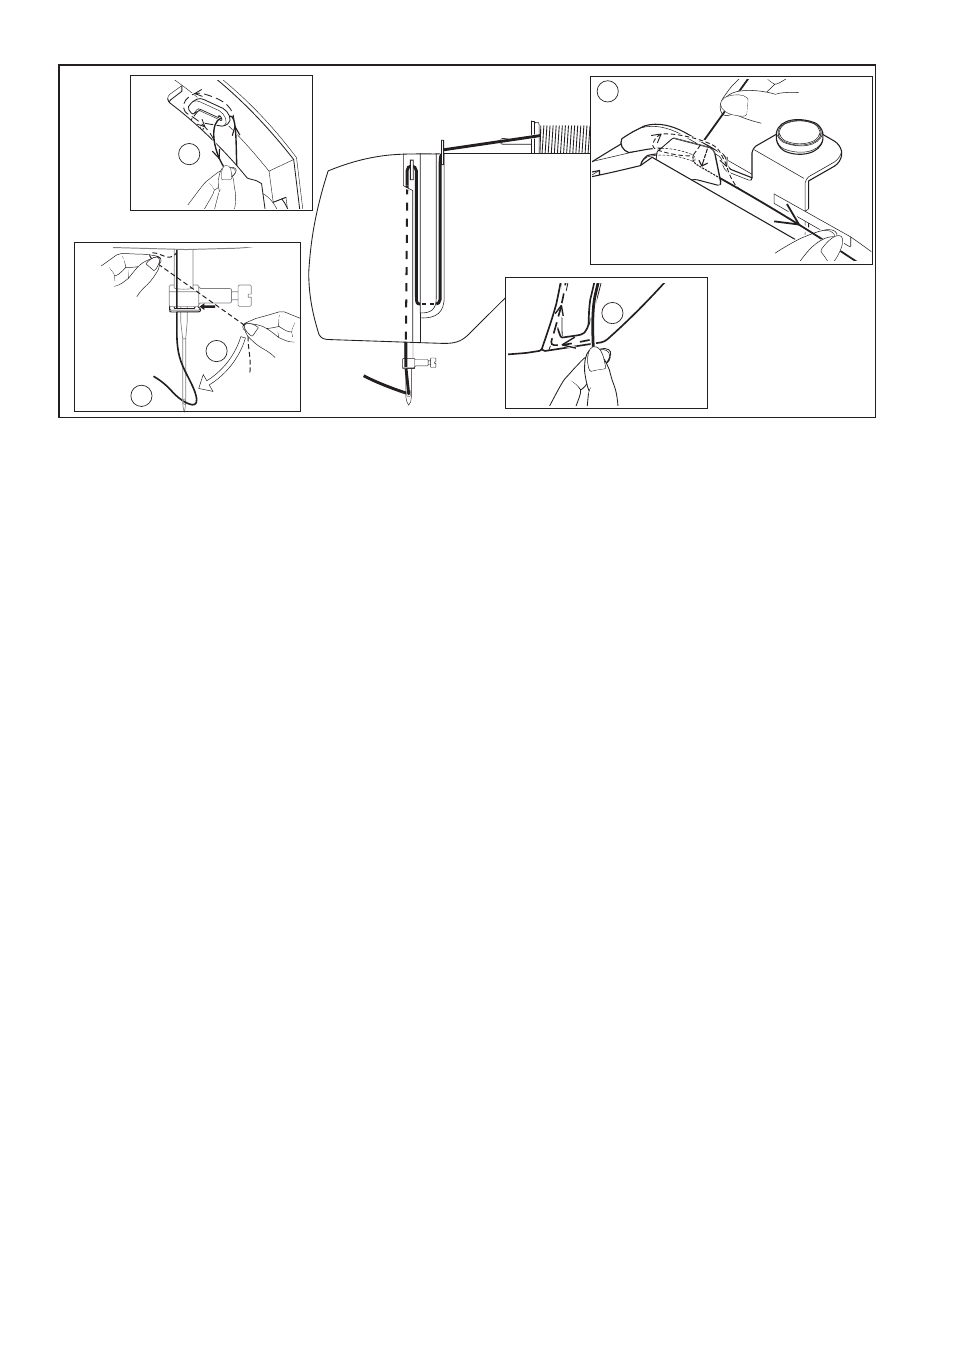
*Pass the thread through the thread take-up (3) from right to left.
*Pass the thread through the eye of the needle (5) from front to back. (See following
page for instructions on operation of the Automatic Needle Threader.)
1.)With the presser foot raised and the needle threaded, pull the thread. You should
detect only a slight resistance and little or no defl ection of the needle.
2.)Now lower the presser foot and again pull the thread towards the back of the machine.
This time you should detect a considerable amount of resistance and much more
defl ection of the needle. If you do not detect the resistance, this means you have not
threaded the machine correctly and need to rethread it.
C.Thread the machine with your left hand while fi rmly gripping the thread with your right hand
in the following order as illustrated.
IMPORTANT: To verify that the machine is threaded properly in the tension discs,
do this simple check:
C. Придерживая конец нити правой рукой, заправьте машину левой рукой в
последовательности, показанной на рисунке.
* Проведите нить через нитепритягиватель (3) справа налево.
* Проведите нить через игольное ушко (5) спереди назад. (См. следующую страницу
для получения инструкций по использованию автоматического нитевдевателя.)
1.)При поднятой лапке и заправленной игле потяните за нить. Вы должны почувствовать
лишь небольшое сопротивление, при этом игла может немного отклониться или
совсем не отклониться.
2.)Теперь опустите лапку и снова потяните за нить по направлению назад. На этот
раз Вы должны почувствовать значительное сопротивления и намного большее
отклонение иглы. Если же сопротивление отсутствует, это означает, что Вы
неправильно заправили машину и Вам необходимо ее повторно заправить.
ВАЖНО: ЧТОБЫ УБЕДИТЬСЯ, ЧТО МАШИНА ЗАПРАВЛЕНА ПРАВИЛЬНО, ПРОВЕДИТЕ
СЛЕДУЮЩУЮ ПРОВЕРКУ:
C. Aşağıda gösterilen sıraya göre, ipliği sağ elinizle sıkıca tutarken sol elinizle makineye iplik takın.
* İpliği sağdan sola doğru horozdan (3) geçirin.
* İpliği önden arkaya doğru iğne deliğinden (5) geçirin. (Otomatik İğne İplik Takıcı özelliğinin
çalışması ile ilgili talimatlar için, sonraki sayfaya bakın.)
ÖNEMLİ : Makine ipliğinin tansiyon disklerine düzgün takıldığından emin olmak
için, aşağıdaki basit kontrolü yapın:
1.) Baskı ayağı yukarı kaldırılmışken ve iğne ipliği takılmışken, ipliği çekin. Sadece hafi f bir
direnç hissetmelisiniz ve iğnede çok hafi f esneme olmalı veya hiç olmamalıdır.
2.) Şimdi baskı ayağını indirin ve ipliği tekrar makinenin arka tarafına doğru çekin. Bu sırada
biraz daha fazla direnç hissetmelisiniz ve iğnede çok daha fazla esneme olmalı dır. Eğer
direnç hissetmezseniz, makinenin ipliği düzgün takılmamıştır ve ipliği yeniden takmalısınız.
(C)