Инструкция по эксплуатации ZELMER 04Z011
Страница 44
46
GW04-004_v01
The fryer complies with the requirements of the binding
norms.
The appliance complies with the requirements of the
directives:
Electrical low voltage appliance (LVD) – 2006/95/EC.
–
Electromagnetic compatibility (EMC) – 2004/108/EC.
–
The appliance is marked with an indication CE on the data
plate.
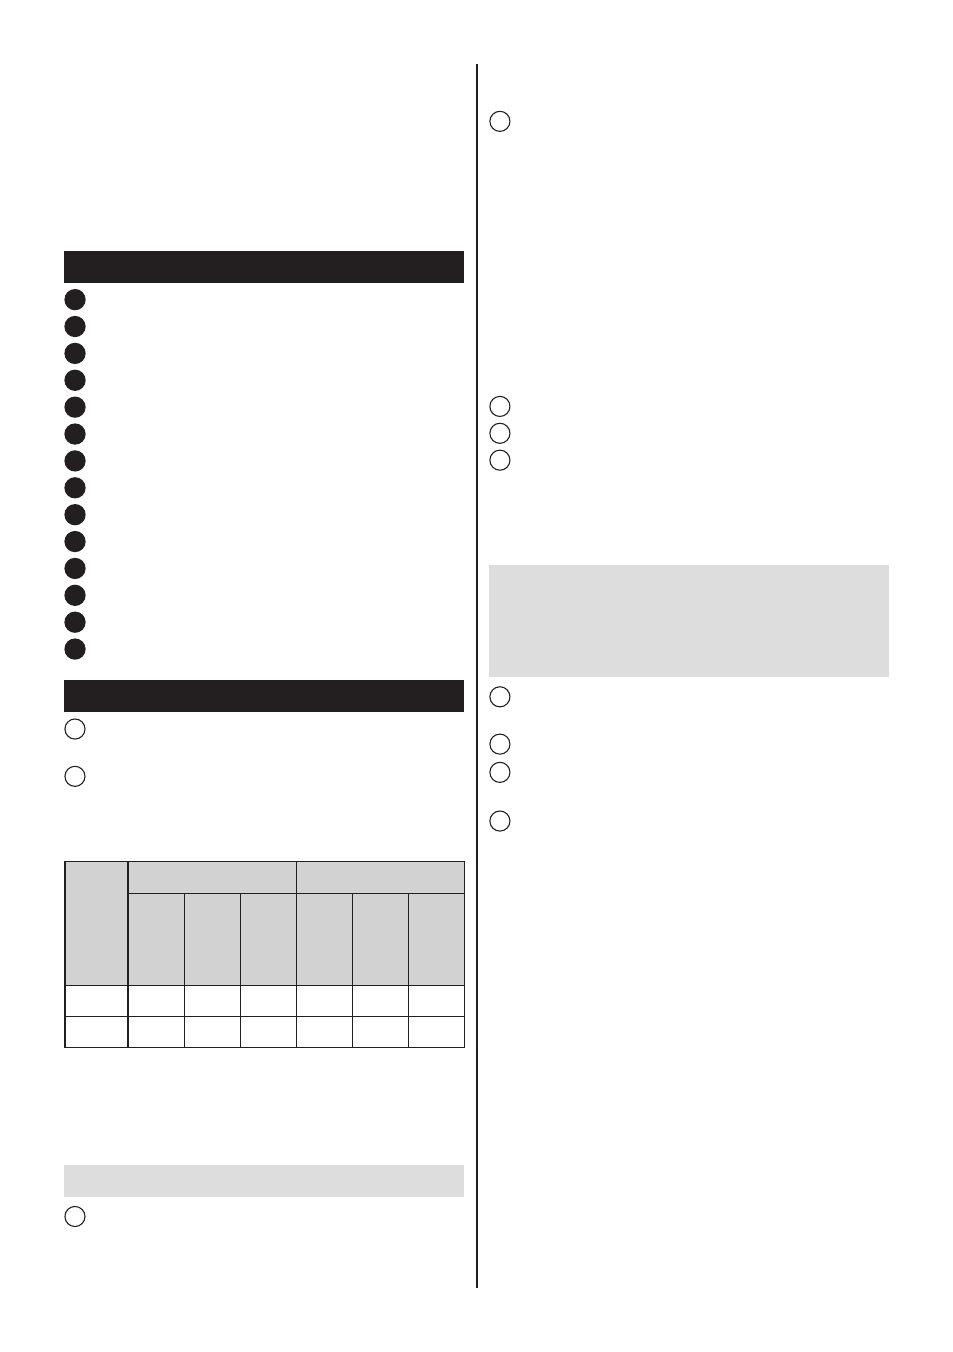
Parts Map
(Fig. A)
1
Cover lid
2
Frying basket release button
3
Handle
4
“POWER” lamp
5
Temperature control
6
“TEMP.” lamp
7
Cover lid opening button
8
“TIMER” button – timer
9
ON/OFF button
10
Frying basket
11
Pot
12
Filter cover
13
Filter
14
Power supply cord and plug
Operation and use
(Fig. B)
1
Put the appliance on a horizontal, even and stable
surface out of the reach of children.
2
Fill the fryer with oil, liquid fat or melted solid fat up to the
level between indication marks of MIN and MAX on the inner
part of the pot (11) based on figures presented in the below
table:
Capacity
04Z011
04Z012
Liquid oil [l]
Solid Fat
[kg]
Amount of chips [kg]
Liquid oil [l]
Solid Fat
[kg]
Amount of chips [kg]
MIN
2.2
2.1
-
1.5
1.4
-
MAX
2.5
2.3
1
1.7
1.6
0.4
We advise you to use frying oil or other liquid fat. If you want
to use new blocks of fat, melt them slowly over a low heat
in a normal pan to prevent spattering or overheating of the
fat. It is possible to use solid fat, but in that case extra pre-
cautions are necessary to prevent the fat from spattering.
ATTENTION! Never mix two different kinds of oil or fat.
3
Close the lid (1) and put the plug in the wall socket. Push
the power ON/OFF button, the red “POWER” (4) indicator
signalling connection of the appliance to the electric power
sup-ply becomes bright simultaneously as well as the green
“TEMP.” (6) indicator signalling that the appliance is in
heating up process.
4
Set the temperature control (5) to the correct temperature.
For information about which temperature to select, check the
chapter “Preparation times and temperature settings” in this
Use & Care Manual. The oil or fat will be heated to the right
temperature in 10 to 15 minutes.
While the fryer is working, the green indicator light (6) will go
on and off a number of times as a result of reaching the set
temperature. This is a normal state. When the appliance is
ready for frying (the set temperature has been reached), the
green indicator light will go off.
The same procedure applies if you want to fry a number of
batches in a row. Therefore, wait until the green indicator
light has gone off before you start frying the next batch.
5
Open the lid (1) pressing the release button (7).
6
Lift the handle.
7
Take the basket out of the fryer. Put the food to be fried
in the bas-ket. For the best frying results, we advise you to
use the recom-mended quantities of food as indicated in the
chapter “Preparation times and temperature settings” of this
Use & Care Manual.
ATTENTION! During frying, hot steamed is released
through the fil-ter (13). Remember to keep your hands
and face at a safe distance from the filter. You should
also be careful of the hot steam when you open the
lid (1).
8
Carefully insert the basket (10) in the fryer and make
sure it is properly installed.
9
Next, close the lid (1).
10
Move the handle (3) up gently, move the release switch
on it (2) and fold the handle.
11
In order to set the required frying time (in minutes), press
the button „TIMER” (8) of a timer.
Method of using the timer button
Keep pressing the timer button „TIMER”
●
(8) for 1 second.
The display of the timer will show a figure <00>. The
display will turn off 5 seconds after the last pressing.
Keep pressing the button „TIMER”
●
(8) In order to set
the required time. The figure on the display increases
by 1 minute from <00> to <30>. When the time setting
reaches the Max. figure, further pressing of the button
„TIMER” (8) will again cause an increase of the figure
on the display from the beginning, i.e. from <00> to <30>
minutes.
2 seconds after setting the time, the display will begin
●
to flash and count down the time. During counting down
the dis-play show the figure indicating the remaining
time of frying. The last minute of frying is indicated in
seconds.
Keeping pressing the button „TIMER”
●
(8) for over
2 seconds during counting down the time results in
stopping of counting down. The display will show a figure
<00>. Then, the timer may be set again. The display will