Installation of gas cookers – Инструкция по эксплуатации Beko M 6604 CTW
Страница 36
Внимание! Текст в этом документе был распознан автоматически. Для просмотра оригинальной страницы Вы можете воспользоваться режимом "Оригинал".
Installation of gas cookers
^Before your appliance is
connected to the gas supply,
check the ensure that the gas
category and pressure
specifications shown in the data
piate corresponds with your gas
supply. If necessary call
a u t h o r i z e d s e r v i c e for
adjusting to gas category.
*This appliance shall be installed
in
accordance
with
the
regulations in force and only used
in a well ventilated space. Read
the instructions before installing
or using this appliances.
In the interest of safety this
appliances must be installed
and/or serviced by a competent
person as stated in the gas safety
regulations current editions.
* Please refer to the data plate
for details about gas supply and
pressures.
* The appliance must not be
installed in a room without a
window or other controllable
opening. If is installed in a room
without a door which opens
directly to tohe outside, a
permanent opening is required.
The air circulation should be 2
m3/h per kW of burners.
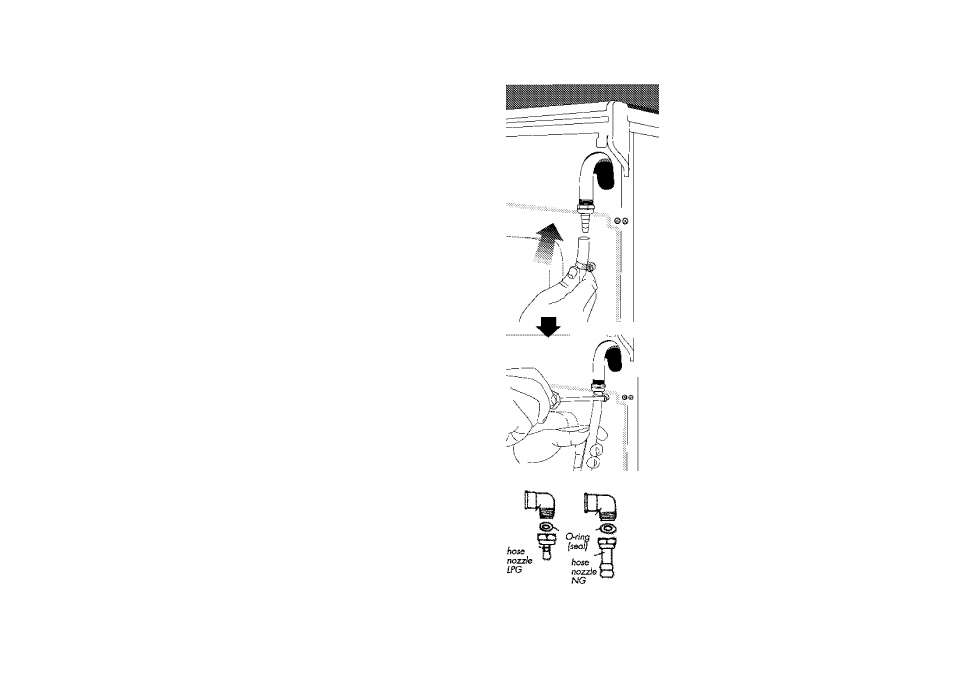
C o n n e c t i o n o f t h e g a s h o s e t o t h e
o v e n
Convenient position is selected by interchanging
the hose nozzle and plug according to the
location of the main gas inlet valve. If you make
a connection with a flexible metal hose, locate
a seal between the main gas pipe. The inner
diameter of the flexible hose, which the butane
hose nozzle is connected, should be 6mm for
the house-type gas tubes.
The inner diameter of the flexible hose, which
the natural hose nozzle is connected, should
be 15mm. The hose should tightly be fitted to
the hose nozzle by squeezing with a clamp.The
plastic hose end is soaked in hot water for one
minute to soften and inserted fully into the
hose nozzle. The clamp is fastened securely by
a screw driver. The other end of the hose is
connected to the gas valve with the same
operation.
The hose should be replaced before its last
expiry date.
Hose nozzle
C a u t i o n !
M a k e t h e o v e n c o n n e c t i o n t o t h e g a s
i n i e t v a i v e , t h e h o s e i e n g t h m u s t b e
s h o r t a n d b e s u r e t h a t t h e r e i s n o
i e a k a g e . T h e h o s e u s e d s h o u i d n o t
b e i o n g e r t h a n 1 2 5 c m f o r s a f e t y .
5
Connection of the gas hose
to the oven
Convenient position is selected by
interchanging the hose nozzle and
plug according to the location of the
main gas inlet valve. The plastic hose
end is soaked in hot water for one
minute to soften and inserted fully
into the hose nozzle. The clamp is
fastened securely by a screw driver.
The other end of the hose is
connected to the gas valve with the
same operation.
Gas leakage control
During control, be sure that the control
knobs are closed and the gas inlet
valve is open. Apply soap bubbles to
the connections for leakage control.
In case leakage exists, buble will
appear. In such case, check the gas
connection
immediately.
Do
not
control gas leaks by using fire.
C a u t i o n !
N e v e r u s e l i g h t e r o r m a t c h f l a m e ,
f o r c o n t r o l l i n g t h e g a s l a c k a g e .
clamp
Tube
Hose nozzle and elbow
types for Natural gas
and Butane/propane