Threading the top thread, Заправка верхней нити – Инструкция по эксплуатации SINGER Fashion Mate 7256
Страница 11
20
4
3
B. Turn the hand wheel toward you until the needle is in its
highest position.
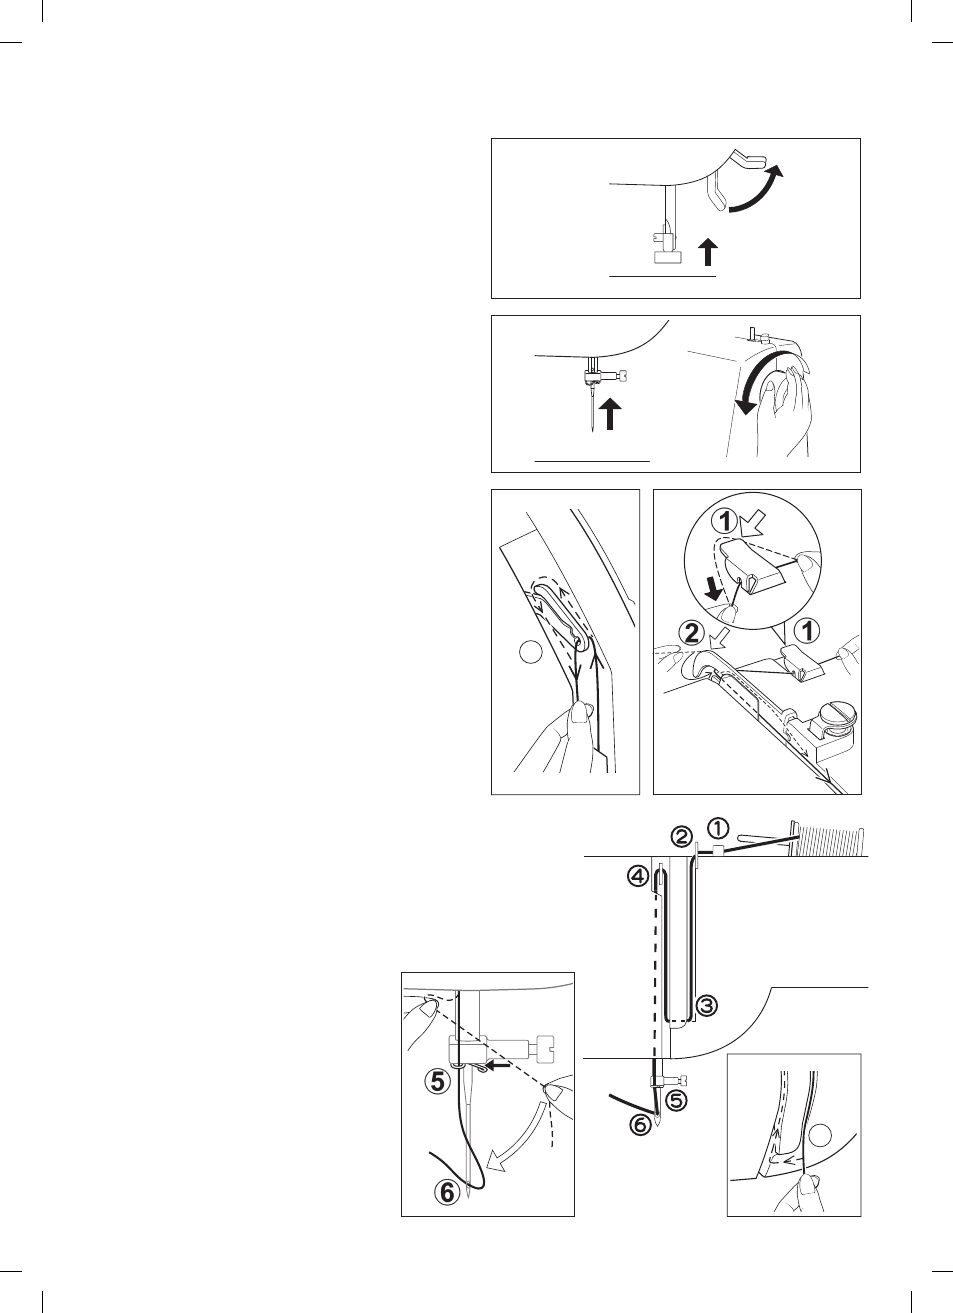
THREADING THE TOP THREAD
A. Raise the presser foot lifter. Always be sure to raise the
presser foot lifter before threading the top thread. (If the
presser foot lifter is not raised, correct thread tension
cannot be obtained.)
C. Thread the machine with your left hand while firmly gripping
the thread with your right hand in the following order as
illustrated.
* Guide the thread through thread guide (1), and then pull
it into the pre-tension guide (2).
* Pull the thread into the tension discs (which are located
inside the machine) by first passing the thread to the left
of plate (2). Then guide the thread to the bottom of the
groove.
* Do a U-turn around the inside of the tab (3).
* Pass the thread through the thread take-up (4) from right
to left.
* Pull the thread into the inside of the take-up lever until it
reaches the eye of the lever.
* Guide the thread into the thread guide (5).
* Pass the thread through the eye of the needle (6) from
front to back. (See following page for instructions on
operation of the Automatic Needle Threader.)
IMPORTANT:
To verify that the machine is threaded
properly in the tension discs, do this simple
check:
1.) With the presser foot raised and the
needle unthreaded, pull the thread. You
should detect only a slight resistance
and little or no deflection of the needle.
2.) Now lower the presser foot and again
pull the thread towards the back of the
machine. This time you should detect a
considerable amount of resistance and
much more deflection of the needle.
If you do not detect the resistance,
this means you have not threaded the
machine correctly and need to rethread
it.
ЗАПРАВКА ВЕРХНЕЙ НИТИ
А. Переведите рычаг прижимной лапки в крайнее верхнее
положение. Всегда поднимайте рычаг прижимной лапки
перед заправкой верхней нити. (В ином случае натяжение
нити будет неправильным.)
B. Поворачивайте маховик на себя, пока игла не станет
в крайнее верхнее положение.
С. Придерживая конец нити правой рукой, заправьте машину
левой рукой в последовательности, показанной на рисунке.
* Проведите нить через нитенаправитель (1), а затем под
выступ (2).
* Проведите нить через направляющие каналы, начав
с правого и проведя нить слева от направляющей
пластины (2). Опуститесь по каналу вниз.
* Измените направление движения нити, сделав внизу
U-образный разворот (3).
* Проведите нить через нитепритягиватель (4) справа
налево.
* Потяните за нить внутри нитепритягивателя, пока она
не попадет в глазок нитепритягивателя.
* Проведите нить через нитенаправитель(5).
* Проведите нить через игольное ушко (6) спереди назад.
(См. следующую страницу для получения инструкций
по использованию автоматического нитевдевателя.)
ВАЖНО:
Чтобы убедиться, что машина заправлена
правильно, проведите следующую
проверку:
1.) При поднятой лапке и заправленной
игле потяните за нить. Вы должны
почувствовать лишь небольшое
сопротивление, при этом игла может
немного отклониться или совсем не
отклониться.
2.) Теперь опустите лапку и снова потяните
за нить по направлению назад.
На этот раз Вы должны почувствовать
значительное сопротивления
и намного большее отклонение иглы.
Если же сопротивление отсутствует,
это означает, что Вы неправильно
заправили машину и Вам необходимо
ее повторно заправить.
11
7256_SINGER_rus.indd 11
7256_SINGER_rus.indd 11
21.12.10 09:31
21.12.10 09:31