Инструкция по эксплуатации Saturn ST-FP1095
Страница 5
8
to steam them before adding them to the
meet. Place a dry towel beside the mincer
to dry off overrunning liquids.
1. Cut the meat into small pieces that will
fit in the feed tube and remove hard
parts like bones, shells or stems.
2. Assemble the appliance as described
and place a plate or dish in front of the
worm housing.
WARNING: Always make sure that the
mincer is turned off before plugging in
the power supply.
3. Plug the power supply cable into a
mains socket and switch on the mincer.
WARNING: Never hold your face or
other body parts over the feed tube when
the motor is running because little pieces
of food could be thrown out of the feed
tube. Never push the food into the feed
tube with your fingers or put foreign sub-
stances (hair, towels, cutlery) into the
feed tube. Always use the feedstick for
this purpose!
4. Slowly feed the meat pieces into the
feed tube and push down with the feed-
stick (see fig. 6). Do not apply excessive
force when pushing down the feedstick.
Use only the feedstick to press down the
meat. Never use the fingers!
5. Switch off the mincer after use and
disconnect the power supply cable from
the mains socket.
The mincer will easily continuously mince
up to 30 kg of meat (raw, cooked, differ-
ent kinds of meat). 5 kg of raw meat are
minced in 15 minutes max.
IMPORTANT: Operate in a slow and con-
stant pace. Do not try to rush the proce-
dure by pushing down the meat with
force. This way the worm might get
blocked and stops operating. Only use
the feedstick to slowly push down food
through the feed tube. If no meet is com-
ing out the worm housing even though
there is still meat in the feed tube turn
the mincer off and work according to the
instructions “Troubleshooting”.
6. As soon as the last bit is minced turn
the appliance off and pull the plug.
7. Clean and disassemble the appliance
right after use and make sure that no
leftover food desiccate on the appliance.
Work according to the instructions “Care
and cleaning”.
Sausage filler - Chopper attachments
Ingredients for the filling:
100 g mutton, once or twice minced with
the mincer
1 ½ tablespoon olive oil
1 ½ tablespoon fine chopped onions
1 1/3 teaspoon grounded pimento
½ teaspoon salt
1 ½ tablespoon flour
Ingredients for the wrapping:
at least 450 g fatless meet of mutton, calf
or beef the most 150-200 g flour*
1 teaspoon grounded pimento
1 teaspoon grounded nutmeg
1 pinch of chillipowder
1 pinch of pepper
*The consistency of the wrap is better if
you use less flour and more meet.
1. Prepare the filling: Steam the onions.
Mince the meet once or twice with the
mincer and then mix the ingredients.
2. Prepare the wrapping: Mince the meet
for the wrapping 3 times in total. For the
first
mincing procedure use the grinding disc –
7 mm then use the grinding disc – 5mm.
After mixing all the ingredients for the
wrapping mince it one more time with the
5 mm grinding disc.
3. Unscrew the closing ring and take out
the mincer plate and crossed-blade knife.
Operate according to the instructions
“Disassembling the appliance”.
WARNING: Do not cut yourself remov-
ing the crossed-blade knife.
4. Assemble the appliance this time with
the chopper attachments.
IMPORTANT: Never assemble the appli-
ance with the chopper attachment and
the crossed-blade knife with the grinding
disc.
a. Assemble the worm housing in the
opening of the drive shaft. Place the
worm inside the worm housing (operate
according to the instructions “Assembling
the appliance”; see fig. 1 and 2).
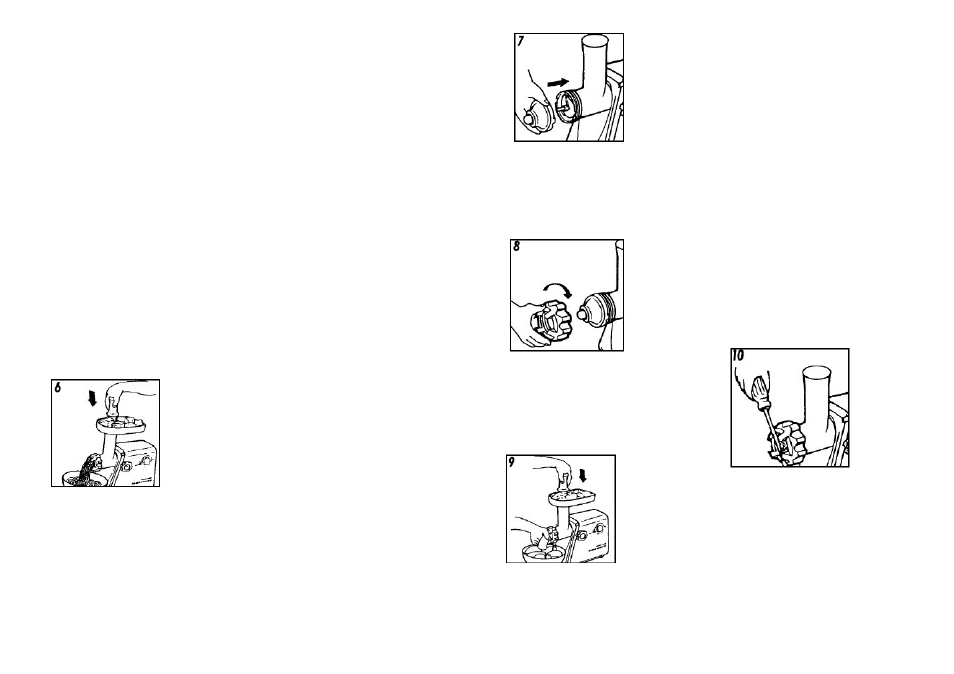
b. Place the chopper attachment A on the
axis of the worm.
The slim end has to face the front (see
fig. 7). Turn the chopper attachment a
little bit while pushing it into the worm
housing.
9
c. Place the chopper attachment B on top
of the chopper attachment A. The wide
opening of the chopper attachment B
should be facing the chopper attachment
A. The chopper attachment B has a gap
on the outside edge which should slide
over the guiding pin on the inside of the
worm housing (see fig. 8).
d. Attach the closing ring to the worm
housing and screw it on tight with your
hands.
5. Process the wrapping mixture in the
mincer with the attached chopper at-
tachments (see fig. 9). The finished
product will be one long wrapping. Cut
the wrapping into convenient seize.
6. Freeze the wrapping shortly.
7. Fill the wrapping with the filling mix-
ture.
8. Fry the wraps with some olive oil until
it has the favored browning.
Care and cleaning
WARNING: Never hold your face or
other body parts over the feed tube when
the motor is running because little pieces
of food could be thrown out of the feed
tube. Never put foreign substance or
hard objects into the feed tube.
Before the mincer is used for the first
time, all parts – with the exception of the
motor block – must be thoroughly
cleaned in warm soapy water.
Disassembling the appliance
WARNING: To avoid injury and dam-
ages of the appliance turn the appli-
ance off and then wait for approx. 6
seconds to be certain that the motor
is no longer running. Always pull the
plug before you start disassembling
or cleaning the appliance.
1. Switch off the mincer and disconnect
the power supply cable from the mains.
Check that the motor has completely
stopped.
2. Detach the worm housing from the
motor block.
3. Unscrew the closing ring turning it
counterclockwise.
TIP: If the closing ring is screwed on to
tight you can use a screwdriver as shown
in the fig. 10.
4. Remove the grinding disc. If necessary
insert a knife or screwdriver between the
grinding disc and the worm housing to
pry out the grinding disc.
5. Remove the crossed-blade knife and
pull out the worm or if you used the
chopper attachments
remove them.
TIP: If the tools are stucked knock the
mincer carefully on a stable cutting
board. The grinding
disc should be facing up.