Инструкция по эксплуатации Saturn ST-EC0125
Страница 3
4
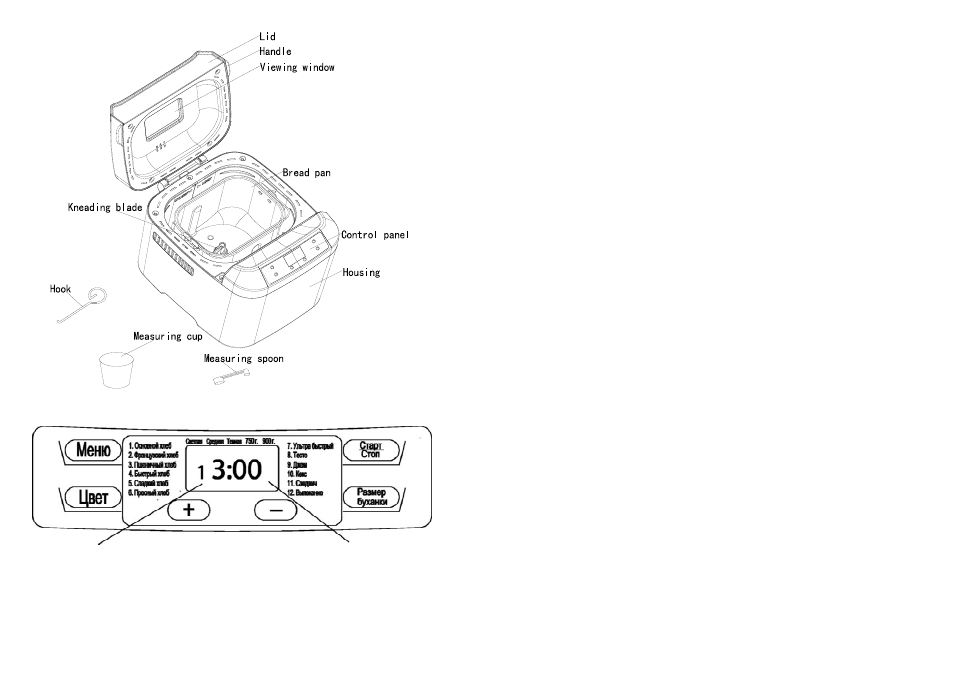
INTRODUCTION OF CONTROL PANEL
(The silkscreen may be subject to change without prior notice)
This indicates the programm The operation time
You have chosen for each program
5
AFTER POWER-UP
As soon as the bread maker is plugged
into the power supply, a beep will be
heard and “3:00” appears in the display
after a short time. But the two dots be-
tween the “3” and “00” don’t flash con-
stantly. The arrow points to 800g and
MEDIUM. It is the default setting.
START/STOP
The button is used for starting and
stopping the selected baking program.
To start a program, press the
START/STOP button once. A short
beep will be heard and the two dots in
the LCD begin to flash, the working light
illuminates and the program starts. Any
other button is inactivated except the
START/STOP button after a program
has begun. This feature will help to pre-
vent any unintentional disruption to the
operation of program.
To stop the program, press the
START/STOP button for approx. 2 sec-
onds, then a beep will be heard, the
working light will be extinguished, it
means that the program has been
switched off.
After procedure starts up, you can press
START/STOP button once to interrupt
at any time, the operation will be
paused but the setting will be memo-
rized, the working time will be flashed
on the LCD. Touch START/STOP button
again.
MENU
It is used to set different programs.
Each time it is pressed (accompanied by
a short beep) the program will vary.
Press the button continuously, the 12
menus will be cycled to show on the
LCD display. Select your desired pro-
gram. The functions of 12 menus will be
explained as below.
1. Basic: kneading, rise and baking
normal bread. You may also add in-
gredients to increase flavor.
2. French: kneading, rise and baking
within a longer rise time. The bread
baked in this menu usually will have
a crisper crust and light texture.
3. Whole wheat: kneading, rise and
baking of whole wheat bread. It is
not advised to use the delay function
as this can produce poor results.
4. Quick: kneading, rise and baking
loaf within the time less than Basic
bread. But the bread baked on this
setting is usually smaller with a
dense texture.
5. Sweet: kneading, rise and baking
sweet bread. You may also add in-
gredients to add flavor.
6. Gluten free: kneading, rise and
baking gluten free bread. You may
also add ingredients to add flavor.
7. Ultra fast: kneading, rise and bak-
ing in a shortest time. Usually the
bread
made is smaller and
rougher than that made with Quick
program.
8. Dough: kneading and rise, but
without baking. Remove the dough
and use for making bread rolls, piz-
za, steamed bread, etc.
9. Jam: boiling jams and marmalades.
Fruit or vegetables must be chopped
before putting them into the bread
pan.
10. Cake: kneading, rise and baking,
rise with soda or baking powder.
11. Sandwich: kneading, rise and bak-
ing sandwich. For baking light tex-
ture bread with
a thinner
crust.
12.Bake: only baking, no kneading and
rise. Also used to increase the baking
time on selected settings
COLOR
With the button you can select a
LIGHT, MEDIUM or DARK color for the
crust. Press this button to select your
desired color. This button is not applica-
ble for the programs Dough and Jam.
LOAF SIZE
Press this button to select the Loaf size
of the bread. Please note the total oper-
ation time may vary with the different
loaf size. This button is not applicable
for the program Quick, Dough, Jam,
Cake and Bake.
DELAY function
If you want the appliance do not start
working immediately you can use this
button to set the delay time.。
You must decide how long it will be be-
fore your bread is ready by pressing the
+ or -. Please note the delay time
should include the baking time of pro-
gram. That is, at the completion of de-
lay time, there is hot bread can be ser-
viced. At first the program and degree
of browning must be selected, then
pressing “+” or “ –” to increase or de-
crease the delay time at the increment
of 10 minutes. The maximum delay is
13 hours.
Example: Now it is 8:30p.m, if you
would like your bread to be ready in the
next morning at 7 o’clock, i.e. in 10
hours and 30 minutes. Select your
menu, color, loaf size then press the
“+” or “–” to add the time until 10:30
appears on the LCD. Then press the
STOP/START button to activate this