Fig. 4 – Инструкция по эксплуатации Bell'O PVS3103- FEB12
Страница 7
me
mF
mG
mc
m2
mA
mD
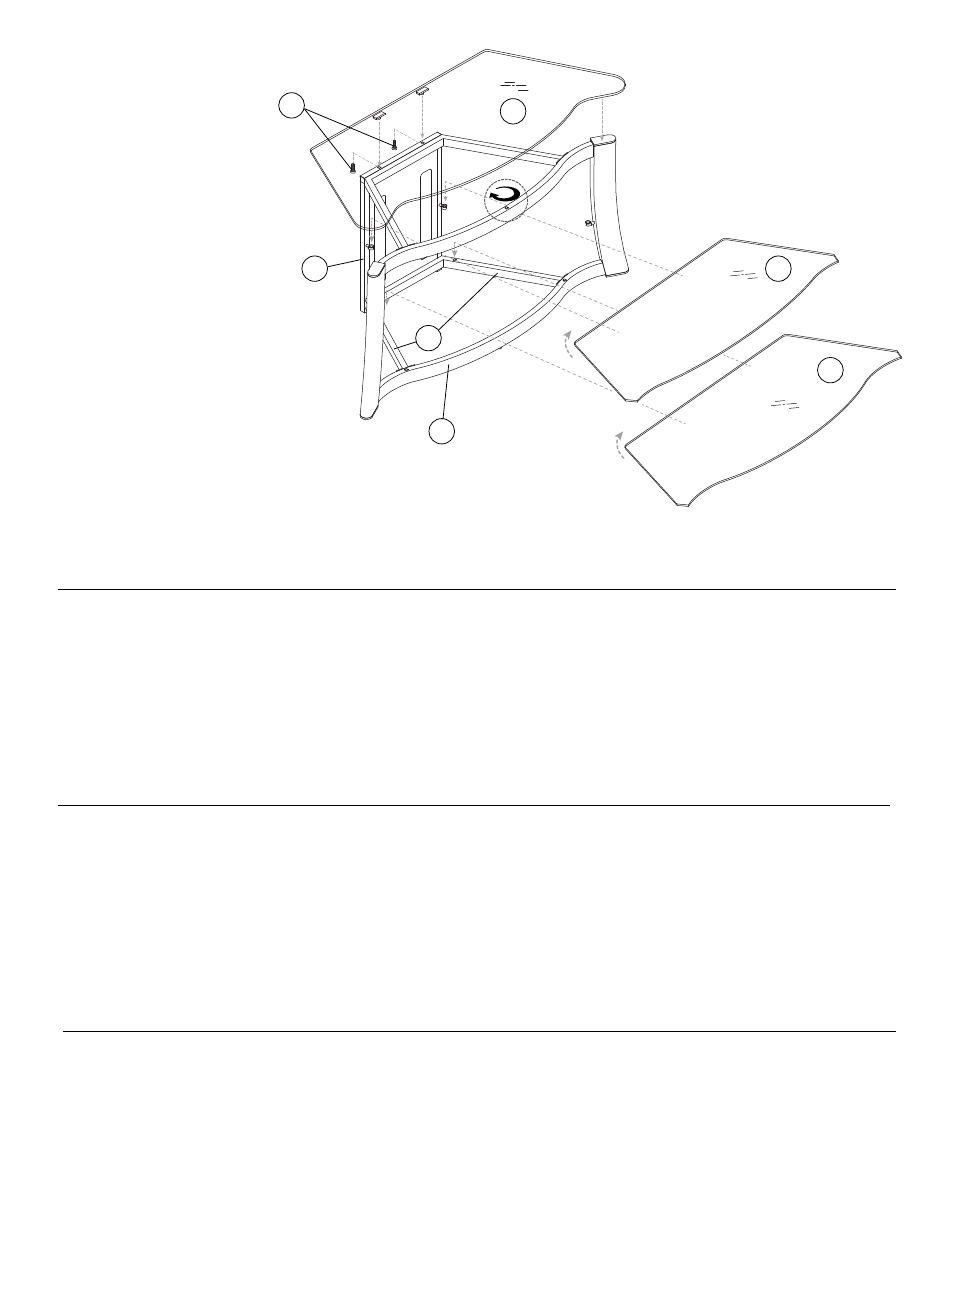
Fig. 4
14. cAreFully PlAce the top Glass
shelf (Me) onto the top of the
CMs
®
Frame (MA) with the two
silver discs sitting inside the holes
at the top of the Frame. secure the
silver discs from below with two 15 mm
screws (M2). Do not oVertIGhten.
15. From the front, cAreFully AnGle and
slIDe the Bottom shelf (MG) into place
as shown above. tilt the back edge up
and carefully drop it down after the front
edge is secure. Make sure the Bottom
Glass shelf is level and laying securely on
the 4 mm Glass Pads (M4) placed along the
Bottom shelf support Frame (MC).
16. From the front, cAreFully AnGle and slIDe the Middle Glass shelf (MF) into
place as shown above. tilt the back edge up and carefully drop it down after the front
edge is secure. Make sure the Middle shelf is level and laying securely on the shelf
support Posts (M3).
note (!) : there is an Adjustable Glass Pad located on the top front edge of the Front Frame (MD). turn this Adjustable Glass Pad to adjust.
ALwAyS MAKE SURE ThE STAND AND ALL ShELVES ARE LEVEL AND wELL SUPPORTED BEfORE ATTEMPTING TO PLACE ANy
COMPONENTS ON ThEM.
14. coloQue cuIDADosAmente el estante de vidrio superior (Me) sobre la parte superior del sostén del CMs
®
(MA) con los dos discos
plateados apoyándose dentro de los orificios que se encuentran sobre la parte superior del marco. AseGure los discos plateados de la parte
trasera con dos tornillos de 15 mm (M2). no los AJuste DemAsIADo.
15.
Desde el frente, busQue el ÁnGulo y DeslIce con cuIDADo el estante inferior (MG) tal como se muestra más arriba. Incline el borde trasero
hacia arriba y con cuidado desplegable después de la parte delantera es segura. Asegúrese de que el estante de vidrio inferior esté nivelado y bien
afirmado sobre las almohadillas para vidrio de 4 mm (M4) y colocadas a lo largo del marco de soporte del estante inferior (MC).
16.
Desde el frente, busQue el ÁnGulo y DeslIce con cuIDADo el estante del medio (MF) tal como se muestra más arriba. Incline el borde trasero
hacia arriba y con cuidado desplegable después de la parte delantera es segura. Asegúrese de que el estante de vidrio del medio esté nivelado y bien
afirmado sobre los soportes (M3).
notA (!): encima del borde frontal superior del marco del
panel frontal (MD)
hay un pata niveladora ajustable. GÍrelAs para ajustar. ASEGÚRESE
SIEMPRE DE QUE LA BASE y LOS ESTANTES ESTÉN NIVELADOS y BIEN APOyADOS ANTES DE INTENTAR COLOCAR ALGÚN
COMPONENTE SOBRE ELLOS.
14. AVec PrÉcAutIon, Poser le plateau en verre du haut (Me) sur le dessus du cadre CMs
®
(MA), en plaçant les deux disques argentés dans les trous
au sommet du cadre. AttAcher les disques argentés depuis ci-dessous avec deux vis de 15 mm (M2). ne PAs Forcer.
15.
Depuis l'avant, AVec PrÉcAutIon, InclIner et enFIler le plateau du bas (MG) pour le mettre en place, comme sur l’illustration
ci-dessus. Inclinez le bord arrière et soigneusement déroulant après le bord antérieur est sécurisée. s’assurer que le plateau en verre du bas est
de niveau et repose fermement sur les tampons d’appui de 4 mm (M4) le long de la barre support de plateau du bas (MC).
16.
Depuis l'avant, AVec PrÉcAutIon, InclIner et enFIler le plateau du milieu (MF) pour le mettre en place, comme sur l’illustration
ci-dessus. Inclinez le bord arrière et soigneusement déroulant après le bord antérieur est sécurisée. s’assurer que le plateau en verre du milieu
est de niveau et repose fermement sur les tenons d’appui de plateau (M3).
remArQue (!): Il y a un pied de niveau réglables sur le bord supérieur avant du
panneau frontal (MD)
. tourner ces pieds de niveau pour les
ajuster. TOUjOURS S’ASSURER LE MEUBLE ET LES PLATEAUX SONT DE NIVEAU ET CORRECTEMENT SOUTENUS AVANT
DE TENTER D’y POSER UN QUELCONQUE APPAREIL.
!
14. АккурАтно поЛоЖИте верхнюю стеклянную полку (ME) на верхнюю раму CMS
®
(MA), вставив два серебряных диска в отверстия на верхней
грани рамы. ЗАкрепИте серебряные диски снизу с помощью двух винтов длиной 15 мм (M2). не ЗАтяГИВАЙте сЛИШкоМ туГо.
15. АккурАтно держа нижнюю полку (MG) поД уГЛоМ, ВстАВЬте ее на свое место с лицевой стороны, как показано на рисунке выше. Приподнимите
заднюю грань полки и аккуратно опустите ее после закрепления передней грани. убедитесь в том, что нижняя стеклянная полка выровнена
горизонтально и устойчиво лежит на 4-миллиметровых прокладках для стекла (M4), помещенных вдоль опорной рамы нижней полки (MC).
16. АккурАтно держа среднюю стеклянную полку (MF) поД уГЛоМ, ВстАВЬте ее на свое место с лицевой стороны, как показано на
рисунке выше. Приподнимите заднюю грань полки и аккуратно опустите ее после закрепления передней грани. убедитесь в том, что
средняя полка выровнена горизонтально и устойчиво покоится на опорных штырях полки (M3).
прИМеЧАнИе (!): на верхней передней грани передней рамы (MD) имеется регулируемая прокладка для стекла. отреГуЛИруЙте эту
регулируемую прокладку для стекла, повернув ее в нужное положение. Прежде чем ставить на подставку и на полки какие-либо
компоненты аппаратуры, обязательно убедитесь в том, что все полки выровнены в горизонтальном положении и надежно
закреплены.