English – Инструкция по эксплуатации Bell'O AVSC-2121 -Feb12
Страница 4
English
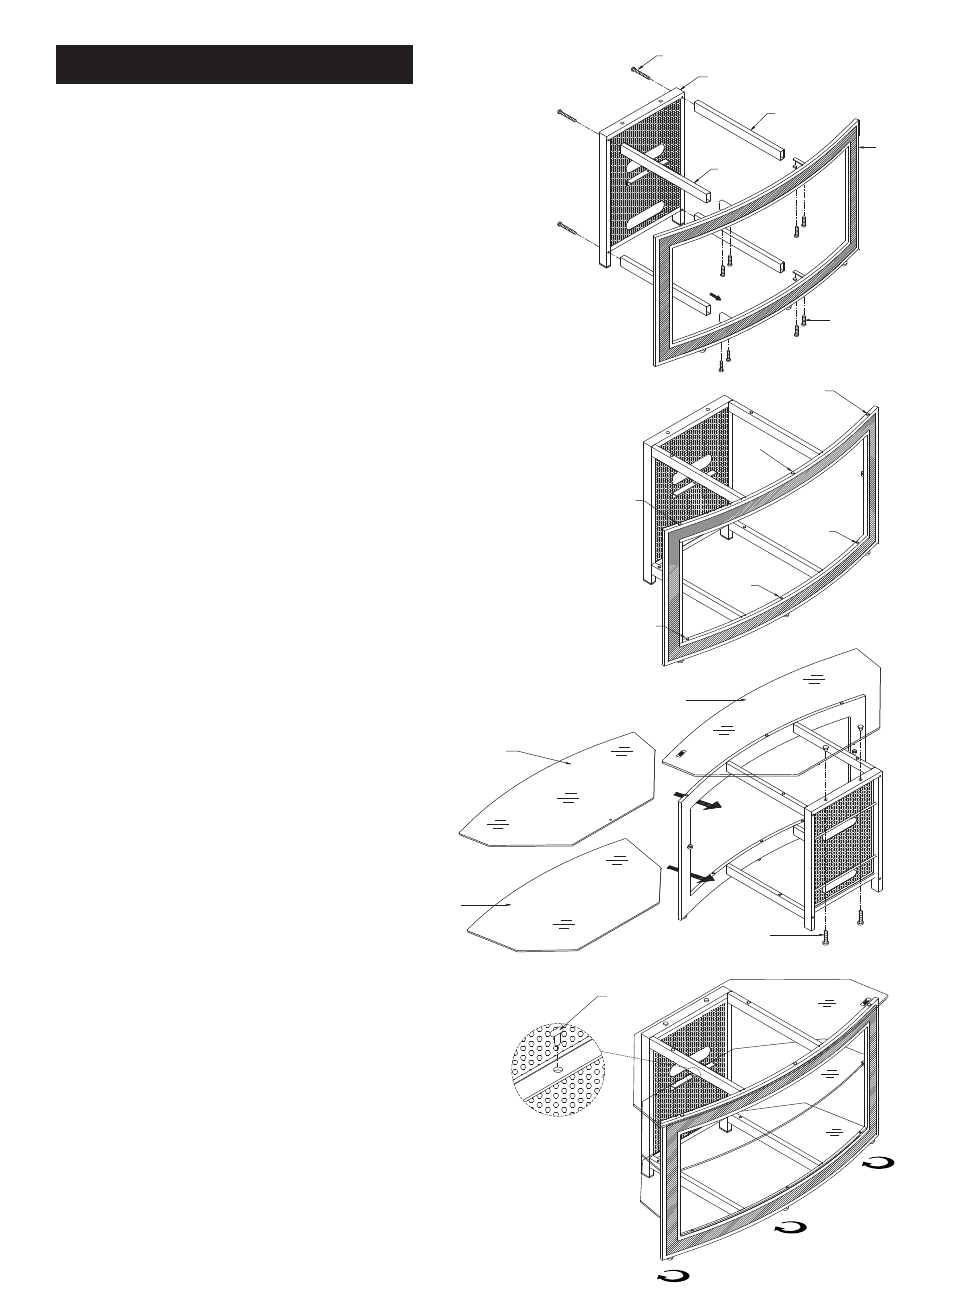
NOTE: TWO PEOPLE ARE RECOMMENDED TO ASSEMBLE
THIS TABLE.
1. Stand the CMS
®
(Cable Management System) Frame
(A) upright. Attach the Right & Left Shelf Supports
(B & C) to the bottom of the CMS
®
Frame with 55mm
Bolts (1). DO NOT TIGHTEN FULLY AT THIS POINT.
2. Insert the extensions on the Wood Front Panel (D)
into the open ends of the Right & Left Shelf Supports
and secure with 12mm screws. DO NOT TIGHTEN
FULLY AT THIS POINT.
3. NOW GO BACK AND FULLY TIGHTEN ALL BOLTS
AND SCREWS.
4. Place five of the larger 5mm Glass Pads (3) on the
top of the frame as shown in Fig. 2.
5. Place five of the smaller 2mm Glass Pads (4) as
shown in Fig. 2.
6. CAREFULLY move the frame assembly into the place
it will occupy when fully assembled and in use. DO
NOT ATTEMPT TO MOVE THE TABLE AFTER THE
GLASS SHELVES HAVE BEEN INSTALLED.
7. CAREFULLY place the Bottom Glass Shelf (G) and
then the Middle Glass Shelf (F) onto the frame as-
sembly. NOTE: the Middle Glass Shelf has a hole in
the rear edge.
8. CAREFULLY attach the Top Glass Shelf (E) to the
frame assembly. Place the silver discs along the
Shelf’s rear edge into the two holes in the top of the
CMS
®
Frame (A) and secure with two 15mm Screws
(5) as shown in Fig. 3. BE CAREFUL NOT TO OVER-
TIGHTEN.
9. Insert the Glass Shelf Securing Pin (6) into the Middle
Glass Shelf (F) and the CMS
®
Frame (A) as shown in
Fig. 4.
10. ADJUST the three adjustable feet in the underside
of the Wood Front Panel (D) to ensure the stand is
level and properly supported on a flat, solid
surface.
A
Fig. 1
Fig. 2
Fig. 3
Fig. 4
1
B
D
C
2
3
3
3
4
4
4
E
F
G
5
6