Инструкция по эксплуатации Sony NWZ-B143
Music library
4-145-624-21 (1)
Quick Start Guide
Краткое руководство / Короткий посібник
©2009 Sony Corporation Printed in China
NWZ-B142/B143/B142F/B143F
English
About the Manual
Quick Start Guide: Explains set up, enabling you to import songs to a computer, and to
transfer them to the player.
Operation Guide (PDF file): Explains advanced features of the player and offers
troubleshooting information. The Operation Guide (PDF file) is stored in the built-in
flash memory of the player. To view the Operation Guide (PDF file), see “Supplied Items.”
Supplied Items
Headphones (1)
Quick Start Guide (this manual) (1)
Included items in the built-in flash memory of the player
The following items are stored in the [Storage Media] folder of the built-in flash memory
of the player.
1. Remove the USB cap of the player and connect the player directly to a USB connector
on your computer.
2. Double-click [My Computer] or [Computer] - [WALKMAN] - [Storage Media]*
1
.
The following folders are displayed.
3. Copy all data or the necessary data in the following folders to your computer.
Storage Media
Operation Guide*
2
Support
PC_Application_
Software
Stored PDF files of the Operation Guide.
There are shortcut icons to “Customer
Support” and “Customer Registration” in
the country/region folders.
There is a shortcut icon to Windows
Media Player 11 download site.
*
1
Data hierarchy may differ, depending on your computer environment.
*
2
PDF files named [xxx_NWZB140.pdf] in this folder are the Operation Guide. The language name
is displayed in the place of “xxx.” Choose the manual of your language. To view the Operation
Guide (PDF file), you need Adobe Reader or Acrobat Reader 5.0 in your computer. Adobe Reader
can be downloaded from the Internet for free.
Hint
To use the free space in the [Storage Media] folder more effectively, back up all necessary
data in the above three folders to your computer, and then delete the folders. To format the
built-in flash memory of the player, see “To initialize (format) the player.”
Before Connecting the Player to Your Computer
Make sure that the OS is Windows XP (Service Pack 2 or later) or Windows Vista
(Service Pack 1), and the installed Windows Media Player version on your computer is
11.
Charging the Battery
The player’s battery is recharged while the player is connected to a running computer.
To
Charging
Fully charged
About 70 minutes
Note
If the player is used for the first time, or left unused for an extended period, the player’s display
may remain blank for about 5 minutes after connecting to a computer or other device, or
during charging.
If the player’s display remains blank for more than 5 minutes, press the RESET button to reset the
player.
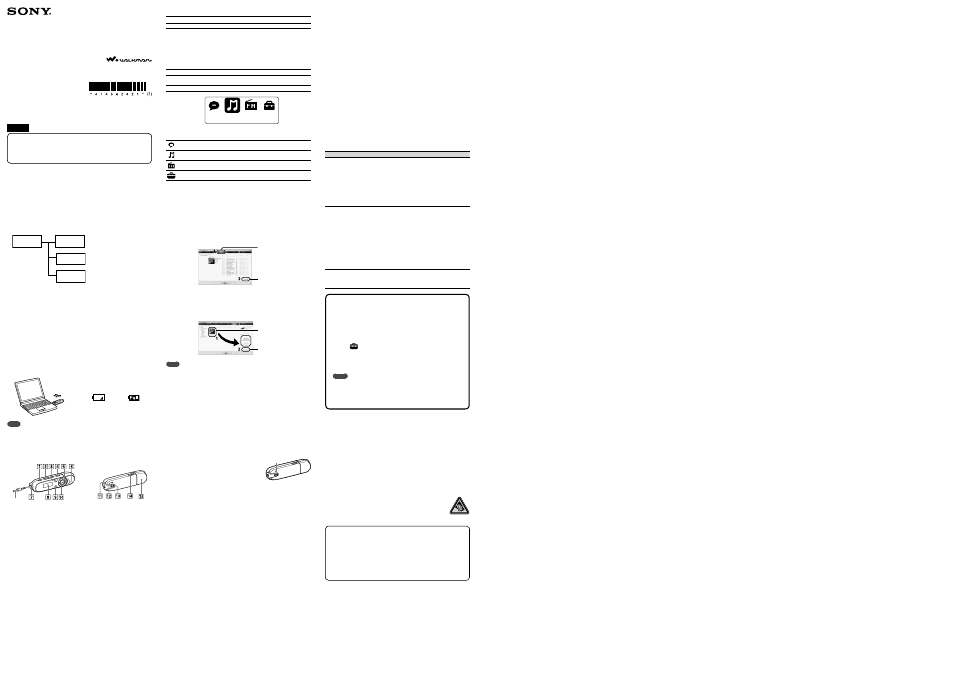
Parts and Controls
Headphones
Front
Rear
REC/STOP button
Starts/stops recording. You can record
sound using the player’s built-in
microphone. You can also record the
currently received FM program (NWZ-
B142F/B143F only).
VOL +/– button
ZAP button
Changes between normal playback and
ZAPPIN playback. ZAPPIN playback is
sequential playback of song clips at a
preset duration.
BASS button
Activates the Bass function to emphasize
the low sound range.
button
Starts/pauses song playback, or pauses/
restarts recording.
/ button
Finds the beginning of a song, or fast-
rewinds/forwards. You can also select the
previous/next frequency or preset number
on the FM radio screen.
(Headphone) jack
Display
BACK/HOME button
See “How to Use the Player.”
Power Illuminator
Illuminated by LED.
Microphone
For recording sound by the player.
RESET button
Use a small pin, etc.
Strap hole
HOLD switch
Disables the operation buttons to avoid
accidental operation while carrying the
player.
USB cap
When connecting with USB, remove the
USB cap.
Turning the Player On and Off
To turn on
Press the button.
To turn off
Press and hold the button.
Hint
If song playback is paused and there is no operation for a certain period of time, the player
turns off automatically.
How to Use the Player
The HOME menu is the starting point of each application.
To display the HOME menu
Press and hold the BACK/HOME button.
To select an item
Press the / button to select an item, and then press
the button to confirm.
To return to the previous screen
Press the BACK/HOME button.
HOME menu
Music Library
The icons appear in the HOME menu and the color of the selected icon is inverted.
Voice
Plays back/deletes sound files recorded with the player’s built-in
microphone.
Music Library Plays back transferred songs on the player.
FM*
1
Plays FM radio, or plays back/deletes FM radio programs recorded with the
player.
Settings
Sets function settings of music, FM*
1
, voice recording, or the player.
*
1
NWZ-B142F/B143F only
Importing and Transferring Music
You can transfer songs to the player using Windows Media Player 11 on your computer.
If you do not have Windows Media Player 11 in your computer, click a shortcut icon to
the Windows Media Player 11 download site in the built-in flash memory of the player.
1
Import songs from CDs, etc., to Windows Media Player 11 on the
computer.
For details on how to import songs from CDs, etc., refer to the Help of Windows
Media Player 11. You do not need to re-import songs that have previously been
imported to Windows Media Player 11.
1 Click “Rip.”
2 Click here to
start importing.
2
Connect the USB connector of the player to your computer.
Insert the USB connector fully.
3
Transfer songs from Windows Media Player 11 to the player.
“DATA ACCESS” appears in the display while transferring songs to the player.
1 Choose albums,
etc.
2 Click here to transfer
to the player.
Note
Do not disconnect the player while files are being transferred. If you do, the file being transferred
will be damaged.
Hint
You can also transfer data to the player by dragging and dropping in Windows Explorer on
your computer.
To delete songs transferred to the player
Connect the player to your computer, and then delete any unnecessary audio files using
Windows Media Player 11 or Windows Explorer.
Troubleshooting
If the player does not function as expected, try the following steps to resolve the issue.
1
Find the symptoms of the issue in “Troubleshooting” in the Operation
Guide (PDF file), and try any corrective actions listed.
About connecting with a computer, see the following “Connection with a
computer.”
2
Connect the player to your computer to
charge the battery.
You may be able to resolve some issues by charging
the battery.
3
Press the RESET button with a small pin, etc.
If you press the RESET button while operating the player, stored data and settings on the player
may be deleted.
After resetting the player, press the button to turn on the player.
4
Check the information about the issue in the Help of the software.
5
Look for information about the issue on one of the customer support
web sites.
About the customer support web sites, see “For the latest information.”
6
If the approaches listed above fail to resolve the issue, consult your
nearest Sony dealer.
RESET button
RESET button
Computer
IBM PC/AT or compatible computer
preinstalled with the following Windows
operating systems*
1
:
Windows XP Home Edition (Service Pack 2 or
later) / Windows XP Professional (Service
Pack 2 or later)*
2
/ Windows Vista Home
Basic (Service Pack 1) / Windows Vista Home
Premium (Service Pack 1) / Windows Vista
Business (Service Pack 1) / Windows Vista
Ultimate (Service Pack 1)
Not supported by OSs other than above.
*
1
Excluding OS Versions not supported by
Microsoft.
*
2
Excluding 64-bit OS Version
CPU: 300 MHz or more (For Windows Vista,
800 MHz or more)
RAM: 128 MB or more (For Windows Vista,
512 MB or more)
USB connector (Hi-Speed USB is
recommended)
Internet Explorer 6.0 or later, Windows Media
Player 11 need to be installed.
Broadband Internet connection is required to
use Electronic Music Distribution (EMD) or
to visit the web site.
We do not guarantee operation for all computers
even if they meet the above System
Requirements.
Not supported by the following environments:
– Personally constructed computers or
operating systems
– An environment that is an upgrade of the
original manufacturer-installed operating
system
– Multi-boot environment
– Multi-monitor environment
– Macintosh
Design and specifications are subject to change
without notice.
Symptom
Cause/Remedy
The player cannot
charge the battery.
The player is not connected to a USB connector on your computer
properly.
Disconnect the player, and then reconnect it.
The battery is charged in an ambient temperature outside the range of
5 °C (41°F) to 35 °C (95°F).
Charge the battery in an ambient temperature of between 5 °C (41°F)
to 35 °C (95°F).
Your computer is not on.
Turn on the computer.
Your computer enters Sleep or Hibernate status.
Release the computer from Sleep or Hibernate status.
“CONNECTED USB”
does not appear when
the player is connected
to the computer.
The player’s USB connector is not connected to a USB connector on
your computer properly.
Disconnect the player, and then reconnect it.
A USB hub is being used.
Connect the player directly to a USB connector, as connection via a
USB hub may not work. However, a USB hub that supplies power can
be used.
Another application is running on the computer.
Disconnect the player, wait a few minutes, and reconnect it. If the
problem persists, disconnect the player, restart the computer, and
then reconnect the player.
The USB connector on your computer may have a problem. Connect
the player’s USB connector to another USB connector on your
computer.
The player becomes
unstable while it is
connected to the
computer.
A USB hub is being used.
Connect the player directly to a USB connector, as connection via a
USB hub may not work. However, a USB hub that supplies power can
be used.
To initialize (format) the player
You can format the built-in flash memory of the player. If the memory is
formatted, all shortcut icons and files including the Operation Guide (PDF file)
will be erased and all setting values returned to their defaults. Be sure to verify
the files stored in memory prior to formatting and export any necessary files to
the hard disk of your computer or other device beforehand.
1 Press and hold the BACK/HOME button until the HOME menu
appears.
2 Select
(Settings) – “Initialize” – “Format” – “OK,” in this order.
Press the / button to select the item, and then press the button
to confirm.
After selecting “OK” and confirming, “FORMATTING…” appears and
formatting starts. When formatting is complete, “COMPLETE” appears.
Notes
Do not format the built-in flash memory using Windows Explorer. If you
format the built-in flash memory, format it on the player.
If you format the built-in flash memory of the player by accident, download
the Operation Guide (PDF file) from the web site mentioned in “For the latest
information.”
Precautions
About the headphones
Avoid playing the unit at so loud a volume that extended play might affect your hearing.
At a high volume outside sounds may become inaudible. Avoid listening to the unit in
situations where hearing must not be impaired, for example, while driving or cycling.
As the supplied headphones are of open-air design, sounds go out through the headphones.
Remember not to disturb those close to you.
Notice for customers: the following information is only applicable to equipment sold
in countries applying EU directives
The manufacturer of this product is Sony Corporation, 1-7-1 Konan, Minato-ku, Tokyo, Japan. The
Authorized Representative for EMC and product safety is Sony Deutschland GmbH, Hedelfinger
Strasse 61, 70327 Stuttgart, Germany. For any service or guarantee matters please refer to the
addresses given in separate service or guarantee documents.
For users in France
When replacing the headphones/earphones, please refer to the model of the headphones/earphones
adapted to your unit that appears below.
MDR-E804
At high volume, prolonged listening to the personal audio player can damage the
user’s hearing.
Program ©2009 Sony Corporation
Documentation ©2009 Sony Corporation
For the latest information
If you have any questions or issues with this product, or would like information on compatible
items with this product, visit the following web sites.
For customers in the USA: http://www.sony.com/walkmansupport
For customers in Canada: http://www.sony.ca/ElectronicsSupport/
For customers in Europe: http://support.sony-europe.com/DNA
For customers in Latin America: http://www.sony-latin.com/index.crp
For customers in other countries/regions: http://www.sony-asia.com/support
For customers who purchased the overseas models:
http://www.sony.co.jp/overseas/support/
Connection with a computer
About connecting with a computer, check the following “System Requirements (for the
player)” and tables.
System Requirements (for the player)