Инструкция по эксплуатации Saturn ST-HC7387
Страница 4
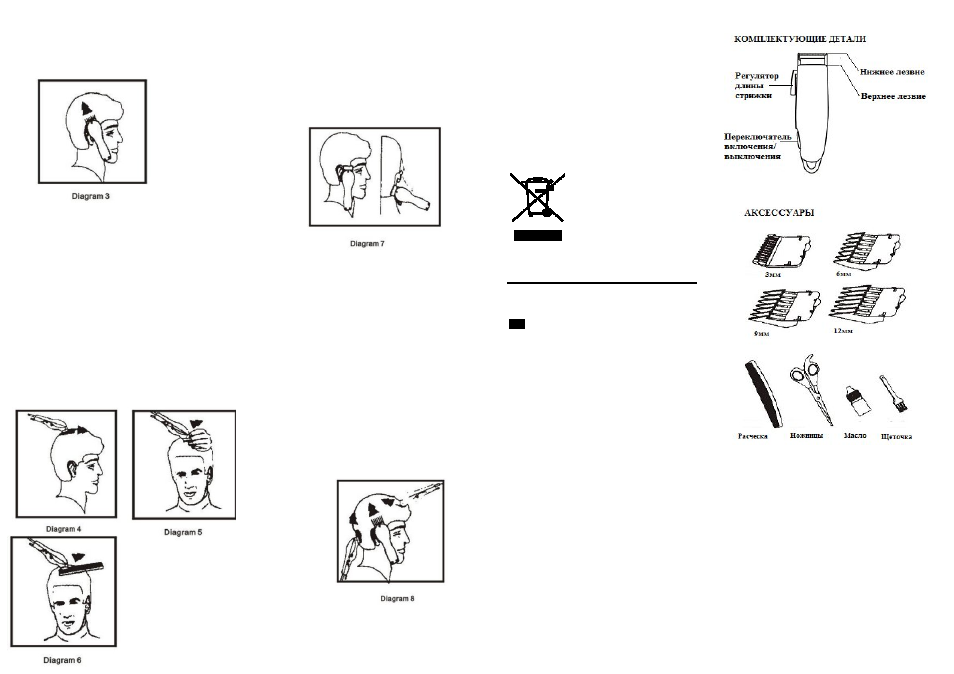
6
3mm or 6mm, trim sideburns, i.e. the
hair directly in front of the ears. Then
change to one of the longer combs 9mm
or 12mm, and continue to cut to the top
of the head (see diagram 3).
STEP 4 - TOP OF THE HEAD
1.
Using comb attachment 9mm or
12mm, cut top of head from back to front
against the direction, in which the hair
normally grows (see diagram 4). ln some
cases, this may require the reverse, or
cutting from front to back.
2.
Comb attachments 3mm or 6mm
are used to achieve a close crew cut or
short cut.
3.
For longer hair on top, use the
comb provided and lift hair on the top of
the head. Cut over the comb, with the
hair lifted or hold the hair between the
fingers to lift it and cut it to desired
length (see diagrams 5 and 6). Always
work from the back of the head. You can
cut the hair shorter gradually by reducing
the space between the comb/fingers and
the head. Comb out trimmed hair and
check for uneven strands.
STEP 5 - THE FINISHING TOUCH
1.
Finally, use the taper lever with-
out an attachment comb for close trim-
ming around the base of the neck, the
sides of the neck and the ears.
2.
Press the clipper at right angles
to the head, tips of the blades lightly
touching the skin and work downwards.
This way you will obtain a clean cut, as
would be given by a razor.
SHORT TAPERED STYLES - 'FLAT
TOPS' AND SHORT CUTS
1.
Starting with the longest at-
tachment comb (12mm), cut from the
back of the neck to the crown. Hold the
attachment comb flat against the head
and slowly move the clipper through the
hair, as shown (see diagram 8).
2.
Use the same procedure from
the lower side to the upper side of the
head, as illustrated. Then cut the hair
against the direction, in which it grows,
from the front to the crown and then lev-
el the cut with the sides.
3.
To give a flat top look, the hair
on top of the head must be cut over the
top of a flat comb rather than by using
the attachment comb.
4.
Use closer cutting attachment
combs to taper the hair down to the
neckline as desired. Comb hair and check
for uneven areas and outlining sideburns
and neckline, as described previously.
7
Technical Data:
Power:
15 W
Rated Voltage:
220-230 V
Rated Frequency:
50 Hz
Rated Current:
0.07 А
Accessories:
4
attached
combs, clean brush, scissors, hair comb,
oil
Set
HAIR CLIPPER
1
INSTRUCTION MANUAL WITH
WARRANTY BOOK
1
PACKAGE
1
Environment friendly disposal
You can help protect the
environment!
Please remember to re-
spect the local regulations:
hand in the non-working
electrical equipment to an
appropriate waste disposal
centre.
The manufacturer re-
serves the right to
change the specification and design
of goods.
RU
МАШИНКА ДЛЯ СТРИЖКИ
Уважаемый покупатель!
Поздравляем Вас с приобретением
изделия торговой марки “Saturn”.
Мы уверены, что наши изделия
станут верными и надежными по-
мощниками в Вашем домашнем хо-
зяйстве.
Не подвергайте устройство резким
перепадам температур. Резкая сме-
на температуры (например, внесе-
ние устройства с мороза в теплое
помещение) может вызвать кон-
денсацию влаги внутри устройства
и нарушить его работоспособность
при включении. Устройство должно
отстояться в теплом помещении не
менее 1,5 часов.
Ввод устройства в эксплуатацию
после транспортировки произво-
дить не ранее, чем через 1,5 часа
после внесения его в помещение.
ПРОЧИТАЙТЕ ВСЮ ИНСТРУКЦИЮ ПО
ЭКСПЛУАТАЦИИ ПЕРЕД ИСПОЛЬЗО-
ВАНИЕМ И СОХРАНИТЕ ЕЕ НА БУДУ-
ЩЕЕ
РЕГУЛИРОВКА ЛЕЗВИЙ
·
Перед поставкой производи-
тель проверяет, чтобы лезвия были
смазаны маслом и отрегулированы.
·
Перед эксплуатацией машинки
для стрижки лезвия необходимо снова
отрегулировать, если их снимали для
чистки или меняли.
·
Чтобы отрегулировать лезвия,
точно совместите зубья верхнего и
нижнего лезвий.
(Края зубьев верхнего лезвия должны
быть приблизительно на 1,2мм смеще-
ны назад относительно зубьев нижнего
лезвия; посмотрите, как это показано
на рисунке).