Использование определяемых пользователем кнопок, Using the user defined keys, Chapter 21—other functions – Инструкция по эксплуатации Yamaha dm2000v2e1
Страница 270: Микшер отобразит окно user define select
DM2000 Version 2—Owner’s Manual
Другие функции
270
Использование определяемых пользователем кнопок
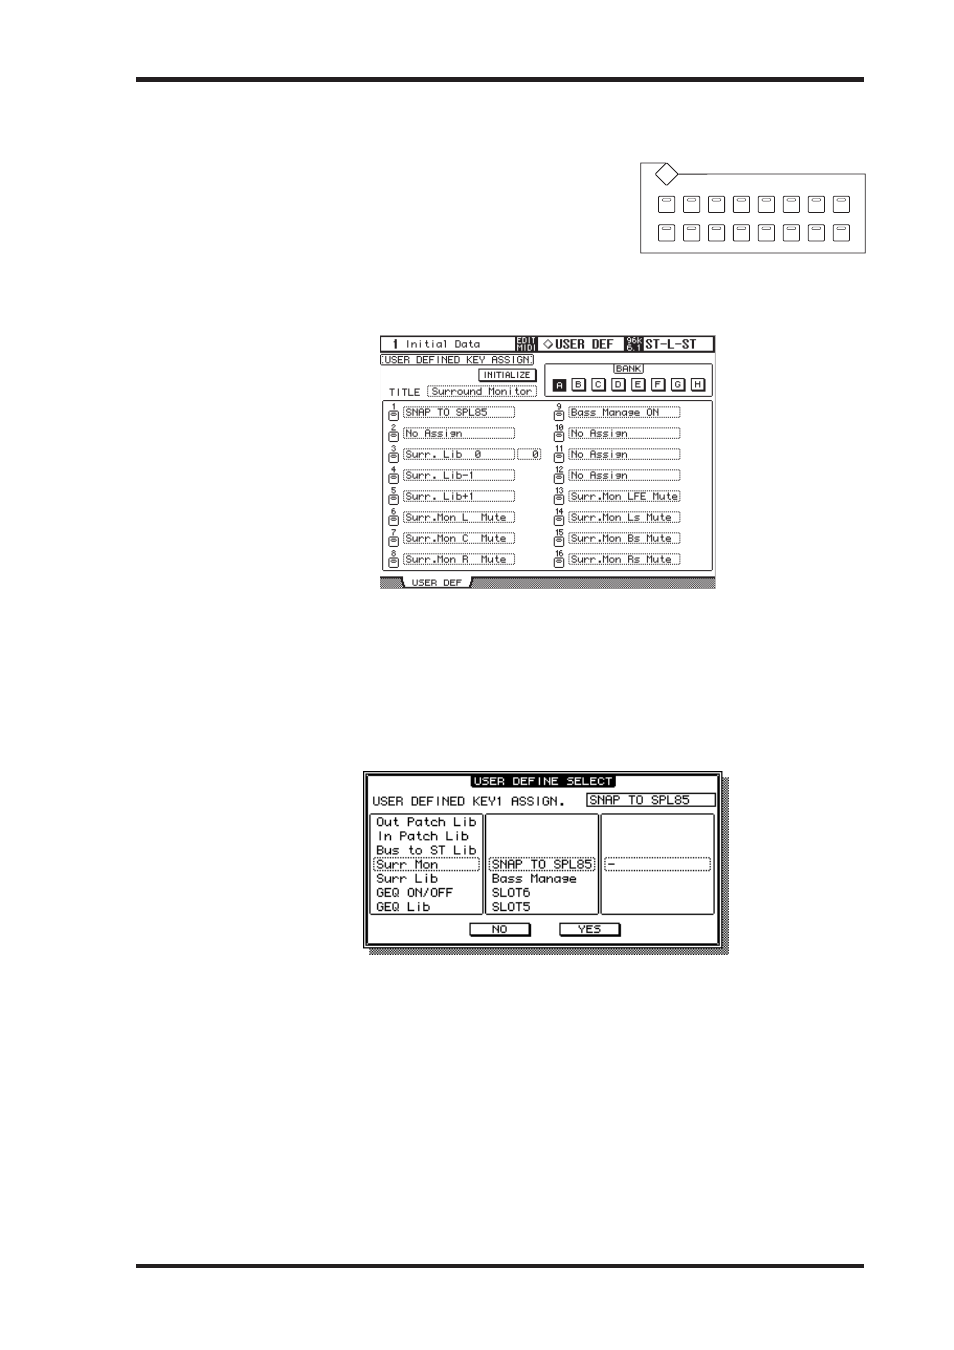
Кнопкам USER DEFINED KEYS [1]–[16] можно присво-
ить любую из 200 функций. Функции, назначенные
User Defined Keys, хранятся в 8 модулях A-H (ин-
формация по настройкам модулей приведена на стр.
283).
1 Чтобы открыть страницу User Defined Key Assign (назначение функций определяе-
мым пользователем кнопкам), нажмите кнопку USER DEFINED KEYS [DISPLAY].
USER DEFINED KE YS
1
2
3
4
5
6
7
8
9
10
11
12
13
14
15
16
DISP LA Y
2 С помощью курсора выберите необходимую кнопку BANK (модуль; 1-12), затем
нажмите [ENTER].
Параметр TITLE соответствует названию выбранного модуля. Выберите поле параметра
TITLE и нажмите [ENTER]. Появится окно редактирования заголовка (Title Edit).
3 Подведите курсор к одному из полей параметров 1–16, затем нажмите [ENTER].
Микшер отобразит окно User Define Select.
270
Chapter 21—Other Functions
DM2000 Version 2—Owner’s Manual
Using the User Defined Keys
Up to 16 functions from a list of over 200 can be
assigned to the USER DEFINED KEYS, and up to
eight assignment setups can be stored in banks A to
H. See page 283 for a list of initial bank assignments.
1
Use the USER DEFINED KEYS [DISPLAY] button to locate the User Defined
Key Assign page.
2
Use the cursor buttons to select the BANK buttons, A to H, and press [ENTER]
to select a bank.
The TITLE parameter box displays the name of the selected bank. Select the TITLE param-
eter box, then press [ENTER]. The Title Edit window appears, enabling you to enter a
name.
3
Use the cursor buttons to select from 1–16, then press [ENTER].
The following User Define Select window opens.
4
Move the cursor to the left column, then rotate the Parameter wheel or press
the [INC]/[DEC] buttons to select the function you wish to assign.
5
Select options in the center and right columns in the same way.
The items displayed in the center and right columns vary depending on the function
assigned in Step 4.
6
Use the cursor buttons to select YES, then press [ENTER].
When the window closes, the specified function is assigned to the selected User Defined
button.
When you select a function that recalls a specific Scene or library memory, you need to spec-
ify the number of the memory that you want recalled when the USER DEFINED KEY is
pressed. To do this, in the left-hand box, select the number parameter next to the Assign
button, and use the Parameter wheel or INC/DEC buttons to specify the number.
USER DEFINED KEYS
1
2
3
4
5
6
7
8
9
10
11
12
13
14
15
16
DISPLAY
4 Чтобы выбрать функцию для назначения, подведите курсор к левому столбцу, за-
тем поверните ручку установки параметров или нажимайте кнопки [INC]/[DEC].
5 По такому же принципу выберите опции в центральном и правом столбце.
Элементы в правом и центральном столбце могут быть отличными друг от друга в за-
висимости от функций, выбранных в шаге 4.
6 Чтобы закрыть окно, с помощью курсора выберите кнопку YES, затем нажмите
[ENTER].
Когда окно закрылось, указанная функция присваивается выбранной кнопке User
Defined.
Чтобы отменить назначение, выберите кнопку CANCEL, затем нажмите [ENTER].
USER DEFINED KE YS
1
2
3
4
5
6
7
8
9
10
11
12
13
14
15
16
DISP LA Y