Инструкция по эксплуатации ViTESSE VS-230
Страница 3
www.vitesse.ru
P/3
P/4
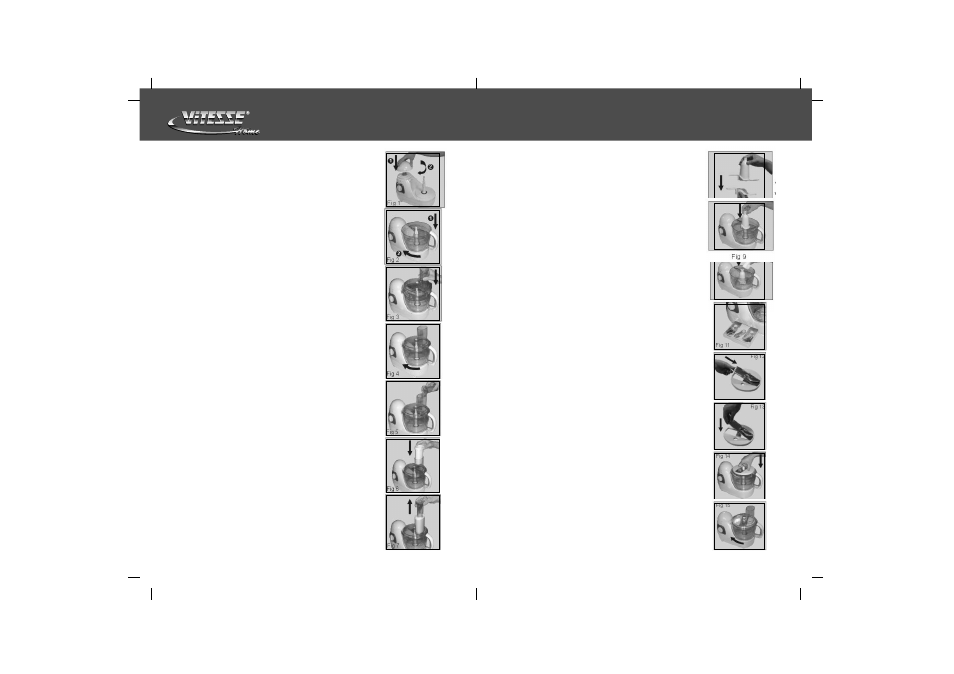
HOW TO USE:-
1. Placing the Bowl
-
Put the housing cap on the housing, and turn it
clockwise (Fig 1)
-
Put the bowl on the food processor as shown (Fig 2)
-
Turn the handle clockwise until the bowl cannot be
moved any further and you hear a “Click”
2. Placing the Bowl Lid
-
Put the lid on the bowl as shown in the Fig 3
-
Turn the lid with some force clockwise until the lid will
not move any further and you hear a “click”
(Fig 4)
-
Make sure that the mark on the lid and the arrow on
the bowl are directly opposite each other.
3. Food Inlet and Pusher
-
The inlet can be used to add liquid and solid
ingredients (Fig 5)
-
Use the pusher to push ingredients through the throat
(Fig 6)
-
You can also use the pusher to close the inlet while
the appliance is running to prevent dust or drops of
liquid from escaping through the inlet.
-
The pusher has been provided with a pusher cap
(Fig 7)
-
The pusher cap can be removed to create a narrow
inlet.
-
A narrower inlet may be handy (e.g. cover) when you
want to cut or when the amount of ingredients used is
too small to use the normal inlet.
4. Attachments
-
The housing cop or the blender have been properly
mounted onto the housing
-
If both the blender and the bowl have been mounted
correctly onto the housing, only the blender will
function.
A. “S” Blade
·
Be careful: the cutting edges of the “S” Blade are very
sharp! Especially when removing the blade from the
bowl. Emptying the bowl and during clearing.
FUNCTION:-
·
The “S” Blade can be used for chopping, mixing ,
blending, preparing puff pastry, crumble and short
crust pastry.
HOW TO USE:-
·
Remove the “S” Blade from the “S” Blade protector
(Fig 8)
·
Put the bowl on the housing and fit the “S” Blade onto
the driving shaft (Fig 9)
·
Put the ingredients onto the bowl (Fig 10)
·
Fasten the lid onto the bowl and put the pusher in the
inlet
·
Se the speed control to the position indicated in the
table and switch-on the application. If you have
doubts about the correct speed, always select the
highest speed (position 3)
·
Applications / recipes mentioned in the table will be
ready after 10~60 Seconds.
TIPS:-
1. Put the pieces approximately 3 * 3 * 3 (Cm3) in the
bowl.
2. The appliance chops very quickly, let it run for short
periods at a time.
3. Do not let the appliance run for too long time.
4. If food sticks to the “S” Blade or to the inside of the
bowl.
-
Turn the appliance off.
-
Remove the lid from the bowl
-
Remove the ingredients from the “S” Blade or the
inside of the bowl with a spatula.
Be careful with the cutter: the cutting edges are very
sharp! Especially while removing the blade from the
cutter disc.
HOW TO USE:-
-
Put the bowl on the housing
-
Put the cutter from the cutter storage (on the bottom
of the unit) (Fig 11)
-
Put one side of the cutter on the disc (Fig 12)
-
Press down the side that has the word “Push Up” of
the cutter with the toe (Fig 13)
-
Put the cutter disc in place with two fingers (Fig 14)
-
Put the lid on the bowl (Fig 15)
-
Put the ingredients in the inlet (Fig 16)
-
Press the pusher lightly onto the ingredients in the
inlet.
-
For grating and slicing: set the speed control to
position 3. (Highest Speed)
-
If you want to cut soft vegetable or fruits, you can also
select a lower speed setting
Fig 10
Fig 9
Fig 8