Novus security sp. z o.o – Инструкция по эксплуатации NOVUS NVH-100H
Страница 4
© Novus Security Sp. z o.o. All rights reserved
NVH-100H ver. 1.2 - Installation manual
1
2
3
5
4
6
6
L (+)
N (-)
PE
PE
H1
H2 L (+)
N (-)
PE
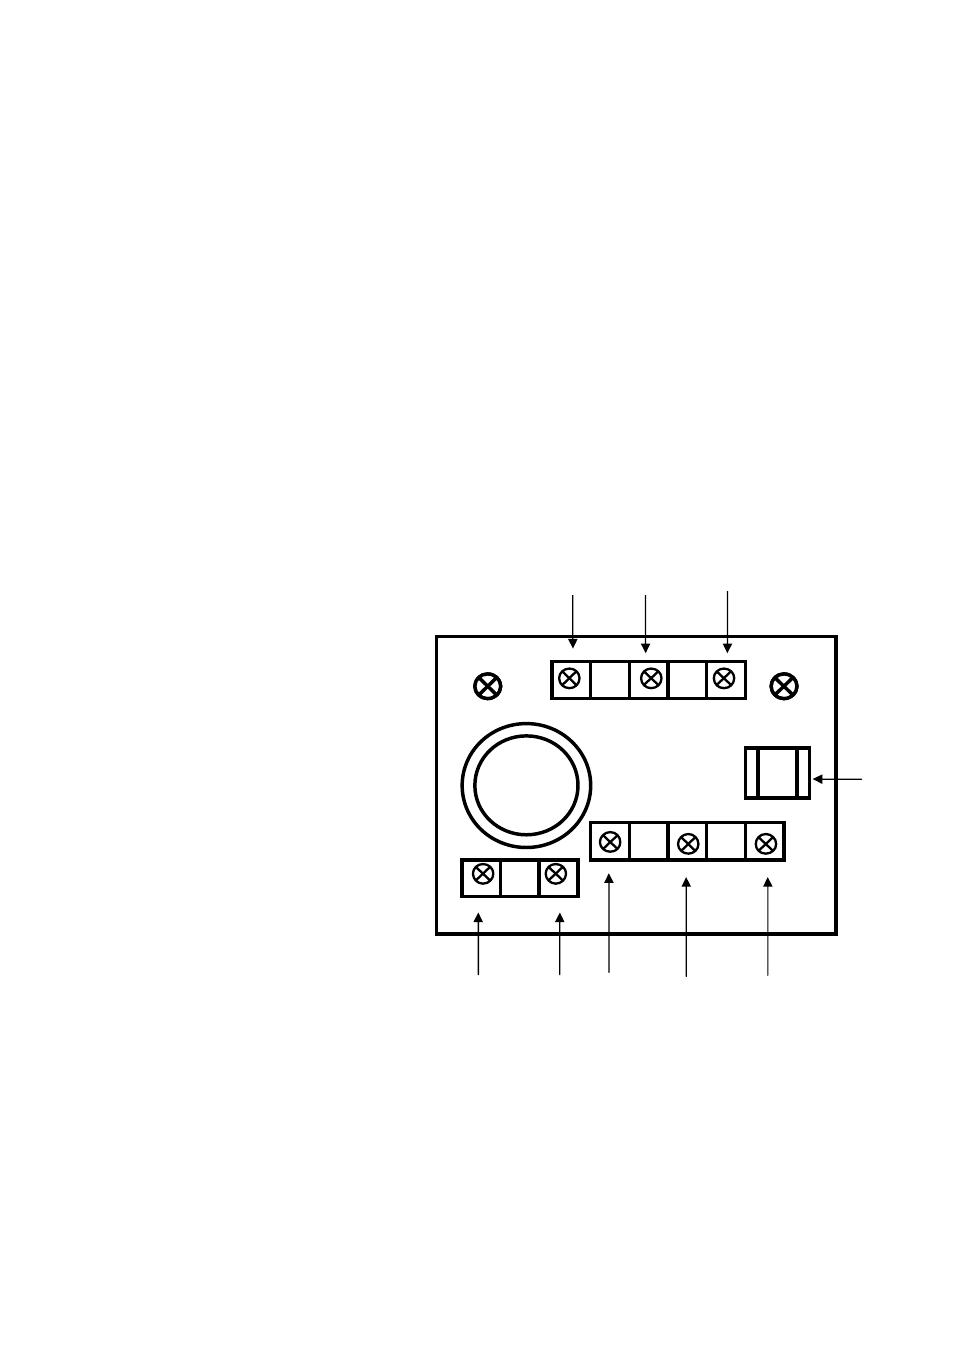
Thermostat printed board
1 - Temperature Sensor
2 - Input voltage terminal block
L - 24 / 230 VAC - phase
N - 24 / 230 VAC neutral
PE - 24 / 230 VAC ground (earth)
+ - 12 VDC plus
- - 12 VDC minus
3 - Ground (earth) connector
4 - Heater connector (H1, H2)
5 - Camera voltage terminal block
L - 24 / 230 VAC - phase
N - 24 / 230 VAC neutral
PE - 24 / 230 VAC ground (earth)
+ - 12 VDC plus
- - 12 VDC minus
6 - Thermostat board mounting screws
Installation
1.
Attach the NVB-100B mounting bracket to the wall (NVB-100B is not included);
2.
Attach the camera housing to the NVB-100B bracket using provided mounting screws;
3.
Unscrew two mount screws from the rear side of the housing;
4.
Take the main body out and leave internal slide in the working position for easy thermostat and camera mount
operation;
5.
Mount camera on the internal slide using provided screws. Beware of lenses damage due to high
temperature of the heater kit. Place the camera and lenses in optimal position for camera view angle.
6.
Connect power cables of the camera to the voltage output terminal block (5) on the thermostat board. Look
at the printed board symbols for proper voltage polarity:
for 24 / 230 VAC power supply L - phase, N - neutral, PE - earth;
for 12 VDC power supply + - plus, - - minus;
7.
Connect heater kit cables to the heater terminal block (4) on thermostat board (H1, H2);
8.
Make sure that the power supply is disconnected and connect power supply cables through the PG cable glands
to the voltage input terminal block (2);
9.
Connect video cables to the camera through the PG cable glands;
10.
Make sure that the ground (earth) cable of the housing is connected to the earth connector (3)
on the thermostat board;
11.
Make all camera and lens regulations and settings in working position;
12.
Close main body, tighten the PG rings and turn off the mounting screws at the rear side of the housing;
13.
Make sure that the housing sunshield is in proper position;
NOTICE:
All the data included in this manual are up to date at the moment of printing this manual. Novus
Security Sp. z o.o. reserves the right to amend this manual. The producer reserves the right to
modify device’s parameters and change its design without notice
.
NOVUS Security Sp. z o.o.
ul. Puławska 431, 02-801 Warszawa
tel.: (22) 546 0 700, fax: (22) 546 0 719
www.novuscctv.com