Инструкция по эксплуатации Saturn ST-FP7071
Страница 3
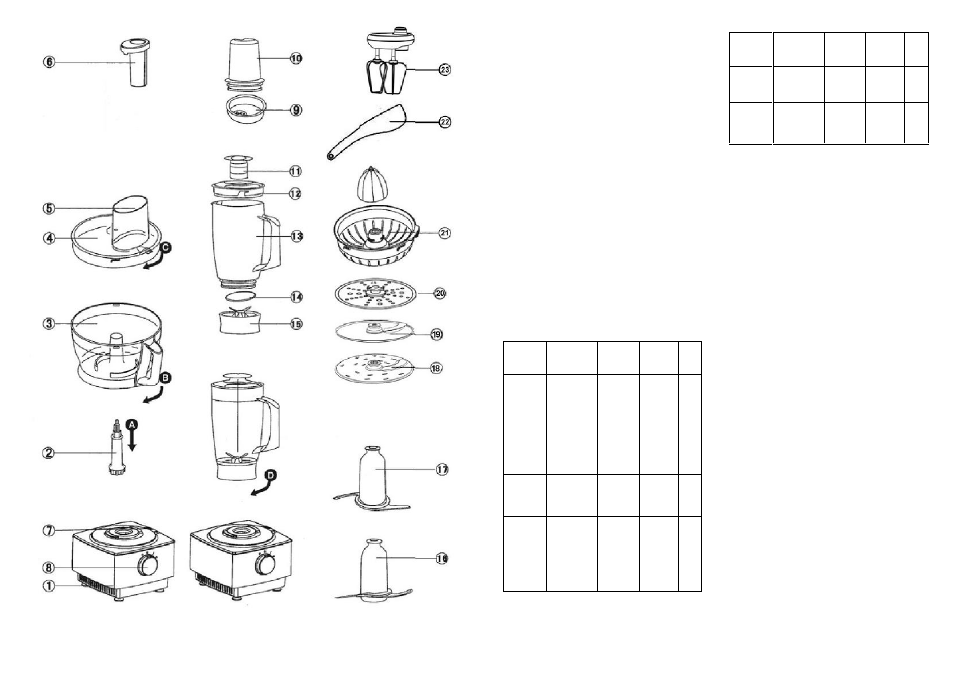
Description
Processor
1 Power unit
2 Transmission
3 Chopping bowl
4 Lid
5 Feed tube
6 Pusher
7 Safety interlock
8 Knob switch
Liquidiser
9 Mill/coffee grinder cover
10 Mill/coffee grinder cup
11 Lid cover
12 Blender lid
13 Blender bowl
14 Seal ring
15 Cup holder
Attachments
16 Chopping blade
17 Kneading
18 Slicing/ shredding disc
19 French potato disc
20 Potato mashing disc
21 Citrus juicer
22 Spatula
23 Whisk
Choosing a speed for all functions
Tool/At-
tach-
ment
Function
Speed
Maxi-
mum
capaci-
ties
KB
ti-
me
Knife
Blade
Grind meat
Cut vege-
tables
Make
stuffing:
cut meat
and vege-
tables
both (need
to put
meat first)
2
1-2
2
500g
meat
500g
meat
3
30
sec
Dough
tool
Dough
making
2
500g
flour
280 ml
water
60
sec
Discs-
slicing/
shred-
ding/
chipping
Slic-
ing/shred-
ding/chip-
ping food
and
vegetables
such as
carrots,
cheese
1-2
60
sec
Mixing
compo-
nents
make jam,
milk
shake,
soup
1-2
1200
ml
60
sec
Citrus
press
compo-
nents
Citrus
fruits
juicing
1
30
sec
Mill/cof-
fee grin-
der
compo-
nents
for spi-
ces,coffee
beans etc.
milling
2
30
sec
To use your food processor
1
Fit the detachable shaft (2) onto
the power unit.
2
Then fit the bowl. Place the handle
towards the back and turn clock-
wise until it locks (3).
3
Fit an attachment over the drive
shaft.
Always fit the bowl and attachment
onto the machine before adding
ingredients.
4
Fit the lid (C).
5
Switch on and select a speed.
The processor won’t work if the
bowl and lid are fitted incorrectly.
Use the pulse (p) for short bursts.
The pulse will operate for as long
as the control is held in position.
6
Reverse the above procedure to
remove the lid, attachments and
bowl.
Always switch off before removing
the lid.
Important
When adding almond essence or
flavoring to mixtures avoid contact
with the plastic as this may result
in permanent marking.
To use your liquidiser
1
Fit the sealing ring (14) into the
blade unit (15) ensuring the seal is
located correctly. Leaking will occur
if the seal is damaged or not fitted
correctly.
2
Screw the jug onto the blade unit.
3
Put your ingredients into the jug.
4
Put the lid cover in the lid, then
turn.
5
Turn the lid in a clockwise direction
to lock onto the jug.
6
Place the liquidiser onto the power
unit and turn to lock(D).
7
Select a speed or use the pulse
control.
Allow all liquids to cool to room
temperature before placing them in
the liquidiser.
Hints
When making mayonnaise, put all
the ingredients, except the oil, into
the liquidiser. With the machine
4
5