Инструкция по эксплуатации Saturn ST-DV7705
Страница 5
8
Easy DVD hook up guide: For the best
possible picture, simply follow these
guidelines and use the best cables your
TV accepts:
Normal: Composite video Good: S-
video.
Better: Component video Best: HDMI
video.
HD DVD playback: Enjoy your entire
DVD collection in brilliant
high definition format.This DVD player
upconvert DVDs to your HDTV's native
resolution,whether it's 480p,720p,576p
or 1080i.
HDMI output:Use this output for HD
conversion and experience stunning HD
images and crisp digital audio.
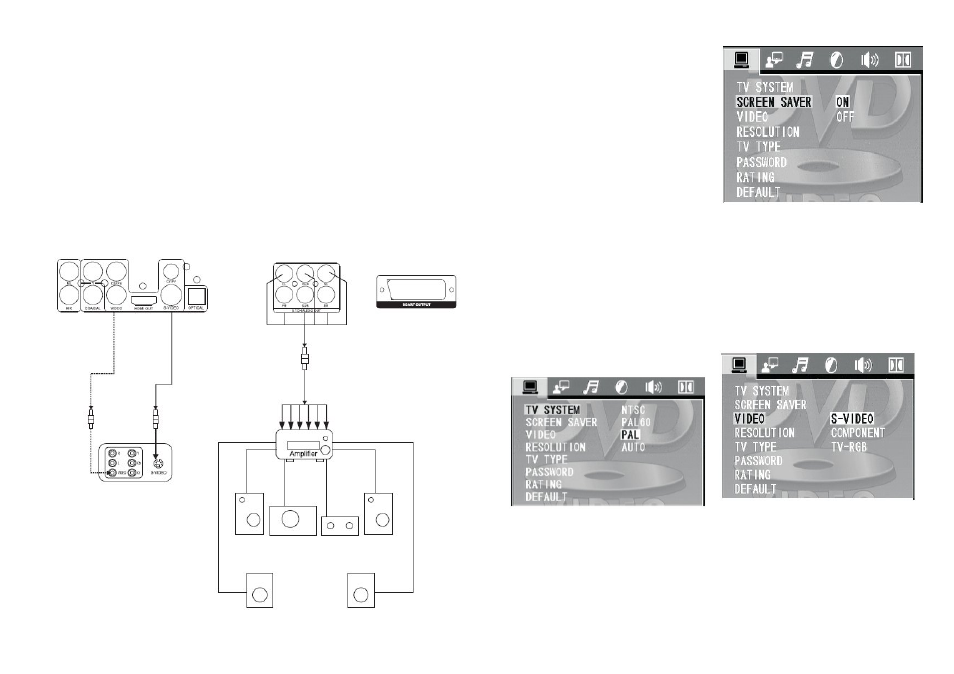
Connecting the AC-3 Decoding Amplifier.
Connect the unit’s video output to the
video input terminals (Video, S-Video or
Y Cb Cr ) of the TV set.
Connect the digital output( optical or
coaxial ) to the AC-3 built-in amplifier.
Press SETUP button on the remote con-
trol to enter the unit’s SETUP menu.
Press directional keys on the remote
control to select the AUDIO OUTPUT.
Press directional keys on the remote
control to select digital output and
choose BISTREAM or LPCM48K.
Press SETUP again to save your selec-
tion and exit [SETUP] menu.
Connecting to 5.1 CH Amplifier
Connect the unit’s video output terminal
to the Tv’s video input terminals (Video ,
S-Video or Y Cb Cr). Connect the unit’s
5.1 channels surround audio output
terminals to the 5.1 channels amplifier’s
audio input terminals.
Prepositive Left , Prepositive Right, Sur-
round Left , Surround Right, Center and
Sub-woofer.
BASIC OPERATION
Press SETUP button on the remote con-
trol unit to the initial setting. Select re-
lated SETUP PAGE through directional
buttons. The selected item will be high-
lighted.
Menu Operations
You can set the mode of audio and video
output, OSD language ,initial setup,
parental control level and so on.
You can also select the aspect ratio of
the playback picture to confirm to your
TV screen.
Press SETUP to display setup menu and
the system convert to stop status itself.
1. Introduction of setup page
1) SYSTEM SETUP
Press SETUP and select system setup
page via directional buttons.
TV system: Using up/down arrow button
to make a selection for TV system.
There are some TV output systems for
chosen:
NTSC, PAL-M, PAL-N , PAL, AUTO.
SCREEN SAVER
Using up/down arrow button to select
the status of the screen saver On:
When enabled, if the machine has been
idle (e.g. in stop/pause state or waiting
for user input or for about 60 seconds),
the video will be blanked while a screen
saver will bounce around the screen to
protect screen.
Off: Setting without screen saver
VIDEO
There are three video output modes for
your choice:
1) COMPONENT: use Y Cb Cr /Y Pb Pr
terminals to output signals
2) TV-RGB: Use S-video or composite
video output terminals to output signals.
3) P-SCAN YPBPR: use Y Pb Pr terminals
to output signals and convert to pro-
gressive output.
4) PC-VGA: Use VGA to output signals &
convert to progressive output.
5) S-VIDEO: Use S-VIDEO to output
signals
TV TYPE
Using left/right arrow buttons to select
TV aspect ratio: 16: 9
16:9 Wide screen video output for a
wide screen TV set;
4:3/LB.
4:3 Letter Box video output for a normal
TV set. The screen displays the wide
picture with brand displayed on the up-
per and lower portions of the screen.
4:3/PS.
4:3 Pan & Scan video output for a nor-
mal TV set. The screen displays the wide
picture on the whole screen with a left
and right portion automatically cut off.
9