Be quiet! limited warranty – Инструкция по эксплуатации be quiet! Silent Wings 3 120mm PWM High-Speed Fan
Страница 2
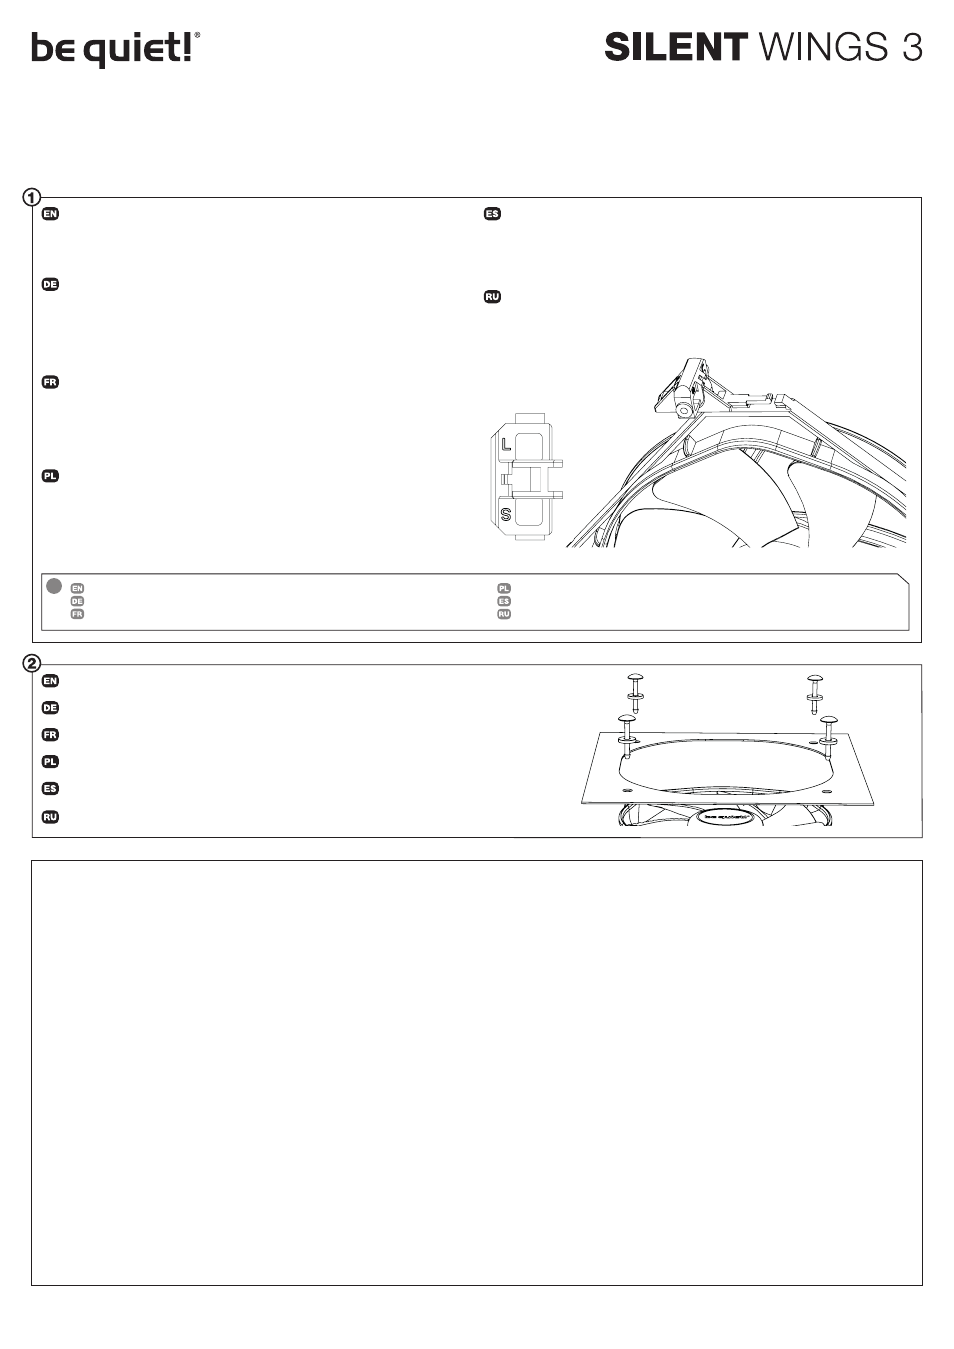
The fan is then mounted into place using the washers and push-pins.
Zur Montage des Lüfters verwenden Sie die Unterlegscheiben sowie die Push-Pins zur Fixierung.
Le ventilateur est fixé avec un système de push pins et de joints.
Wentylator jest mocowany za pomocą podkładek i mocowań push-pin.
Para el montaje del ventilador, utilice las arandelas y los push pins para la fijación.
Закрепите вентилятор с помощью шайб и нажимных штифтов.
Installation of the anti-vibration fittings
Installation der Anti-Vibrations-Befestigungen / Installation des éléments anti-vibration
Instalacja antywibracyjnych uchwytów / Instalación de las fijaciones antivibración /
Установка антивибрационных
держателей
Insert the rubber elements from the left along the rails until these audibly click into place.
•
When positioned towards “L” there is 1mm gap between the housing and the fan frame,
resulting in the maximum possible decoupling.
•
When you position the rubber elements towards “S” they fit flush with the housing.
Schieben Sie die Gummi-Elemente von der linken Seite über die Führungsschiene bis diese
hörbar einrasten.
•
In Richtung „L“ eingesetzt ist zwischen dem Gehäuse und Lüfterrahmen 1mm Luft. Dies
hat eine maximal mögliche Entkopplung zur Folge.
•
Setzt man die Gummi-Elemente in Richtung „S“ ein, schließen diese mit dem Gehäuse
bündig ab.
Insérez les éléments en caoutchouc le long des rails, à partir de la gauche, jusqu’à ce que
vous entendiez un clic.
•
Lorsque les éléments de montage sont positionnés en face du”L”, il y a un interstice de
1 mm entre le cadre du ventilateur et le boîtier, pour une isolation maximale.
•
Lorsque les éléments de montage sont positionnés en face du “S”, il n’y a aucun espace
entre le ventilateur et le boîtier.
Wsuwaj gumowe elementy od lewej strony w szyny montażowe do momentu, gdy
usłysyszysz wyraźny odgłos kliknięcia.
•
W pozycji “L” odległość pomiędzy obudową a ramą wentylatora wynosi 1mm. Zapewnia to
najlepszą możliwą izolację.
•
Po umieszczeniu gumowych elementów w kierunku “S”, przylegają one bezpośrednio do
obudowy
Inserte los elementos de goma en los carriles guía desde la izquierda hasta escuchar un
«clic» que indica que han encajado en su lugar.
•
Si se colocan hacia «L», habrá una separación de 1 mm entre la carcasa y el bastidor del
ventilador, lo que da como resultado el desacoplamiento máximo posible.
•
Si coloca los elementos de goma hacia «S», encajarán en la carcasa al ras.
Установите резиновые элементы в направляющие и нажмите их до защелкивания.
• При установке элементов стороной “L”, между корпусом ПК и рамкой вентилятора
остается зазор в 1 мм.
• При монтаже резиновых элементов стороной “S”, они становятся заподлицо с
корпусом.
be quiet! Limited Warranty »
Per the terms and conditions of this limited warranty as given
below, be quiet! warrants its new products to be free of de
-
fects resulting from faulty materials and faulty manufacturing
for the length of the warranty period.
I. APPLICABILITY
This non-transferable warranty is applicable to newly pur-
chased, previously unopened be quiet! products and is en
-
forceable by only the original consumer purchaser. Proof of
purchase is required for warranty service, so should be re
-
tained. be quiet! does not provide warranty registration services.
II. WARRANTY PERIOD
For eligible products, parts and labor are warranted for the
applicable warranty period from the date of purchase. The ap-
plicable warranty period varies by product model, and is identi
-
fied in your user documentation, on the product package, or as
listed below. Should any of these warranty periods differ, the
longest specified warranty period will apply. Replaced prod
-
ucts will be warranted for the remainder of the original war-
ranty period or thirty days, whichever is longer.
III. EXCLUSIONS
The following are not covered by the warranty:
1. Normal wear and tear.
2. Any product which has been modified without permission
from be quiet!, or on which the serial number or warranty
sticker has been defaced, modified, or removed.
3. Damage, deterioration or malfunction resulting from:
•
Accident, abuse, misuse or improper use, neglect, connec
-
tion to an improper voltage source, unauthorized product
modification, or failure to follow instructions included with
the product.
•
Fire, water, lightning, or other acts of nature.
•
Repair or attempted repair by anyone not authorized by
be quiet!.
• Shipping or transport damage (claims must be made with
the carrier).
• Any other cause which does not relate to a defect in materi-
als or manufacturing workmanship.
4. Cartons, cases, batteries, cabinets, tapes, accessories or
other consumables used with this product.
5. be quiet!, Inc. does not warrant that this product will meet
your requirements. It is your responsibility to determine the
suitability of this product for your purpose.
6. Removal or installation charges.
7. Shipping charges.
8. Any incidental charges.
IV. EXCLUSION OF DAMAGES
be quiet!‘s sole obligation and liability under this warranty is
limited to the repair or replacement of a defective product at
its option. be quiet! shall not, in any event, be liable for any
special, incidental, indirect, or consequential damages what
-
soever, including but not limited to loss of profits, revenue, or
data (whether direct or indirect), damages resulting from inter
-
ruption of service and loss of business, or for liability in tort
relating to this product or resulting from its use or possession,
even if be quiet! has been advised previously of the possibility
of such damages.
V. LIMITATIONS OF IMPLIED WARRANTIES
There are no other warranties, expressed or implied, including
but not limited to those of merchantability or fitness for a par
-
ticular purpose. The duration of implied warranties is limited to
the warranty length specified in Paragraph II.
VI. LOCAL LAW AND YOUR WARRANTY
This warranty gives you specific legal rights. You may also have
other rights granted under local law. These rights may vary.
VII. NO OTHER WARRANTY
No be quiet! employee, dealer, or other agent is authorized to
make any modification, extension, or addition to this warranty.
VIII. TO OBTAIN TECHNICAL SUPPORT OR WARRANTY SERVICE
Please see your product owner’s manual or visit the Online
Support section at www.bequiet.com for details and contact
information. You will need to provide proof of purchase for
warranty service.
Version: 01/2016
bequiet.com
To remove the anti-vibration fittings follow the instructions on page 1.
Zum Entfernen der Anti-Vibrations-Befestigungen folgen Sie bitte den Erklärungen auf S.1.
Pour enlever les éléments anti-vibration, veuillez suivre les instructions indiquées en page 1.
W celu usunięcia mocowań antywibracyjnych postępuj zgodnie z instrukcjami na stronie 1.
Para extraer los accesorios anti-vibración, siga las instrucciones de la página 1.
Для снятия антивибрационных держателей следуйте инструкциям на странице 1.
i