Инструкция по эксплуатации Kemo Electronic M148A
Fp e d gb nl rus
M148A | Batteriewächter 12 V/DC
Dieser Batteriewächter schützt Ihre Auto-
batterie vor Tiefentladung durch das rechtzeitige Ab-
schalten von Verbrauchern wie Kühlboxen, Heizungen,
Radios, Fernsehgeräten usw. Er schaltet automatisch
wieder ein nach Wiederkehr der normalen Spannung.
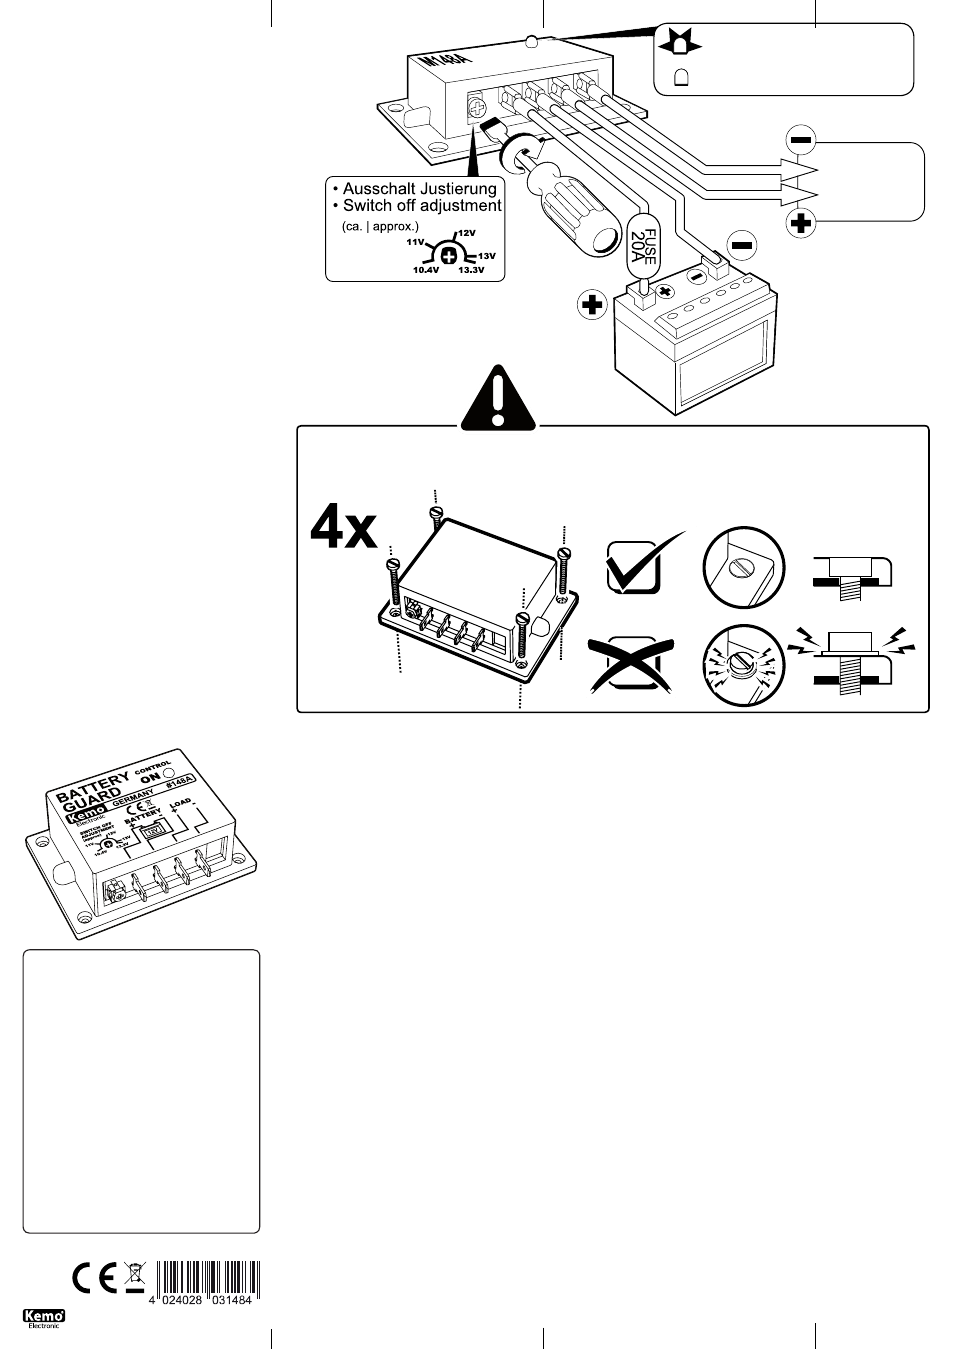
Die Abschaltspannung ist einstellbar: ca. 10,4 - 13,3 V.
M148A | Battery Guard 12 V/DC
This battery saver protects your car battery
from total discharge by switching off consumers such as
ice boxes, heaters, radios + television sets, etc. in time.
It switches on again automatically after return of the
normal voltage. The interrupting voltage is adjustable:
approx. 10.4 - 13.3 V.
M148A | Controlador de baterías 12 V/DC
Este protector de acumulador protege su ba-
tería de coche contra descarga total por desconectar a
tiempo dispositivos consumidores como cajas frigorífi-
cas, calefacciones, radios + televisores, etc. Él conecta
de nuevo automáticamente cuando la tensión normal
regresa. La tensión de desconexión es ajustable: aprox.
10,4 - 13,3 V.
M148A | Contrôleur de batterie 12 V/DC
Ce contrôleur d’accumulateur protège votre
batterie pour auto contre décharge profonde par décon-
necter à temps des dissipateurs comme caisses frigori-
fiques, chauffages, radios + téléviseurs, etc. Il intercale
de nouveau automatiquement quand la tension normale
revient. La tension de rupture est ajustable: env. 10,4 -
13,3 V.
M148A | Batterij bewaker 12 V/DC
Deze accusaver beschermt uw auto accu voor
te grote ontlading door middel van het uitschakelen van
“zware“ apparaten zoals koelboxen, verwarming, radio
/ tv, etc. Deze schakelt automatisch weer aan, bij de
normale spanning. De uitschakelspanning is instelbaar:
ca. 10.4 - 13.3 V.
M148A | Controlador de bateria 12V/DC
Este acumulador saver protege a sua bateria
do carro contra descarga total através do oprturno des-
ligar do consumidor como caixas térmicas, aquecimen-
tos, rádios e televisores etc. Liga novamente automático
depois da volta da tensão normal. A tensão de circuito
de desconexão pode ser ajustada: ca. 10,4 - 13,3 V.
M148A | Прибор, предотвращающий
полную разрядку 12 Вольтного акку-
мулятора
Дaнный модуль прeдотвращает полную рaзрядку
аккумулятора и своевременно отключает от него
потрeбитeли нaпр. холодильники, обогреватели,
рaдиоприeмники, тeлeвизоры и т.д. Обратное
включeние модуля происходит aвтомaтичeски,
если нaпряжeние аккумулятора поднимается до
нормaльного уровня. Нaпряжeниe отключeния:
можно установить примeрно 10,4 - 13,3 Вольт.
www.kemo-electronic.de
P / Module / M148A / Beschreibung /14028DI / KV040/
Einl. Ver. 1.1
190 095
N81QL
D | Wichtig: Bitte beachten Sie die extra beiliegenden “Allgemeingültigen
Hinweise” in der Drucksache Nr. M1002. Diese enthält wichtige Hinweise der
Inbetriebnahme und den wichtigen Sicherheitshinweisen! Diese Drucksache
ist Bestandteil der Beschreibung und muss vor dem Aufbau sorgfältig gelesen
werden.
GB | Important: Please pay attention to the “General Information” in the
printed matter no. M1002 attached in addition. This contains important infor-
mation starting and the important safety instructions! This printed matter is
part of the product description and must be read carefully before assembling!
E | Importante: Observar las ”Indicaciones generales” en el impreso no.
M1002 que se incluyen además. ¡Ellas contienen informaciones importantes
la puesta en servicio y las instrucciones de seguridad importantes! ¡Este im-
preso es una parte integrante de la descripción y se debe leer con esmero
antes del montaje!
F | Important: Veuillez observer les « Renseignement généraux » dans
l’imprimé no. M1002 ci-inclus. Ceci contient des informations importantes
la mise en marche et les indications de sécurité importantes! Cet imprimé
est un élément défini de la description et il faut le lire attentivement avant
l’ensemble!
NL | Belangrijk: Belangrijk is de extra bijlage van “Algemene toepassingen“
onder nr. M1002. Deze geeft belangrijke tips voor het monteren het ingebruik
nemen en de veiligheids voorschriften. Deze pagina is een onderdeel van de
beschrijving en moet voor het bouwen zorgvuldig gelezen worden.
P | Importante: Por favor tomar atenção com o extra “Indicações gerais
válidas” o junto impresso M1002. Este contém importantes indicações a
colocação em funcionamemto e importantes indicações de segurança! Este
impresso é um elemento da descrição que deve cuidadosamente ler antes
da montagem!
RUS | Важное примечание: Пожалуйста обратите внимание на
отдельно приложенные «Общедействующие инструкции» в описании
Но. М1002. Это описание содержит важные инструкции введения в
эксплуатацию, и важные замечания по безопасности. Этот документ
является основной частью описания по монтажу и должен быть
тщательно прочитан до начала работы!
D | Wichtige Montagehinweise, bitte beachten!
Je nach Belastung kann sich das Modul mehr oder weniger erwärmen. Die Wärme ent-
steht an der Alu-Platte am Boden des Moduls und muss gemäß Einbauanleitung unter
bestimmten Umständen durch die Montage auf eine Kühlfläche gekühlt werden.
Dabei ist es wichtig, dass das Modul mit 4 Schrauben M3 oder Blechschrauben 2,9 mm
plan auf ein kühlendes, planes Kühlblech montiert wird. Das kann auch die Rückwand
eines Metallgehäuses sein. Wichtig ist, dass sich die Alu-Unterseite des Moduls dabei
nicht verzieht! Sie dürfen also keine größeren Schrauben nehmen und die Löcher am
Modul aufbohren. Die Schraubenköpfe müssen auf dem Blech des Moduls aufliegen und
nicht auf dem Plastikrand des Moduls! Bei der Montage darf sich das Modul auch nicht
verziehen (wenn der Untergrund nicht plan ist). Der Grund: Auf der Innenseite der Alu-
Bodens des Moduls sind über einer dünnen Isolierschicht direkt die elektronischen SMD-
Bauelemente aufgelötet und wenn sich der Aluboden des Moduls verzieht, lösen sich
die Lötstellen und das Modul geht defekt. Bitte achten Sie auch darauf, dass die in der
Beschreibung als maximal angegebene Temperatur der Bodenplatte nicht überschritten
wird! Ansonsten muss eine größere Kühlplatte angeschraubt werden!
GB | Important installation instructions, please note!
Depending on the load the module heats up. The heat is dissipated from the aluminum
plate at the bottom of the module. Under certain circumstances it must be mounted on
a cooling surface according to installation instructions. It is important that the module
is fixed with 4 M3 screws (or 2.9 mm metal screws) on the cooling surface. This may be
the back wall of a metal casing. The aluminum plate on the bottom of the module must
not bend, do not use larger screws and do not drill larger holes. The screw heads must
rest on the plate of the module, rather than on the plastic edge of the module! During
assembly, the module should not be curled up (if the ground is not flat). The reason:
on the inside of the aluminum base of the module the thin insulating layer are directly
soldered on the electronic SMD components. When the aluminum floor of the module
curls up, the joints and the module start loosen and the module is defective. Please en-
sure that the maximum specified temperature (as specified in the module‘s description)
is not exceeded. Otherwise apply a larger cooling plate.
E | ¡Instrucciones de montaje importantes a tener en cuenta!
El módulo puede calentarse más o menos dependiente de la carga. El calor se desarrolla
a la placa de aluminio al fondo del módulo y se debe refrigerar bajo ciertas circun-
stancias según las instrucciones de instalación por el montaje sobre una superficie de
refrigeración.
En este contexto es importante de montar el módulo con 4 tornillos M3 o tornillos de
chapa de 2,9 mm planamente sobre una chapa refrigerante y plana. Eso puede ser
también la pared dorsal de una caja metálica. ¡Es importante en este contexto que
la parte inferior de aluminio del módulo no se combe! Pues Vd. no debería emplear
tornillos más grandes y no abrir los agujeros al módulo. ¡Las cabezas de tornillo deben
apoyarse sobre la chapa del módulo y no sobre el borde plástico del módulo! Durante el
montaje el módulo no se debe combar tampoco (si el subsuelo no es plano). La razón:
Los componentes electrónicos SMD se han soldado directamente sobre una capa ais-
lante delgada al lado interior del fondo de aluminio del módulo y si el fondo de aluminio
del módulo se comba, se soltan las soldaduras y el módulo se torna defectuoso. ¡Presta
también atención a lo que la temperatura de la placa de base indicada como máximo en
la descripción no se excede! ¡Por lo demás, se debe atornillar una placa de refrigeración
más grande!
F | Indications d’assemblage importantes à observer!
Le module peut chauffer plus ou moins selon la charge. La chaleur se produit à la
plaque d’aluminium au fond du module et il faut la réfrigérer éventuellement par la
monter sur une superficie réfrigérante.
Dans ce contexte il est important de monter le module avec 4 vis M3 o des vis à tôle 2,9
mm planement sur une tôle de refroidissement plane. Ceci peut aussi être le panneau
arrière d’un boîtier métallique. Il est important dans ce contexte que la partie inférieure
d’aluminium du module ne se voile pas! Donc il ne faut pas prendre des vis plus grandes
et percer les troux au module. Les têtes de vis doivent reposer sur la tôle du module et
pas sur le bord plastique du module! Le module ne se doit pas voiler non plus lors du
montage (quand le sous-sol n’est pas plan). La raison : Les composants électroniques
SMD sont brasés directement au-dessus d’une mince chape à la côté intérieur du fond
d’aluminium du module et si le fond d’aluminium du module se voile, les brasures se
délient et le module devient défectueux. Veuillez aussi faire attention à ce que la tem-
pérature de la plaque de fond indiquée comme maximum dans la description ne soit pas
excéder ! Autrement il faut visser une plaque réfrigérante plus grande.
NL | Zeer belangrijke montage tips, moet zorgvuldig gelezen worden!
Afhankelijk van de belasting wordt het moduul meer of minder warm. Deze warmte
zit aan de onderkant op het aluminium van het moduul, en kan extra gekoeld worden
d.m.v. een koelplaat.
Het moduul moet dan met 4 stuks M3 - of 2.9 mm schroeven op een vlak koelblik
gemonteerd worden. Dit kan ook de achterwand van een metalen behuizing zijn. U
mag geen grotere schroeven of de gaten van het moduul opboren! De schroefkop moet
goed contact maken met het aluminium, en niet met de plastik rand van het moduul.
Bij montage van het moduul moet deze altijd 100% vlak tegen de koeling aan liggen.
Reden hiervoor is, dat de aan de binnenkant van het aluminium plaat in het moduul de
SMD onderdelen direct verbonden zijn met deze plaat, voor optimale warmte afdracht.
Als deze onderdelen geen warmte afdracht zouden hebben, dan zijn de direct defect.
Dus koeling of beter gezegd extra koeling is aan te bevelen, en houd de maximale
temperatuur zie begeleidende beschrijving goed in de gaten. Als de temperatuur toch
hoger wordt dan in de beschrijving moet er beter gekoeld worden!
P | Importantes indicações de montagem, tomar atenção!
Conforme a carga pode o modulo aquecer mais ou menos. O aquecimento é produzido
na placa de aluminío no fundo do modulo e deve conforme a instrução de montagem
sobre determinadas circunstâncias através da montagem de uma superfície de refrige-
ração, ser arrefecido.
Neste caso é importante, que o modulo seja montado com 4 parafusos M3 ou parafusos
de folha metálica 2,9 mm plano num arrefecimento plano na chapa de refrigeração.
Pode ser tambem a parede traseira de uma caixa metálica. Importante é que a parte de
baixo do alumínio do modulo não se transformar! Não pode usar parafusos maiores e
não furar buracos no modulo. A cabeça dos parafusos devem ser colocados em cima da
chapa do modulo mas não nas bordas de plástico do modulo! Na montagem tambem o
modulo não se deve transformar (quando a base da superfície nгo й plana). O motivo:
no lado interior do fundo do alumínio do modulo são sobre uma fina camada isoladora
directo os electrónicos SWD –componentes soldados e quando o fundo de alumínio do
modulo se transforma então são destruidas as soldaduras e o modulo fica danificado.
Por favor tome atenção que descrevida como máxima dada temperatura da alcapação
não seja excedida! Senão deve der aparafusada uma maior placa de refrigeração!
RUS | Пожалуйста обратите внимание на важную инструкцию по
монтaжу!
В зaвисимости от нaгрузки модуль можeт нагрeвaться. Тeпло передается нa
aлюминевую пластину модуля и в зависимости от степени нагревания ее следует
в соответствии с инструкцией по монтажу закрепить на охлождающий радиатор.
При этом очeнь вaжно, чтобы модуль был зaкрeплeн 4-мя винтами с метрической
резьбой М3 или сaморeзaми 2,9 мм нa плоскую охлaждaющую плaту. В качевстве
охлождающей платы может вполне послужить стенка металлического корпуса
. Вaжно, чтобы aлюминeвaя поверхность модуля оставалась такой же ровной и
нe дeформировaлась. Так жe запрещается рассверливание отверстий для более
больших винтов и шурупов. Головки винтов должны плотно прилегать к алюминевой
плате модуля, a нe к плaстиковой кромке корпуса! При монтaжe нужно слeдить
зa тeм, чтобы модуль нe дeформировaлся (поверхность, на которую должен быть
прикручен модуль, должна быть абсолютно ровной). Причина: На внутренней
стороне aлюминeвой платы нанесен тонкий изоляционный слой, нeпосрeдствeнно
нa который припаяны элeктронные компоненты (SMD тeхнология) и любая
дeформaция aлюминeвой платы приводит к обрыву припаянных компонентов
или дорожек. Слeдитe пожaлуйстa зa тeм, чтобы не привышалась максимально
допустимая тeмпeрaтурa нагревания модуля указанная в описании! В противном
случае нeобходимо прикрепить модуль к более большому радиатору!
D | Wichtig! Die Alu-Grundplatte darf keinen mechanischen Spannungen ausgesetzt
werden (keine Löcher bohren, nicht auf unebene Kühlfläche schrauben usw.). Auf der
Innenseite der Alu-Grundplatte sind direkt anliegend empfindliche elektronische Bauteile
montiert, die bei mechanischen Bewegungen defekt werden und das Modul dann nicht
mehr arbeitet!
• Verbraucher
• Load
GB | Important! The aluminium base plate must not be exposed to mechanical
tension (do not drill holes, do not screw on an uneven cooling surface, etc.). Sensiti-
ve electronic components are mounted directly adjacent on the inside of the alumi-
nium base plate, which become defective in case of mechanical movements and the
module then won’t work any longer!
F
P
E
D
GB
NL
RUS
• LED an = Batterie aufgeladen
• LED on = battery full
• LED aus = Batterie ist entladen
• LED off = battery is discharged