Installing the *sim card & microsd card – Инструкция по эксплуатации Lenovo A10-70 Tablet
Страница 5
Advertising
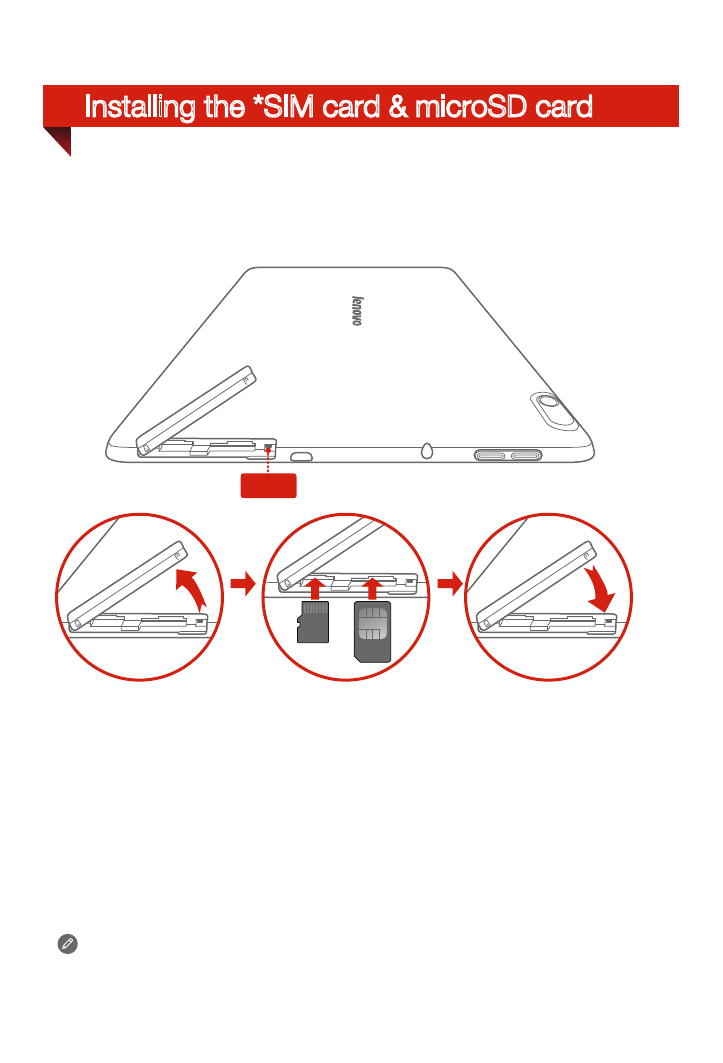
Installing the *SIM card & microSD card
Step 1.
Open the card slot cover as shown.
Step 2.
Insert the SIM card into the SIM card slot and the microSD card
into the microSD card slot.
Step 3.
Carefully replace the card slot cover.
You can use cellular services with the WLAN + 3G model (Lenovo
A7600-H) by inserting the SIM card provided by your carrier services.
Install the SIM card as shown.
Do not insert or remove the SIM card while your tablet is turned on. Doing so
may permanently damage your SIM card or tablet.
SIM
SIM
SIM
SIM
Reset
Advertising
Посмотрите также другие документы по категории КПК Lenovo:
- A1 (38 страниц)
- S5000 Tablet (6 страниц)
- S5000 Tablet (26 страниц)
- S2110 Tablet (37 страниц)
- Yoga Tablet 10 B8000 (6 страниц)
- Yoga Tablet 8 B6000 (30 страниц)
- Yoga Tablet 10 B8000 (22 страницы)
- Yoga Tablet 8 B6000 (29 страниц)
- A7-40 Tablet (25 страниц)
- A7-40 Tablet (31 cтраница)
- S6000L Tablet (29 страниц)
- S6000L Tablet (25 страниц)
- S6000L Tablet (2 страницы)
- ThinkPad 10 (2 страницы)
- ThinkPad 10 (104 страницы)
- ThinkPad Tablet 2 (88 страниц)
- ThinkPad Tablet 2 (2 страницы)
- ThinkPad 8 (2 страницы)
- ThinkPad 8 (76 страниц)
- Yoga Tablet 10 HD+ B8080 (36 страниц)
- Yoga Tablet 10 HD+ B8080 (28 страниц)
- A8-50 Tablet (22 страницы)
- A8-50 Tablet (31 cтраница)
- ThinkPad Tablet (102 страницы)
- ThinkPad Tablet (20 страниц)
- ThinkPad Tablet (1 cтраница)
- S6000 Tablet (2 страницы)
- S6000 Tablet (29 страниц)
- S6000 Tablet (6 страниц)
- S6000 Tablet (30 страниц)
- A7 30 Tablet (26 страниц)
- A7 30 Tablet (17 страниц)
- A7 30 Tablet (32 страницы)
- Yoga Tablet 10 B8000 (30 страниц)
- Yoga Tablet 10 B8000 (29 страниц)
- A10-70 Tablet (22 страницы)
- A10-70 Tablet (30 страниц)
- A10-70 Tablet (6 страниц)
- A1000 Tablet (32 страницы)
- A1000 Tablet (2 страницы)
- A1000L Tablet (24 страницы)
- A1000L Tablet (2 страницы)
- A3000 Tablet (2 страницы)
- S2109 Tablet (50 страниц)