Инструкция по эксплуатации Brother CP-6500
Швейные машинки Brother
4
23
4
4
8d
560b
e
_
g
79ac
9a
11.5 mm
(7/16 inch)
1
2
3
4
5
8
6
7
9
0
a
b
d
f
e
g
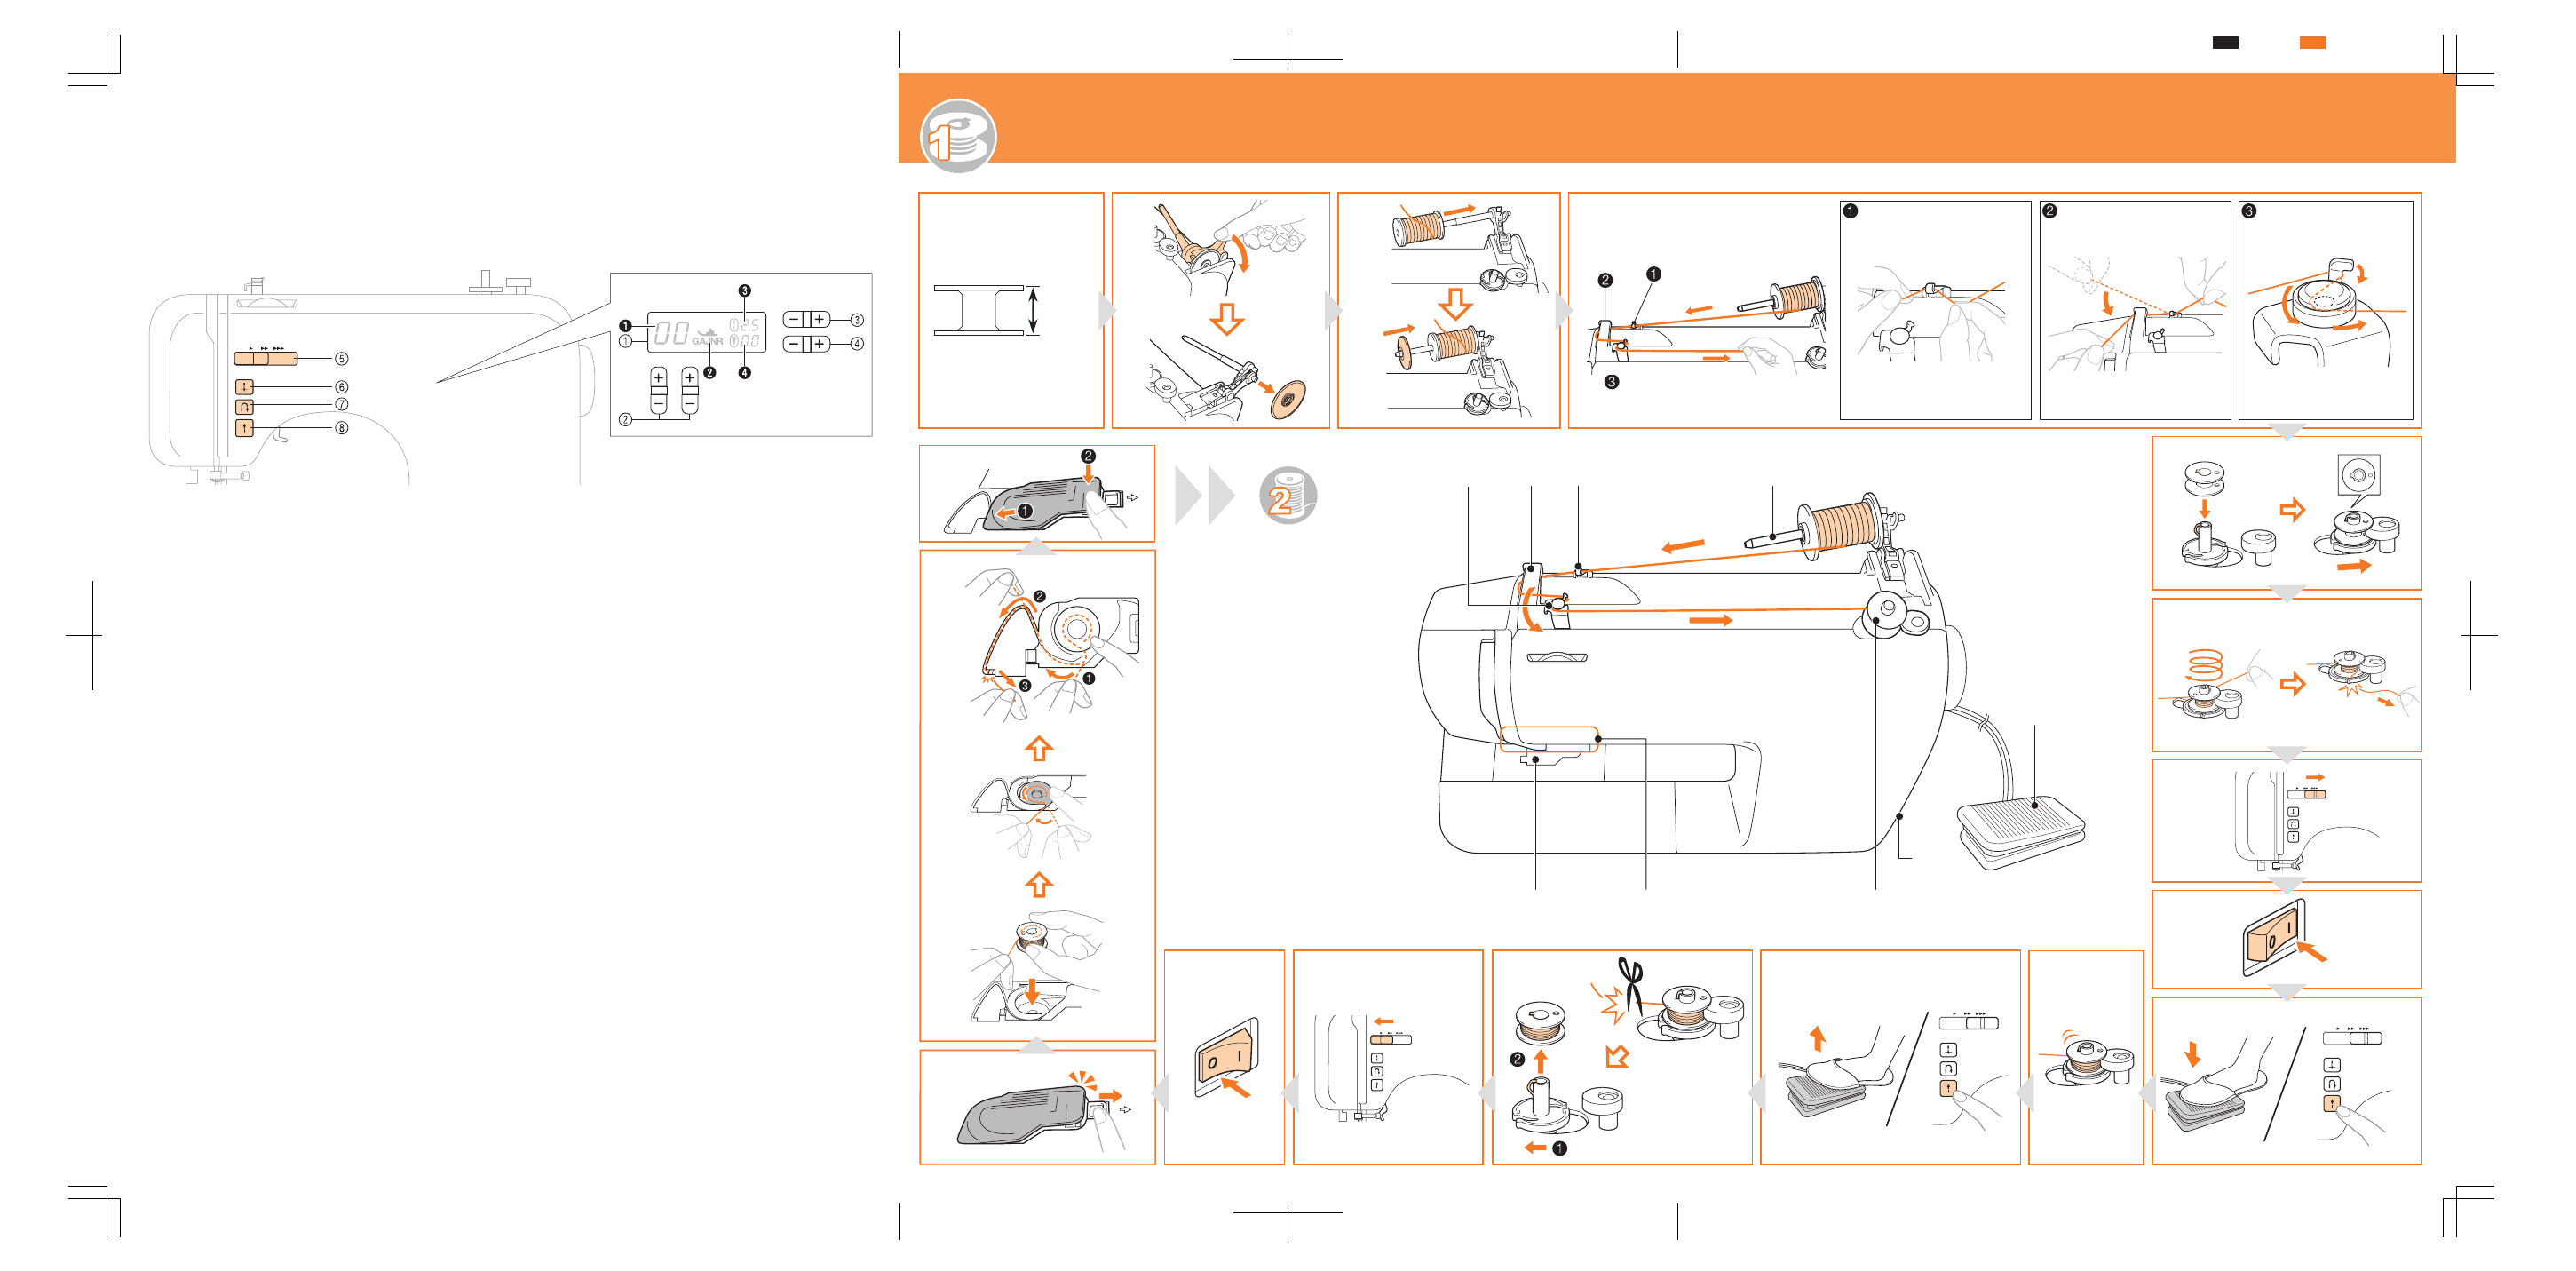
Operation keys and LCD
Bedieningstoetsen en LCD-display
Кнопки управления и ЖК-дисплей
Bedientasten und LCD-Feld
Tasti di funzionamento e display LCD
Touches de fonctionnement et
affichage à cristaux liquids
Teclas de operación y pantalla de LCD
■
1
LCD (liquid crystal display)
1
Number of the selected stitch
2
Presser foot to be used
3
Stitch length (mm)
4
Stitch width (mm)
2
Stitch selection keys
3
Stitch length adjustment key
4
Stitch width adjustment key
5
Sewing speed controller
6
Needle position button
7
Reverse/reinforcement stitch button
8
Start/stop button
1
LCD-Feld (Flüssigkristallanzeige)
1
Nummer des ausgewählten Stiches
2
Erforderlicher Nähfuß
3
Stichlänge (mm)
4
Stichbreite (mm)
2
Stichauswahltasten
3
Stichlängeneinstelltaste
4
Stichbreiteneinstelltaste
5
Nähgeschwindigkeitsregler
6
Taste „Nadelposition“
7
Taste „Rückwärts/Vernähen“
8
Taste “Start/Stopp”
1
Affichage à cristaux liquides
1
Numéro du point sélectionné
2
Pied-de-biche à utiliser
3
Longueur du point (mm)
4
Largeur du point (mm)
2
Touches de sélection de point
3
Touche de réglage de la longueur du point
4
Touche de réglage de la largeur du point
5
Commande de vitesse de couture
6
Touche Positionnement aiguille
7
Touche Point inverse/renfort
8
Touche Marche/arrêt
1
LCD (liquid crystal display)
1
Nummer van de geselecteerde steek
2
Te gebruiken persvoet
3
Steeklengte (mm)
4
Steekbreedte (mm)
2
Steekselectietoetsen
3
Steeklengtetoets
4
Steekbreedtetoets
5
Schuifknop voor snelheidsregeling
6
Naaldstandtoets
7
Achteruit/verstevigingssteektoets
8
Start/stoptoets
1
LCD (display a cristalli liquidi)
1
Numero corrispondente al punto selezionato
2
Piedino premistoffa da utilizzare
3
Lunghezza del punto (mm)
4
Larghezza del punto (mm)
2
Tasti di selezione del punto
3
Tasto di regolazione della lunghezza del punto
4
Tasto di regolazione della larghezza del punto
5
Regolatore della velocità di cucitura
6
Pulsante "Posizione ago"
7
Pulsante "Punti di fermatura/rinforzo"
8
Pulsante "Avvio/stop"
1
LCD (pantalla de cristal líquido)
1
Número de la puntada seleccionada
2
Pie prensatela que se va a utilizar
3
Longitud de la puntada (mm)
4
Anchura de la puntada (mm)
2
Teclas de selección de puntada
3
Tecla de ajuste de longitud de la puntada
4
Tecla de ajuste de anchura de la puntada
5
Control de velocidad manual
6
Botón de Posición de aguja
7
Botón de Costura en reversa/remate
8
Botón de Inicio/parar
1
ЖК-дисплей (жидкокристаллический дисплей)
1
Номер выбранной строчки
2
Тип прижимной лапки
3
Длина стежка (в мм)
4
Ширина строчки (в мм)
2
Кнопки выбора строчки
3
Кнопка регулировки длины стежка
4
Кнопка регулировки ширины строчки
5
Регулятор скорости шитья
6
Кнопка позиционирования иглы
7
Кнопка обратных/закрепляющих стежков
8
Кнопка “Пуск/Стоп”
c
Preparing the bobbin thread
Preparazione della spolina
Vorbereitung des Spulenfadens
Preparación del hilo de la bobina
Préparation du fil de la canette
Подготовка нижней нити
De onderdraad voorbereiden
PANTONE 1585C
BLACK
XE7840_001_CP4_EN_AMAZON_Front