Инструкция по эксплуатации ZELMER 29Z022
Страница 41
41
GW29-028_v02
3. We advise you to use oval/round dishes instead of square/rectangular
ones as food in the corners of the dish burns more often.
4. Protect exposed areas by covering them with narrow stripes of alumi-
num foil. Remember, however, not to use too much foil and to keep
the foil at least 3 cm away from the oven walls.
The list below shall make the choice of the right dishes and kitchen uten-
sils easier.
Kitchen utensils
Microwaves
Grill
Combination
mode
Heat-resistant glass
Non-heat-resistant glass
Heat-resistant ceramic utensils
Microwave safe plastic dishes
Paper towel
Metal tray
Metal gridiron
Aluminum foil and foil containers
Yes
No
Yes
Yes
Yes
No
No
No
Yes
No
Yes
No
No
Yes
Yes
Yes
Yes
No
Yes
No
No
No
No
No
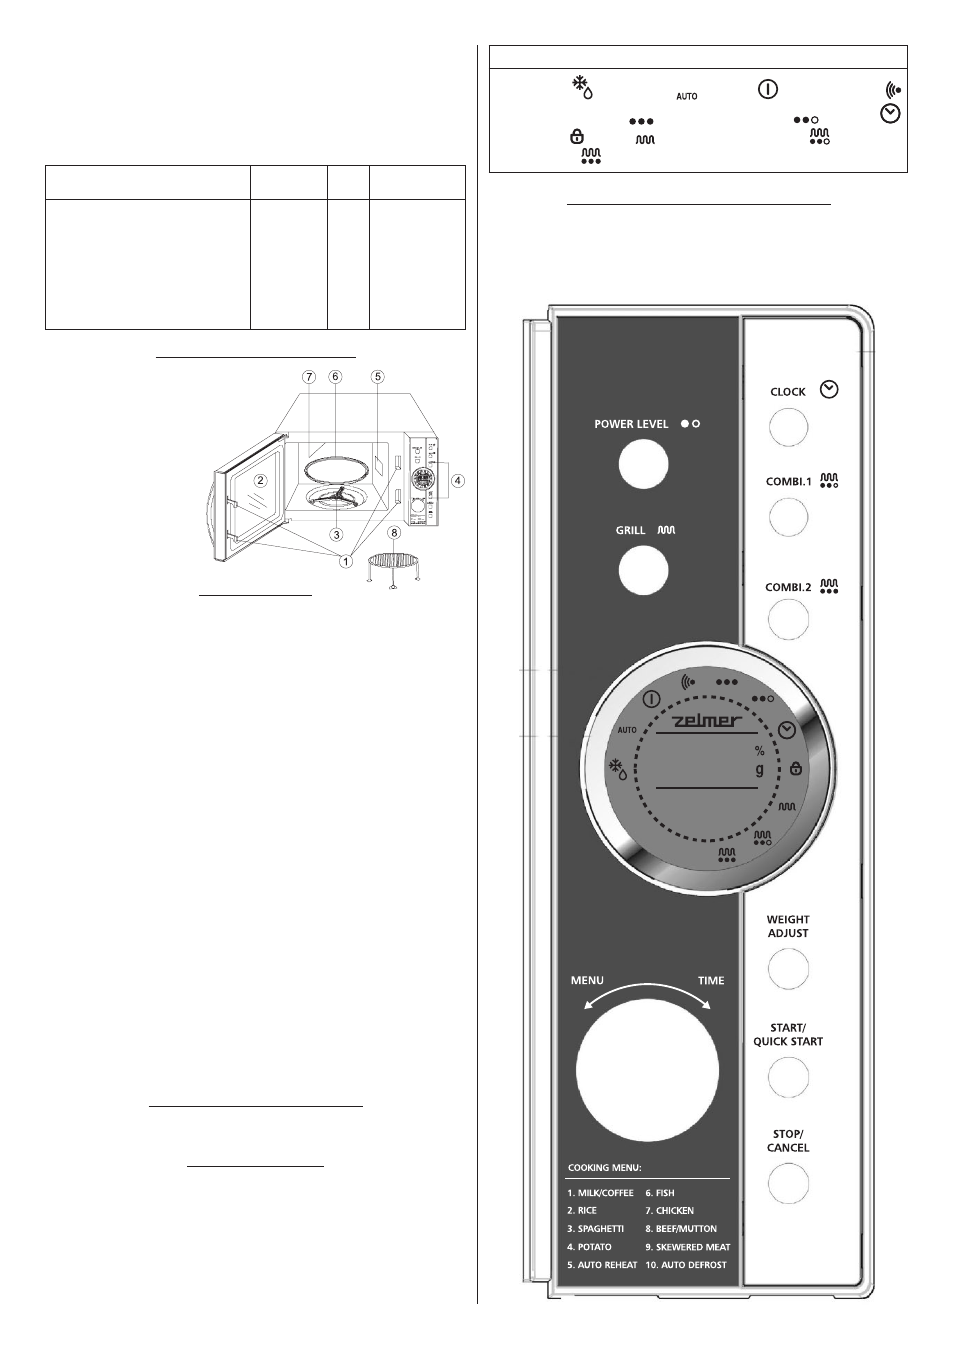
MICROWAVE OVEN FEATURES
1. Door safety lock system
2. Window
3. Shaft
4. Control panel
5. Mica plate
6. Glass tray
7. Grill heating element
8. Metal gridiron
CONTROL PANEL
MENU DISPLAY
●
The clock, cooking time, cooking power and operation symbols are
–
shown on the display.
POWER LEVEL
●
Press several times to select the level of microwave cooking power.
–
GRILL
●
Press this button to set the grill program.
–
COMBI.1/COMBI.2
●
Press to set the microwave cooking and grill combination.
–
WEIGHT ADJUST
●
Use this button to determine the weight of the food or the number of
–
portions while selecting the auto cook function.
START/QUICK START
●
Press to start the cooking program.
–
It’s enough to press the button several times to set the cooking time
–
and cook on the highest power level.
CLOCK
●
Press to set the oven’s clock.
–
STOP/CANCEL
●
Is used to cancel the settings and reset the oven before setting
–
a cooking program.
Press once to pause cooking or press twice to cancel the whole
–
cooking process.
Press and hold to set the child lock.
–
MENU/TIME
●
knob
Turn the knob to set the time one the oven’s clock and to set the
–
cooking time.
Turn the knob to set the auto cook or the auto defrost function.
–
SETTING THE OVEN FUNCTIONS
After plugging the appliance you will hear a beep and the display will
switch on.
SETTING THE CLOCK
Press the
CLOCK button once when the oven is plugged in.
EXAMPLE: In order to set the oven clock at 8:30.
1. Press the
CLOCK button once to start setting the time at 8:30.
2. Turn the
MENU/TIME knob so that the display shows the digit 8.
3. Press the
CLOCK button once to start setting the minutes.
4. Turn the
MENU/TIME knob to set 30 minutes.
5. Press the
CLOCK button to confirm the settings.
MENU Display Indicators – signaling
1. Defrosting
2. Auto cook
3. Pause
4. Microwaves on
5. High cooking power
6. Low cooking power
7. Clock
8. Child lock 9. Grill
10. Combination mode 1
11. Combi-
nation mode 2
SWITCHING ON THE MICROWAVE OVEN
After plugging in the appliance to an appropriate power source and
before starting to program the oven, place the food inside and close
the door.