Инструкция по эксплуатации Saturn ST-OH7259
Страница 3
4
-
Prior to every use, ensure that
the appliance is undamaged and in per-
fect condition. In this case, the appli-
ance should not be connected to the
mains, especially if housing, cord, or
power plug are damaged.
-
The heating element (the plate
behind the guard inside the appliance)
can break, if the appliance falls. Exam-
ine the heating element before every
use. Do not continue to use the appli-
ance, if the heating element is broken!
-
Never open the appliance on
your own. Refer to a qualified expert, if
repairs are necessary.
-
This product is intended for
household use only.
-
This heater must not be placed
directly under a wall outlet.
-
2.
Installation and first use
-
Take the appliance out of the
packaging and remove the protective
bag.
-
If you wish to use the appliance
at different locations, mount the sup-
plied castors. Ensure that they are
mounted securely with the provided
screws. Then place the appliance on an
even, firm and clean surface, and follow
the safety distance between appliance
and other object.
Castors must be secured on appliance
using the provided screws
- If you wish to install the appliance at a
fixed location, such as a wall, drill two
holes with a difference of 120 mm and
insert the dowels. Insert the screws, so
that they protrude about 6 mm. Hang
up the appliance by using the device on
the backside.
CAUTION: Before you attempt to drill
holes, make sure that concerning part of
the wall does not contain any wires or
cables. Furthermore, all screws should
be securely fixed in the wall and the
appliance should be mounted securely.
-
Always place the appliance with
a sufficient safety distance to inflamma-
ble materials or gases.
For installation in bathrooms, a
minimum safety distance of 60 cm in all
directions to all pipe installations, wash
basins, bath tubs and showers is re-
quired! Please follow the sketches in
section 1!
-
The distance between appliance
and ceiling must be at least 50 mm.
-
Ensure that housing, heating
element, power cord and plug are not
damaged.
-
Only use outlets with a mains
voltage that corresponds to the rated
voltage of the appliance. This appliance
requires a voltage of 230V, 50Hz and a
current of not more that 15A. Only con-
nect the appliance to an outlet after
checking the voltage.
-
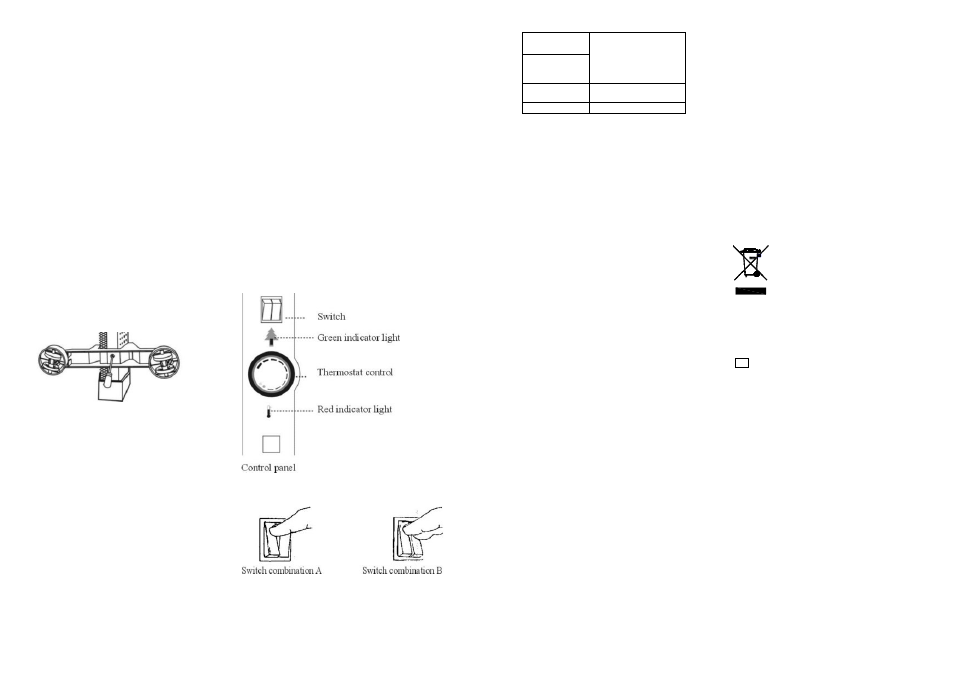
On the right side of the appli-
ance is a control panel. It consists of
two switches, a thermostat control, and
two indicator lights. At first the thermo-
stat control should be turned clockwise
to full position. The appliance starts
then to warm the room at maximum
power. The red indicator light shows this
visually!
When the desired room temperature is
reached, you can turn the control back
to the position where the appliance turn
off (you will hear a click and the green
indicator lights up).
5
Appliance
Power 1500 W
Switch
Combination
A
1000 W
B
1500 W
If you wish you can limit the heating
capacity by turning the switches as
shown in the specified above illustra-
tion.
-
The room temperature will au-
tomatically be kept at the set level. The
appliance will turn itself on periodically if
the room temperature drops below the
desired level.
-
The first time the appliance is
used, light odours might occur. This is
related to manufacturing processes and
disappears quickly!
-
Never operate the appliance
unattended and keep children away.
-
Never cover the appliance!
-
The metal housing of the appli-
ance can become hot during operation.
For this reason it should not be touched.
After switching the appliance off, con-
sider that it takes a few minutes to cool
down. Let the appliance always cool
down for an adequate amount of time
before storing it. Always disconnect the
appliance from the mains, if you do not
use it for long time!
-
The appliance implements a tilt
safety device. If the appliance falls over
inadvertently, it turn itself off automati-
cally. Once it is in its original position
again, it will turn itself on automatically
again.
3.
Cleaning
- Always disconnect the appliance from
the mains before cleaning it! Make sure
that is has cool down completely!
-
Clean the outside of the appli-
ance with a damp and clean cloth und
dry it with a dry cloth afterwards.
-
Never use aggressive cleaning
agents or chemicals, only use mild de-
tergents.
-
Never disassemble the appli-
ance for cleaning.
-
Never rinse or spray the appli-
ance with water!
4.
Troubleshooting
If the appliance malfunctions, check the
following points first:
-
Check the connection to the
mains outlet and make sure that the
outlet is live (e.g. plug in a lamp and
check if it lights up).
-
Check if the appliance is turned on.
-
Check if the appliance stands on a
firm surface. Uneven or tilted positions
can trigger a tilt safety switch. If that is
the case, adjust the position of the ap-
pliance accordingly.
Set
Mica Heater ………………… 1pc
Instruction manual
witj warranty book ...... 1pc
Package . ................... 1pc
Technical Data
Voltage:
220-230 V
Frequency:
50 Hz
Power:
1500 W
Rated current:
6.8 A
ENVIRONMENT FRIENDLY DISPOS-
AL
You can help protect the environ-
ment!
Please remember to respect
the local regulations: hand in
the non-working electrical
equipment to an appropriate
waste disposal center.
The manufacturer reserves
the right to change the
specification and design of goods.
RU
Микатермический обогреватель
Уважаемый покупатель!
Поздравляем Вас с приобретением
изделия торговой марки “Saturn”.
Уверены, что наши изделия будут
верными и надежными помощни-
ками в Вашем домашнем хозяй-
стве.
Не подвергайте устройство резким
перепадам
температур.
Резкая
смена температуры (например,
внесение устройства с мороза в
теплое помещение) может вы-
звать конденсацию влаги внутри
устройства и нарушить его работо-
способность
при
включении.
Устройство должно отстояться в
теплом помещении не менее 1,5
часов. Ввод устройства в эксплуа-
тацию
после
транспортировки
производить не ранее, чем через
1,5 часа после внесения его в по-
мещение.
Описание