Инструкция по эксплуатации Saturn ST-VC7294
Страница 3
4
8.
Turn off the control before unplugging
9.
Do not use the machine for vacuuming
any type of chemicals, acids or sol-
vents. This will damage the machine.
10. Do not use the product near explosive
materials, inflammable liquids or any
type of gas. Such usage can cause fire
or explosions.
11. Do not use for any purpose other than
described in this user’s guide.
12. Using improper voltage may result in
damage to the motor and possible inju-
ry to the user, correct voltage is listed
on the rating label.
13. Do not disconnect the AC plug from the
main outlet roughly. Never remove the
AC plug by pulling the cord; always pull
out the plug by holding the plug itself.
14. Do not connect or disconnect the AC
plug from the main outlet with wet
hands. This may result in an electrical
shock.
15. Always switch-off your machine and
disconnect the AC plug from the main
outlet when the appliance is not in use.
16. Do not use your machine if the AC cord
or plug is damaged.
17. If the cleaner is damages, it must be
repaired by the manufacturer or its
service agent in order to avoid a haz-
ard.
18. This appliance is not intended for use
by children or other persons without
assistance or supervision if their physi-
cal, sensory or mental capabilities pre-
vent them from using it safely. Children
should be supervised to ensure that
they do not play with the appliance.
19. If the supply cord is damaged, it must
be replaced by the manufacturer or its
service agent in order to avoid a haz-
ard.
20. The vacuum cleaner must not be left
unattended while it is connected the
supply mains.
21. This vacuum cleaner is for household
use only
22. The plug must be removed from the
socket-outlet before cleaning or main-
taining the vacuum cleaner.
Caution:
· Do not overfill the water container.
Note the ‘Maximum Level’ mark-
ing.
· Do not fill the water container with
anything other than water.
· Always empty the dirty water,
clean and store you machine cor-
rectly after each use.
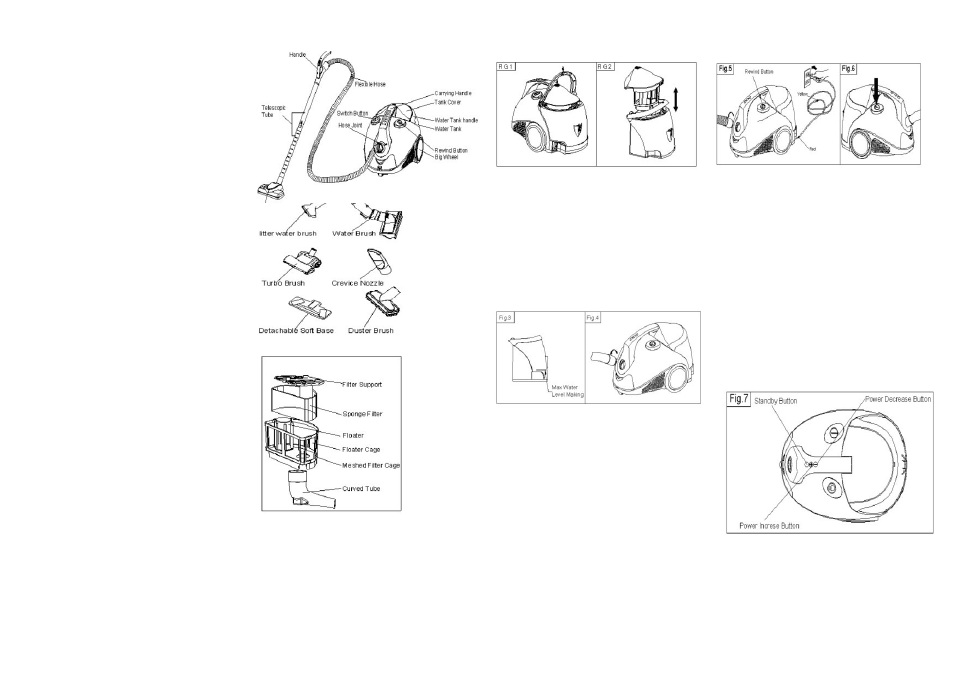
Part and Accessories Index
Brush
Preparation Before Use
1.
Setting Up the Product
·
Remove the water container
using the attached handle
(Fig. 1).
·
Remove the filter assembly
from the water container.
Hang up the handle, and push
5
down the lock button on the
cover (Fig. 2).
·
Fill the container with tap water to ‘Max
Water Level’, indicated on the front of the
container. This is about 1.3 liters. Please
ensure the container is not overfilled (Fig.
3).
·
Assemble the water container back to
the body. Close and lock the water tank
handle. The locking mechanism will “Click”
when locked.
·
Insert the flexible hose into the hose
socket (Fig. 4).
Connect the telescopic tube to the flexible
hose.
2.
Power On
·
Extract the AC power cord
fully by holding the cord and pull it towards
you. Do not pull the cord by holding the
plug, as this will damage the cord.
·
Connect the plug to a suitable
mains power outlet with the correct voltage
(Fig. 5).
Caution:
Before connect the plug to the power
socket, unwind a sufficient length of
cable. A yellow mark on the power ca-
ble shows the ideal cable length. Don’t
expend the cable beyond the red mark
·
Press firmly and turn on the main
ON/OFF switch. One green indicator light
will flash. The machine is now on ‘Standby’
mode. At this stage, your machine is ready
to work (Fig. 6).
·
Push the standby button on the main
body will activate the machine in the lower
suction mode.
Caution: Make sure the AC power cord is
fully extracted. During the operation a
partially extracted power cord will generate
excessive heat.
Use of your product
1.
Standby Button
·
This button is used to switch between
standby mode and operation mode. The
initial push turns the suction power on at
the low mode. While the machine is operat-
ing, push this button returns the machine to
the standby mode.
2.
Suction Power Selection Button
·
There are four suction power setting,
Low, Medium, High and Turbo. Use (+) or
(-) button on the main body of the
machine to select the desired setting (Fig.
7).
·
The current suction power is indicated
by the number of green indicator lights.
Three green lights means the suction power
is now in the high position.
3.
Telescopic Tube
·
The extendable Telescopic Tube gives
you added flexibility and control. Depending
on your application and situation, you may
adjust the length of the Telescopic Tube to
suit your needs. Push and hold the locking
knob, extend or retract the telescopic pole
as required. Release the knob and pull the