Инструкция по эксплуатации Saturn ST-AH2102
Страница 3
4
MAIN FEATURES
· Pre-heating the water to eliminate
bacteria and viruses in the water.
· Adjustable humidistat to remain the
relative humidity selected
· Built-in ionizer to clear the air
· Transparent water tank to ensure the
water level is visible.
· Advanced filter cartridge to reduce
the limes in the water (optional)
· Large water tank for long working
time.
· Automatically stop working when
water is empty.
PRE-OPERATING INSTRUCTIONS
1. Be sure the humidifier is OFF and
disconnected from the electrical
outlet.
2. Place the humidifier on a flat
surface, about 60cm away from the
floor and 10cm away from the wall.
Figure 1
Filling the water tank instructions
- Remove the water tank and lifting
straight upward (See figure 1).
- Twist off the tank cap located on the
bottom of the tank by turning counter
clockwise and fill the water tank with
cool, fresh water.
DO NOT FILL WITH WARM WATER
AS THIS MAY CAUSE LEAKING.
- After filling the tank, replace the
tank cap by firmly turning clockwise
and then replace the water tank on
the base. The tank will immediately
begin to empty into the base.
3. Plug the power cord into a rated
electrical outlet.
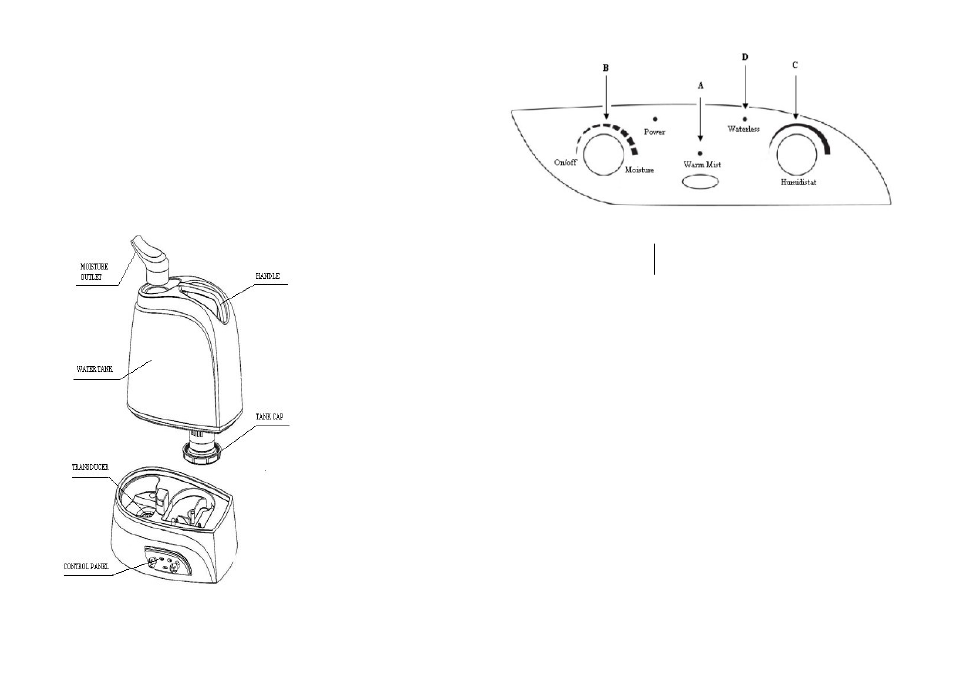
DESCRIPTION OF THE HUMIDI-
FIER
5
CONTROL PANEL
INSTRUCTIONS
A) Warm mist switch
Press Button A to turn the heating
feature ON and OFF.
B) Power &Mist control
Turn knob B to turn the power to be
on or off and adjust the mist outlet to
be low and high.
C) Humidistat control
Turn the Knob C to adjust the desired
humidistat from low to high.
D) Waterless warning
The indicator light (D) will flash
warning when water tank must be
refilled.
ATTENTION!
If condensation forms on your
windows or walls, please turn the unit
off.
CLEANING AND MAINTENANCE
INSTRUCTIONS
In the winter, the lack of humidity can
dry out your skin and cause irritated
nasal, frequent colds, sore throats and
etc. Humidifiers provide relative
humidity to protect our health. To get
the most of the benefit from the
humidifier and avoid product failure,
follow all maintenance instructions
carefully. If the recommended care
and maintenance guidelines are not
followed, micro-organisms may be
able to grow in the water within the
humidifier.
DAILY MAINTENANCE
· Before cleaning, turn the power to
OFF and unplug the unit from the
electrical outlet.
· Lift off the tank and the housing of
the humidifier.
· Carry the water tank to a sink, then
drain and rinse the water tank
thoroughly to remove any sediment
and dirt. Wipe clean and dry with a
clean soft cloth or paper towel.
· Refill the water tank with cool tap
water as instructed in filling the water
tank instructions.
WEEKLY MAINTENANCE
· Repeat steps 1-3 above.
· Fill one cup of white vinegar (about
200ml) to the basin for about 15
minutes, then wipe off the scale in the
basin especially in the transducer with
a soft brush.
· Remove the scale and white vinegar
solution with a clean soft cloth.
CAUTION OF MAINTENANCE
· Make sure main body is never
submerged into water
· Do not use any solvents or
aggressive cleaning agents to clean
the humidifier.
· Clean the inner parts with a soft
cloth.
· Only use the brush to clean the
transducer. This should be done once a
week.
· Only use the soft-bristle portion of
the brush.
· Change the water in the water tank
at least once a week if water is
standing for more than one week.
STORING THE HUMIDIFIER
· Clean the humidifier as described
earlier and dry thoroughly.
· Preferably store the humidifier in its
original box.
· Avoid high temperatures.