Инструкция по эксплуатации Saturn ST-CM7092
Страница 3
4
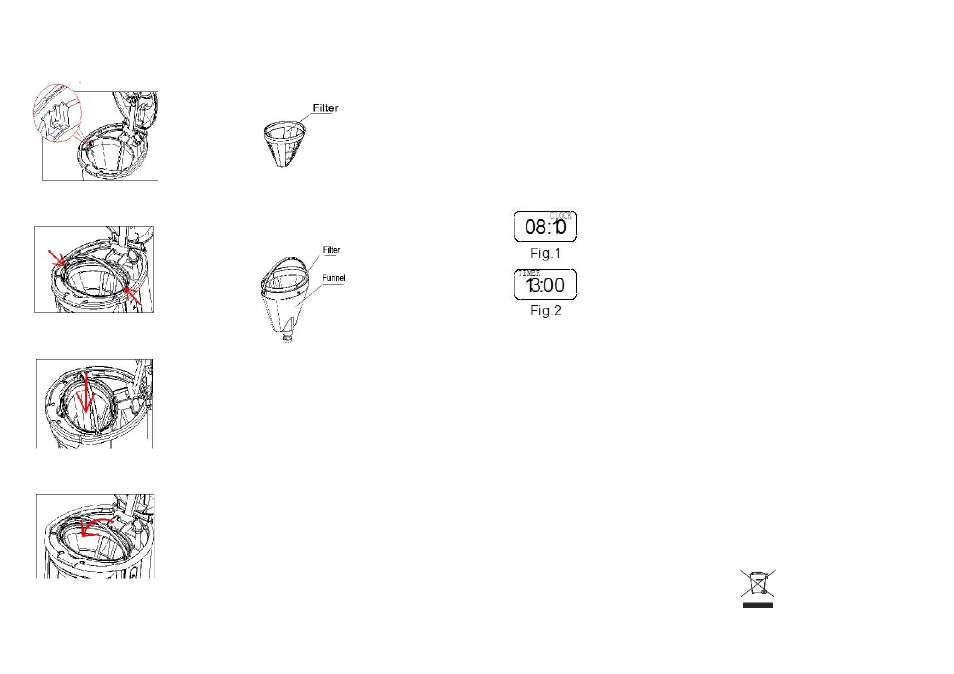
locked firmly and properly.
●
Funnel should not move when
engaged properly.
1. With tank cover open, locate slot on
both sides of the open coffee maker.
2.Locate tabs on funnel and lower
funnel into coffee maker with the handle
upright.
3.Firmly press the funnel into the
coffeemaker while holding handle
upright.
4.Lower funnel handle down so that
tabs lock under slots.
Operation instruction:
1) Open a tank cover of the coffee
maker, fill proper amount water into the
with a carafe. The water level should not
exceed the MAX level.
2) Add coffee ground into the filter.
Usually a cup of coffee need a level
spoon of coffee ground, but you may
adjust according to you taste properly.
3). Then place the filer with coffee
ground in the funnel (please see
following figure). Then place them
together in the funnel support, make
sure it is assembled correctly. See the
section «THE DETAILS ASSEMBLING
STEPS FOR FUNNEL».
4) Insert the carafe on keeping warm
plate.
5) Plug the power cord into the outlet,
the LCD will display “12:00 “.
6) Press “ON/OFF” button, the red lamp
of RUN will be illuminated. The
appliance will begin working.
Note: You can take out carafe, pour and
serve at any time. The appliance will
stop dripping automatically. But the
time cannot exceed 30 seconds.
7) Do not open the tank cover when the
coffee maker is operating. The flow back
of hot water will damage the appliance.
8) You can take out carafe, pour and
serve when finish brewing (about one
minute later after the coffee stops
dripping out.)
Note: the coffee you get will less than
the water you have inputted in, as some
water is absorbed by coffee ground. As
safety is concerned, you had better
cover the lid of carafe when pouring,
that is good to keep warm too.
9) Always turn the coffee maker off and
unplug the power cord from the
electrical outlet when the coffee maker
is not in use.
Note: pay attention to pour the coffee
out, otherwise you may be hurt as the
5
temperature of coffee just finished is
high.
Automatic start function
If you do not want the coffee maker
start operation immediately, for
example now it is 8:10 am, you hope
that the coffee maker will automatically
start at 1:00 pm, first follow steps 1 to
5 of above section, then you can set the
automatic start function as follows:
1).Press “PROG” button, the “LCD” will
display “CLOCK”.
Set the current time by pressing the
“HOUR” and “MIN”(see Fig.1).
Note: the time cycle is 24 hours.
2).Press “PROG” button again, the
“LCD” will display “TIMER”, then set the
automatic start time by pressing the
“HOUR” and “MIN”(Fig.2).
3).Press “ON/OFF” twice, the green
lamp of AUTO will be illuminated, after
about 10 seconds, the LCD will display
the current clock, you may see the
automatic start time by pressing PROG.
Note: You may cancel the automatic
start function by pressing ON/OFF. If
you want to change the automatic start
time, only following the above 1-3 steps
again
At 1:00 pm, the green lamp of AUTO
will be extinguished, and the red lamp
of RUN will be illuminated. The
appliance will start automatically. After
brewing, you can replace the carafe on
keeping warm plate. Once the coffee
maker is energized, the coffee can be
kept warm, if leave the coffee maker
unattended for 2 hours, the appliance
will be cut off power automatically.
CLEANING AND MAINTENANCE:
CAUTION: Be sure to unplug this
appliance before cleaning. To protect
against electrical shock, do not immerse
cord, plug or unit in water or liquid.
1).Clean the funnel, filter, carafe and
carafe lid after each use in hot, sudsy
water.
2).Wipe the product’s exterior surface
and the keeping warm plate
with a soft, damp cloth. Never use
abrasive cleaner to clean it.
CLEANING MINERAL DEPOSITS
To keep your coffee maker operating
efficiently, you should clean away the
mineral deposits left by the water
regularly according to the water quality
in your area and the frequency use the
appliance, the detail is as follows: fill
the carafe with one part of white
vinegar and three parts of cold water,
pour the water and vinegar mixture into
the tank, do not place into coffee
ground, brewing the water-vinegar
solution per “operation instruction”,
repeat it until no yellow liquid comes out
if necessary, then pour out the mixture,
brewing with tap water until no vinegar
odor is left..
HINTS FOR GREAT-TASTING COFFEE
1.A clean coffee maker is essential for
making great-tasting coffee. Regularly
clean the coffee maker as specified in
the “Cleaning and maintenance” section.
Always use fresh, cold water in the
coffee maker.
2.Store unused coffee grounds in a cool,
dry place. After opening a package of
coffee grounds, reseal it tightly and
store it in a refrigerator to maintain its
freshness.
3.For an optimum coffee taste, buy
whole coffee beans and finely grind
them just before brewing.
4.Do not reuse coffee grounds since this
will greatly reduce the coffee’ flavor.
Reheating coffee is not recommended as
coffee is at its peak flavor immediately
after brewing.
5.Clean the coffee maker when over-
extraction causes oiliness. Small oil
droplets on the surface of brewed, black
coffee are due to the extraction of oil
from the coffee grounds.
6.Oiliness may occur more frequently if
heavily roasted coffees are used.
Technical Data:
Power:
1000W
Rated Voltage:
220-230V
Rated Frequency:
50Hz
Rated Current:
4.54А
Set
Coffee maker
1
Measuring spoon
1
Instruction manual with
warranty book
1
Package
1
ENVIRONMENT FRIENDLY
DISPOSAL
You can help protect the
environment!
Please remember to respect
the local regulations: hand in
the non-working electrical
equipments to an appropriate
waste disposal center.