Инструкция по эксплуатации Saturn ST-FP8086
Страница 3
5
DESCRIPTION
Juice cup
Dregs cup
Main body
Right and left lock switch
Drive shaft
Mouth of juice
Mouth for dregs
Juicer container
Seal ring
Filter
Screw
Feeding tray
Feeding chute
Pusher
6
FIRST USE
1. Unpack the appliance, put all the
components on the same horizontal
position.
2. Put all the detachable components
into the warm water for washing and
wipe dry, but do not immerse the motor
into the water for washing in order to
prevent electric shock.
3. Please install the product according to
the description below. Please make sure
that you haven’t connected the plug to
the power and at the same time the
switch should be turned at“O”.
INSTALLATION INSTRUCTION
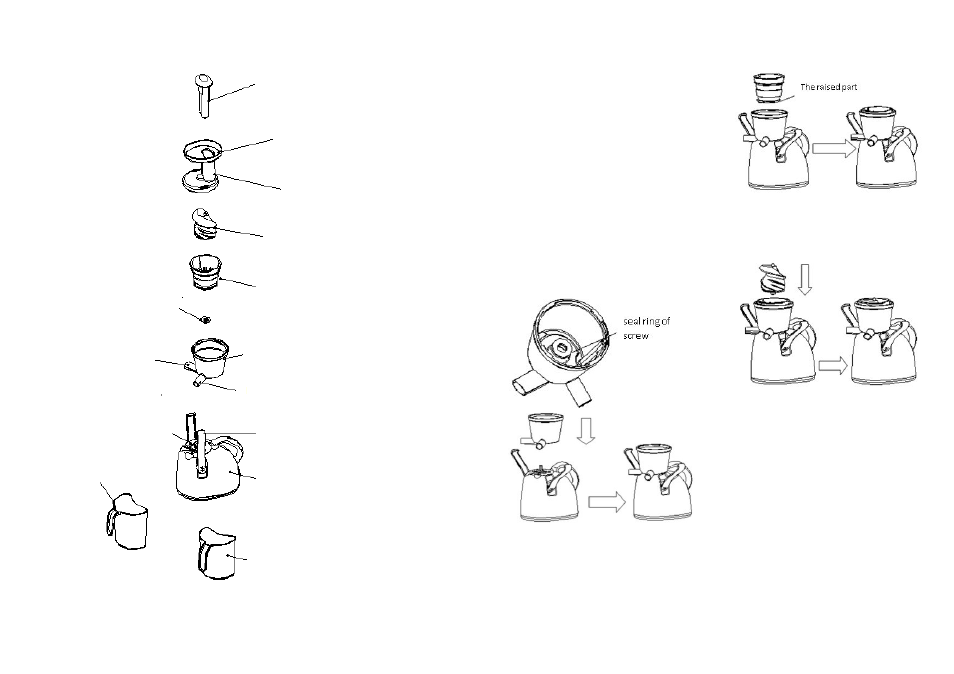
1. Please check if the seal ring of the
screw is installed, and then insert the
juice container into the fixation pin of
main body. (see graphic one)
Please note that the seal ring of the
screw is installed into
the juice
container.
2. Please make the mouth for dregs of
the filter match with the mouth for
dregs of the juice container, install it
into the juice container as it is shown on
graphic two.
Please note that there is a raised part at
the opposite of the mouth for dregs of
the filter. This raised part must match
with the sunken part of juice container.
3. Please put the screw to the shaft of
the main body. (see graphic three)
Please note to rotate the screw to check
if the internal hexagon hole matches
with the shaft of main body perfectly.
4. Install the feeding tray into the juice
container. Adjust the trigon of the
feeding tray to the same line of the dot
of the juice container, and then rotate
feeding tray clockwise until it won’t
move. Lock the feeding tray by using
the right and left lock switch. (see the
graphic four.)
Please note that the bearing hole under
the feeding tray must match with the
stainless shaft of the screw.